\title {Logic I \\ Fast Lecture 02}
\maketitle

\def \ititle {Logic I}
\def \isubtitle {Fast Lecture 02}
\begin{center}
{\Large
\textbf{\ititle}: \isubtitle
}
\iemail %
\end{center}
Readings refer to sections of the course textbook, \emph{Language, Proof and Logic}.
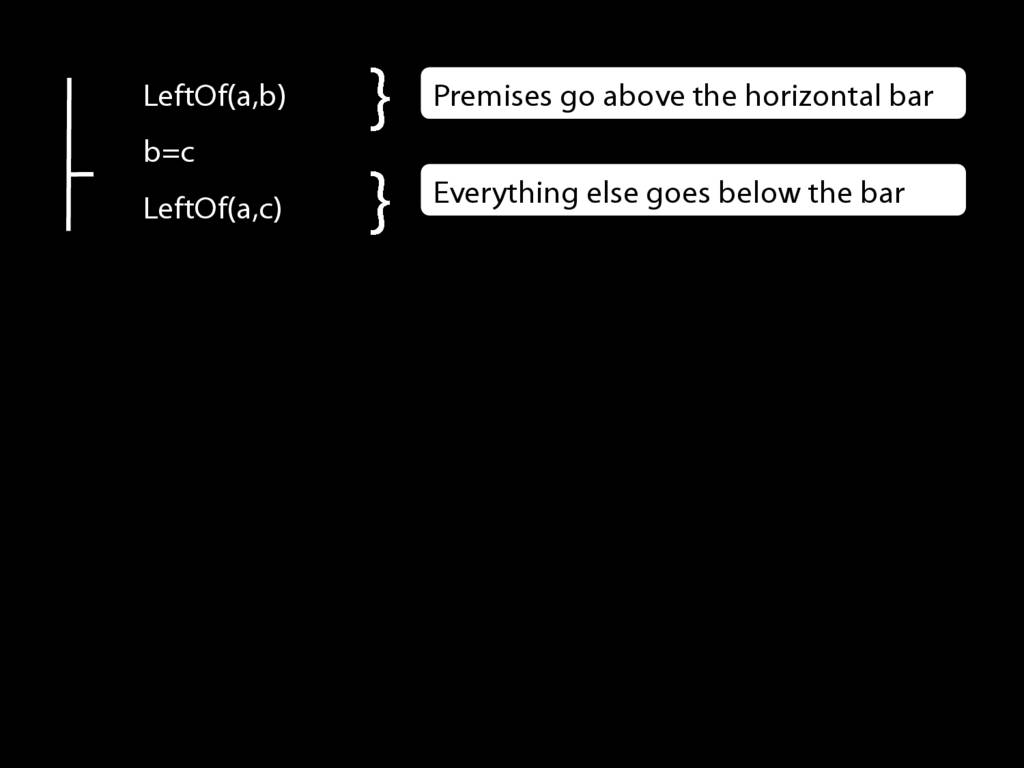
\section{Formal Proof}
\section{Formal Proof: ∧Elim and ∧Intro}
\emph{Reading:} §5.1, §6.1
\section{Formal Proof: ∧Elim and ∧Intro}
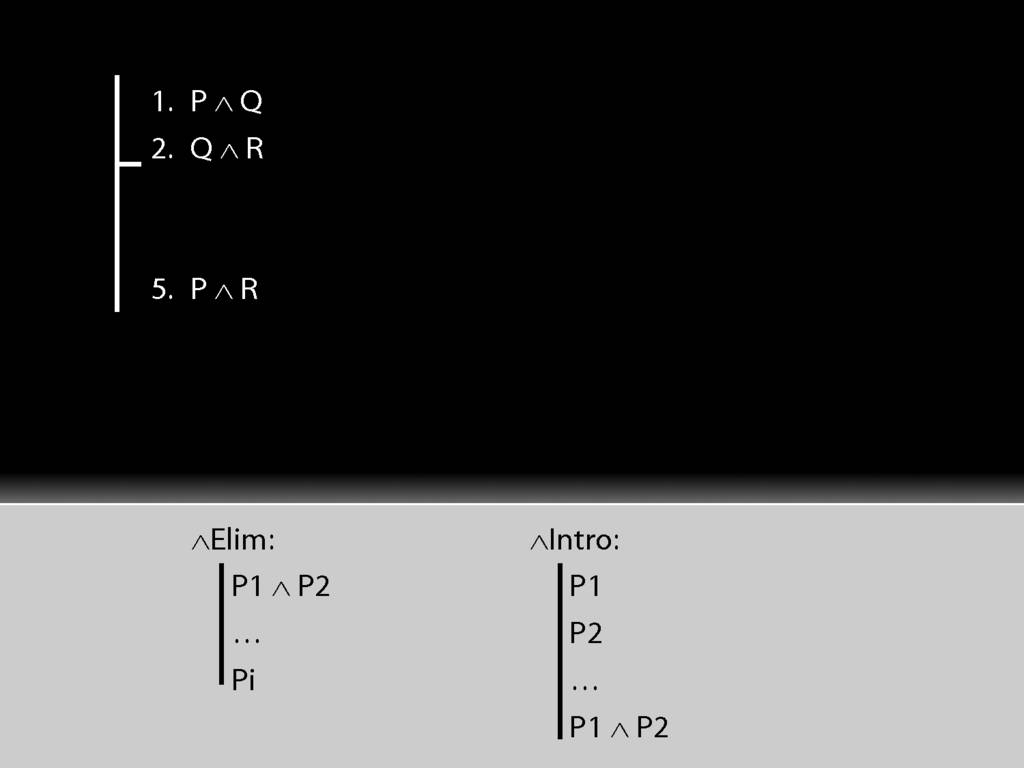
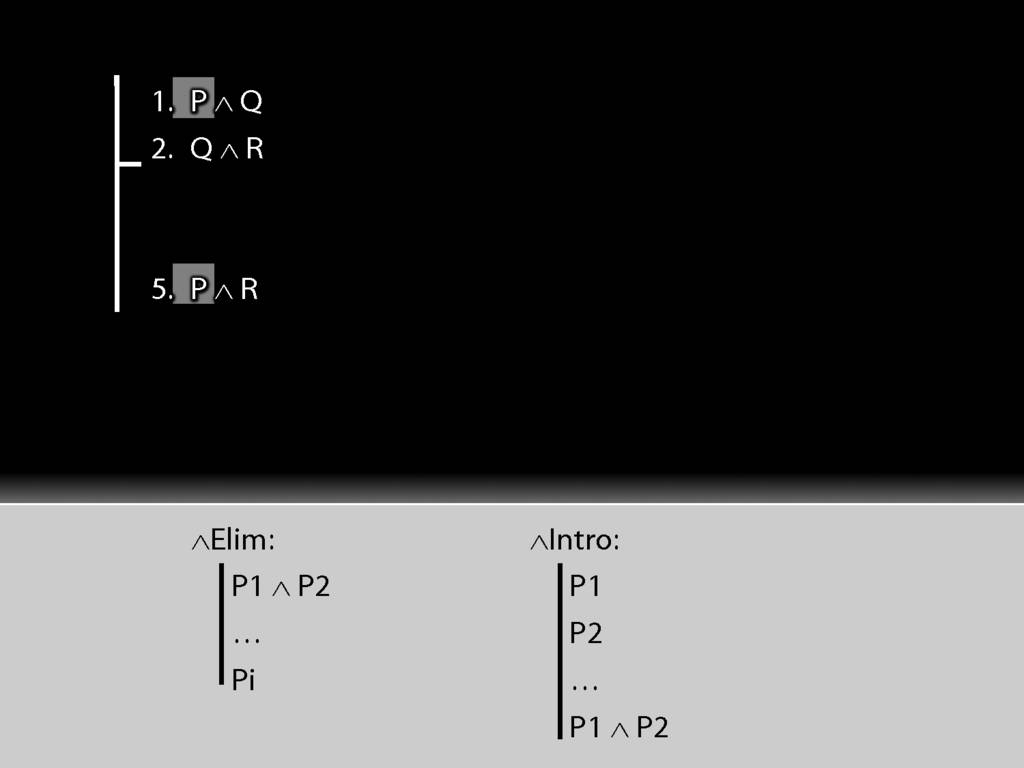
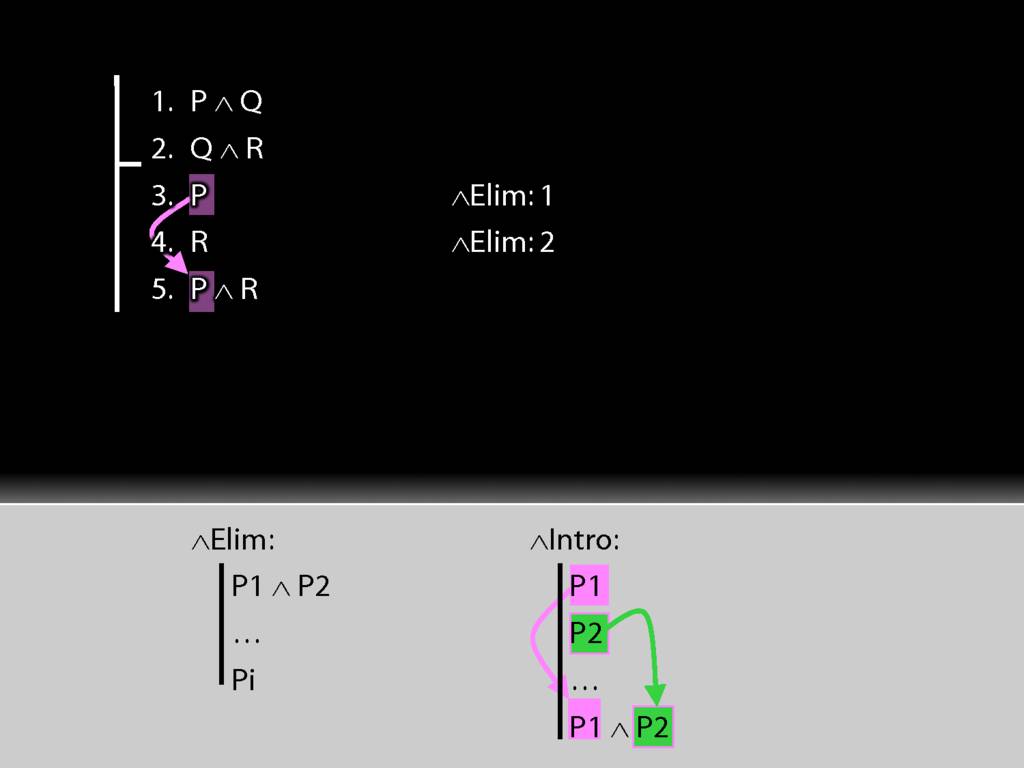
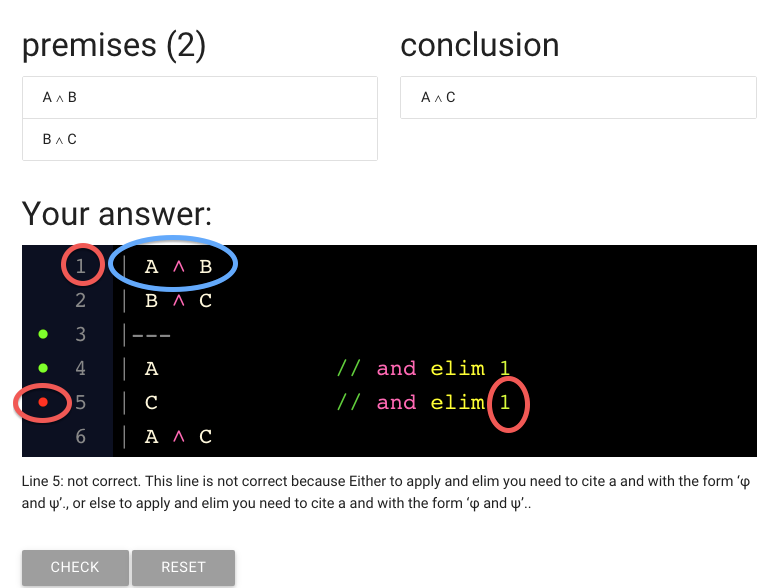
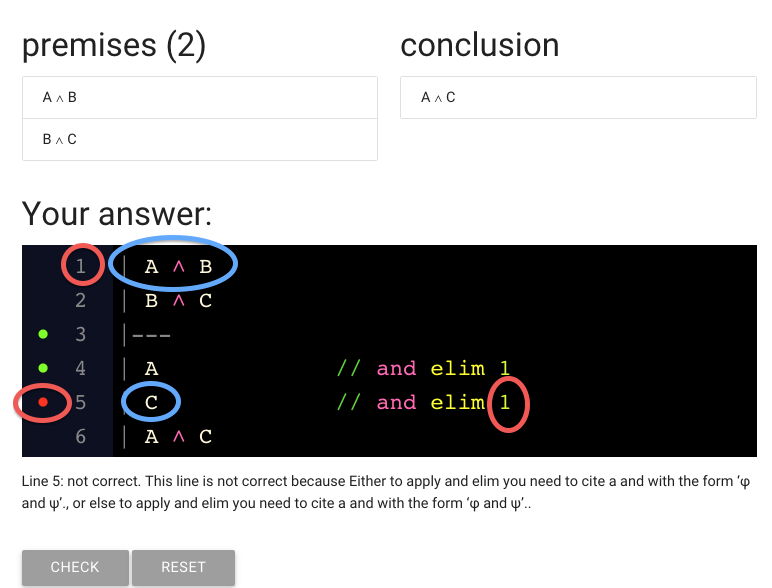
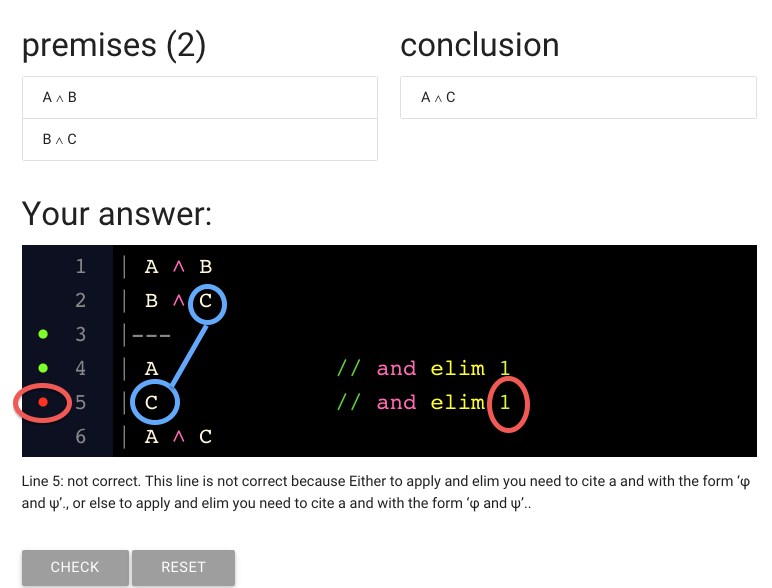
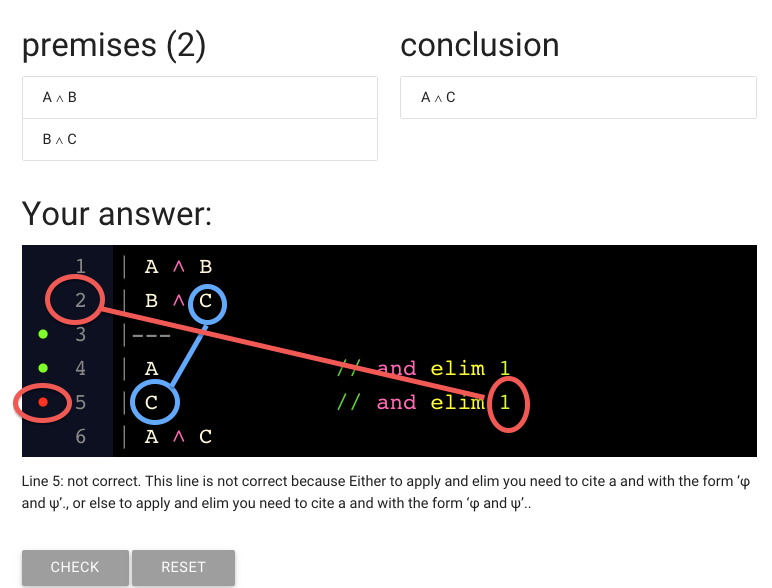
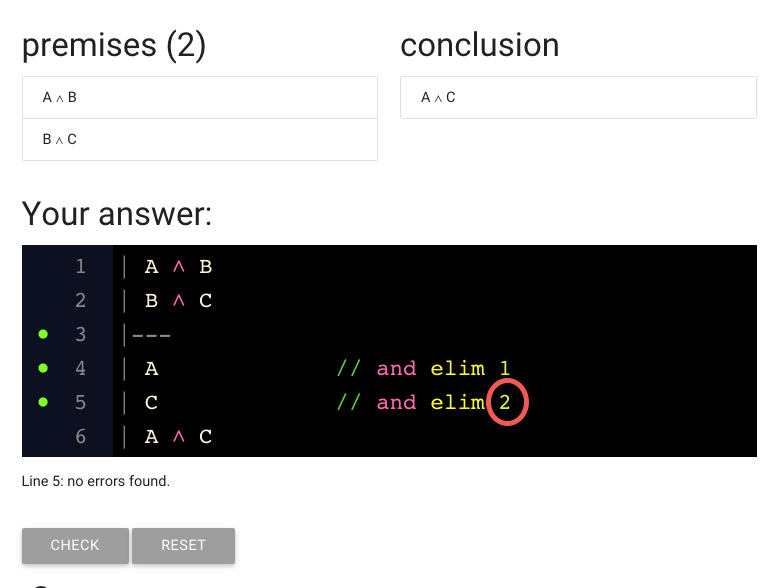
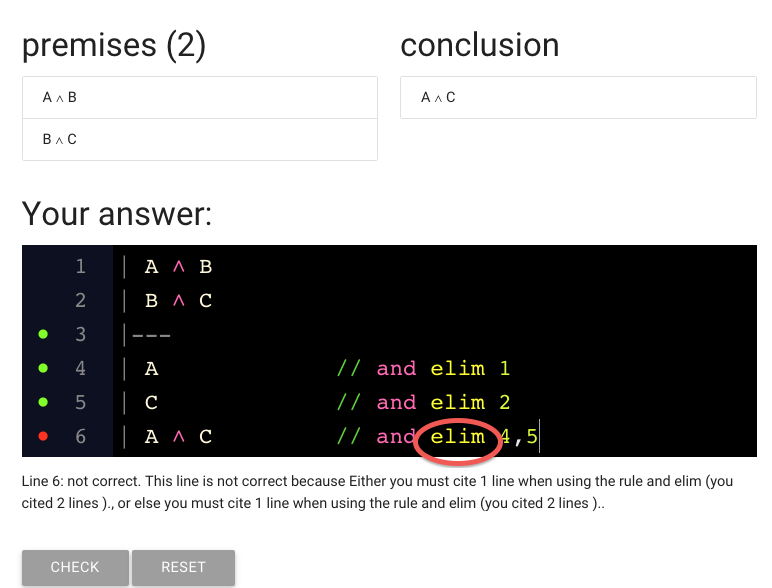
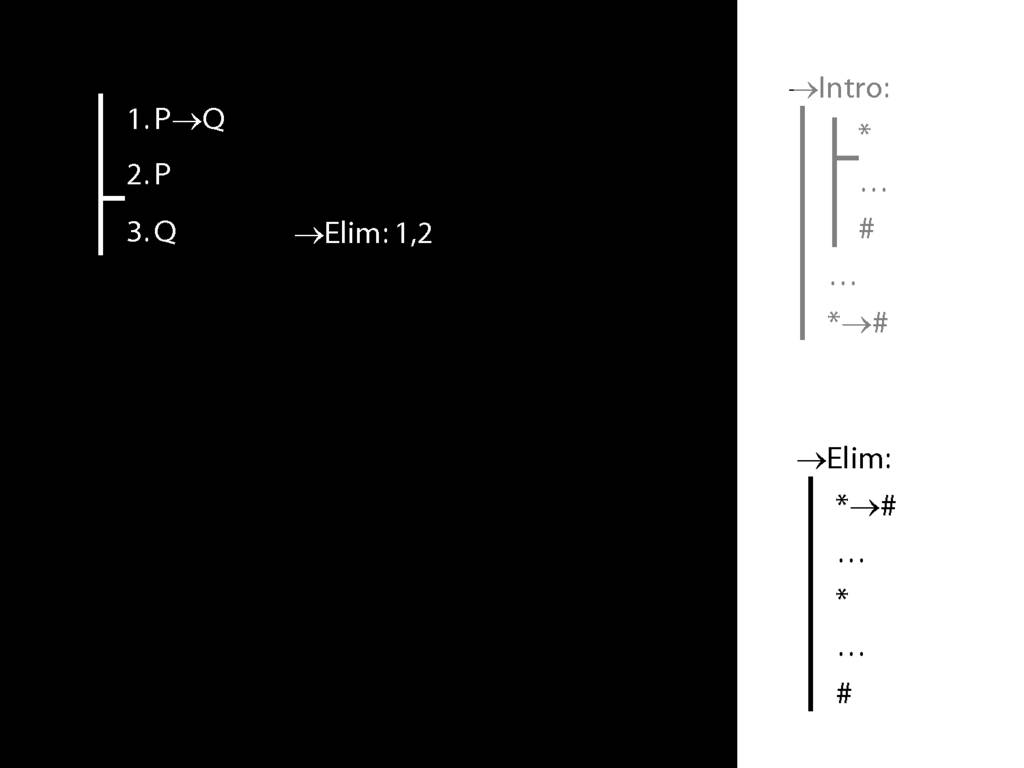
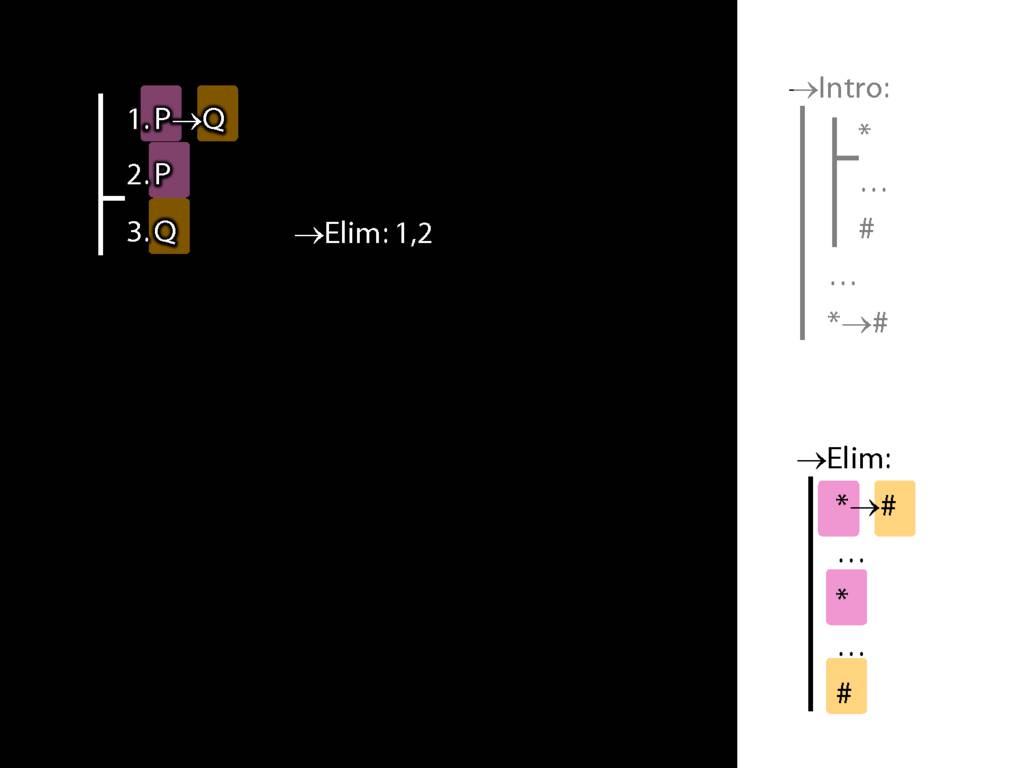
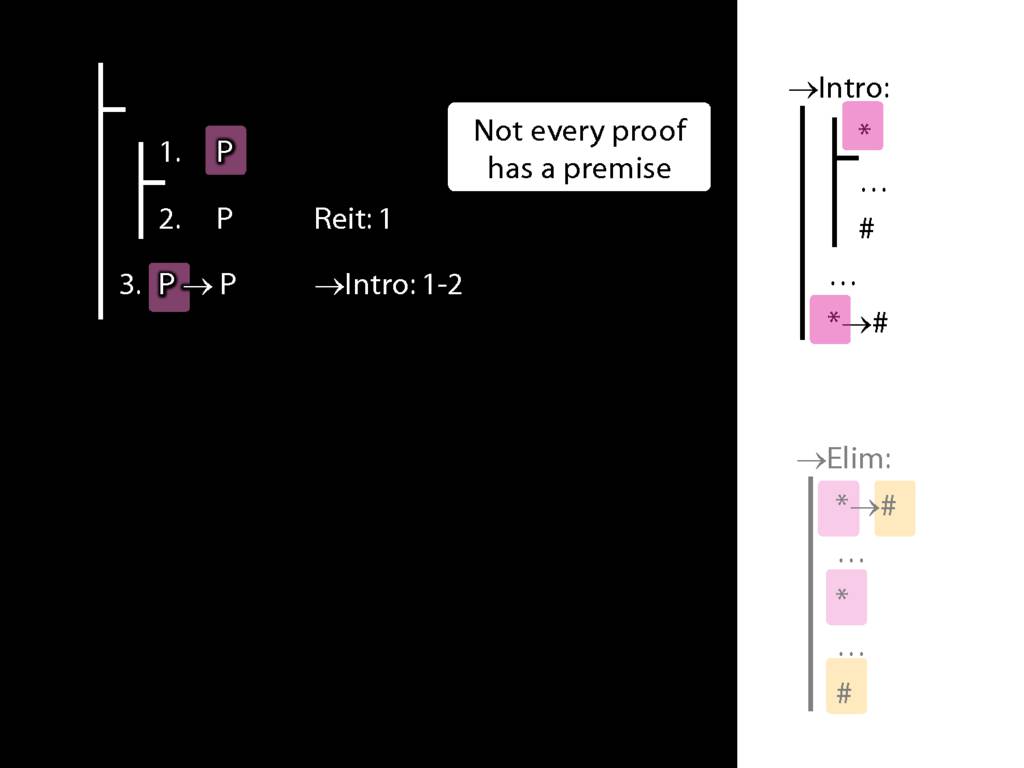
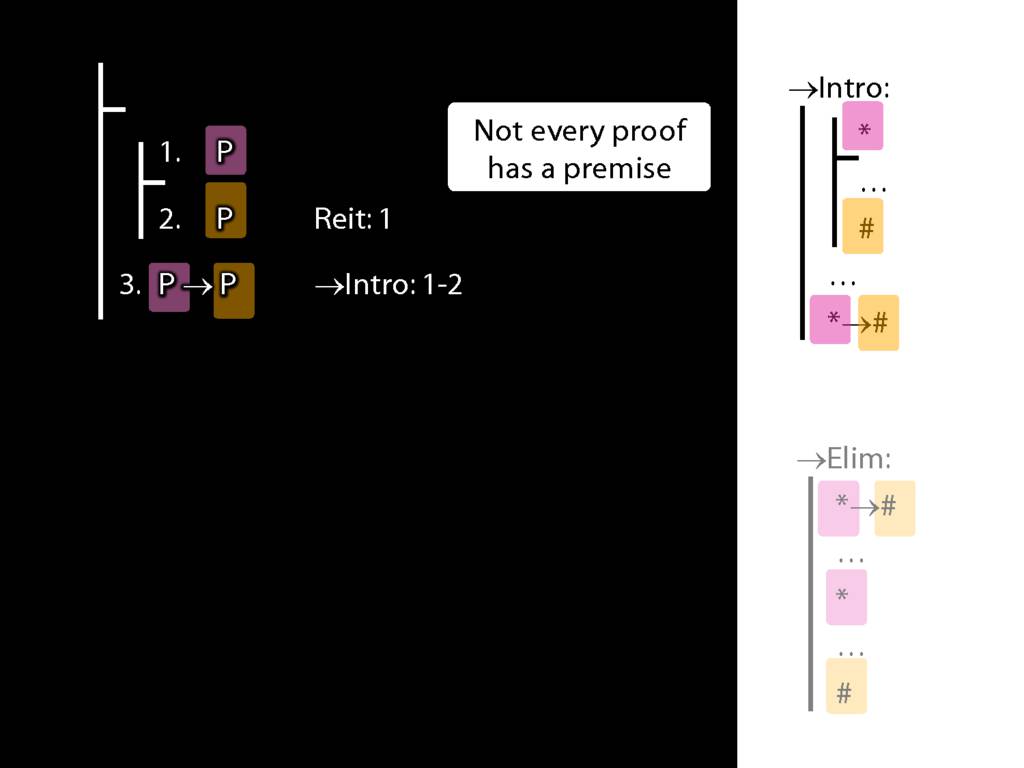
See how we have P in a premise and P in the conclusion?
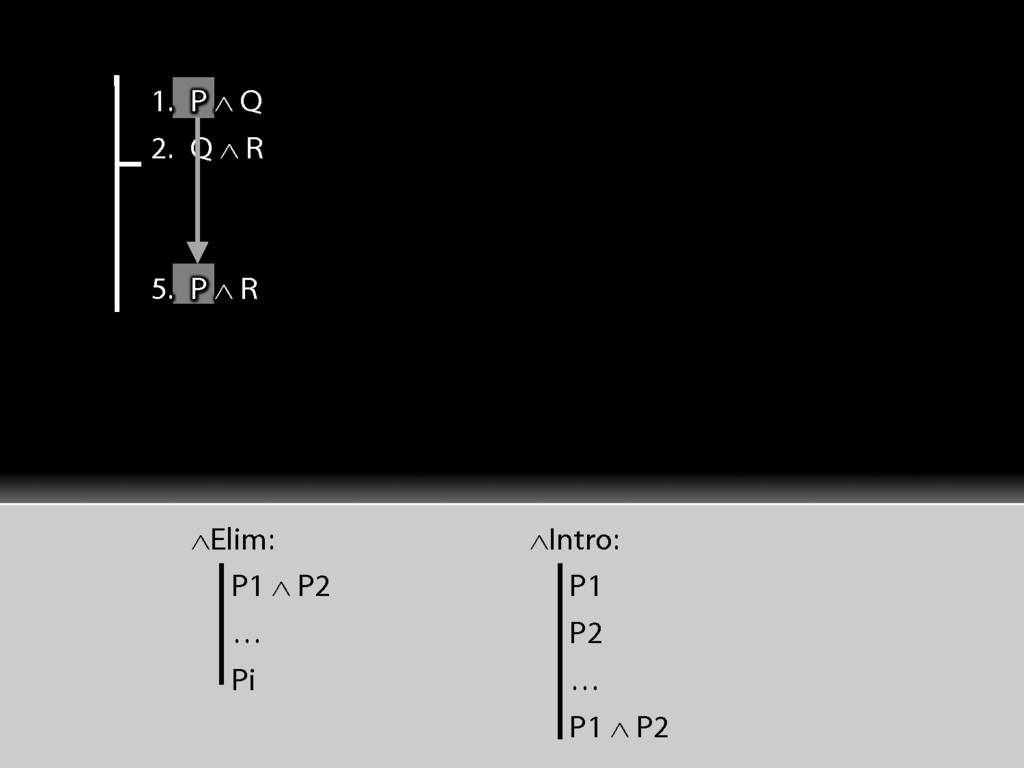
We have to get the P out of the conjunction and back into the conclusion.
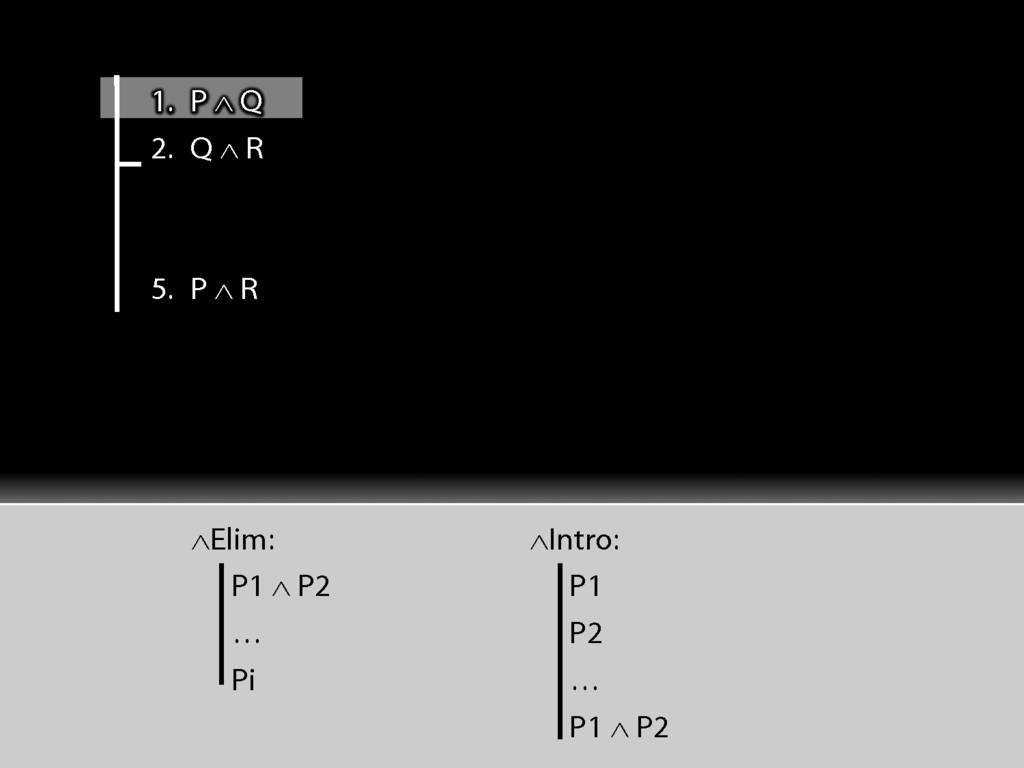
How can we get P out of this premise?
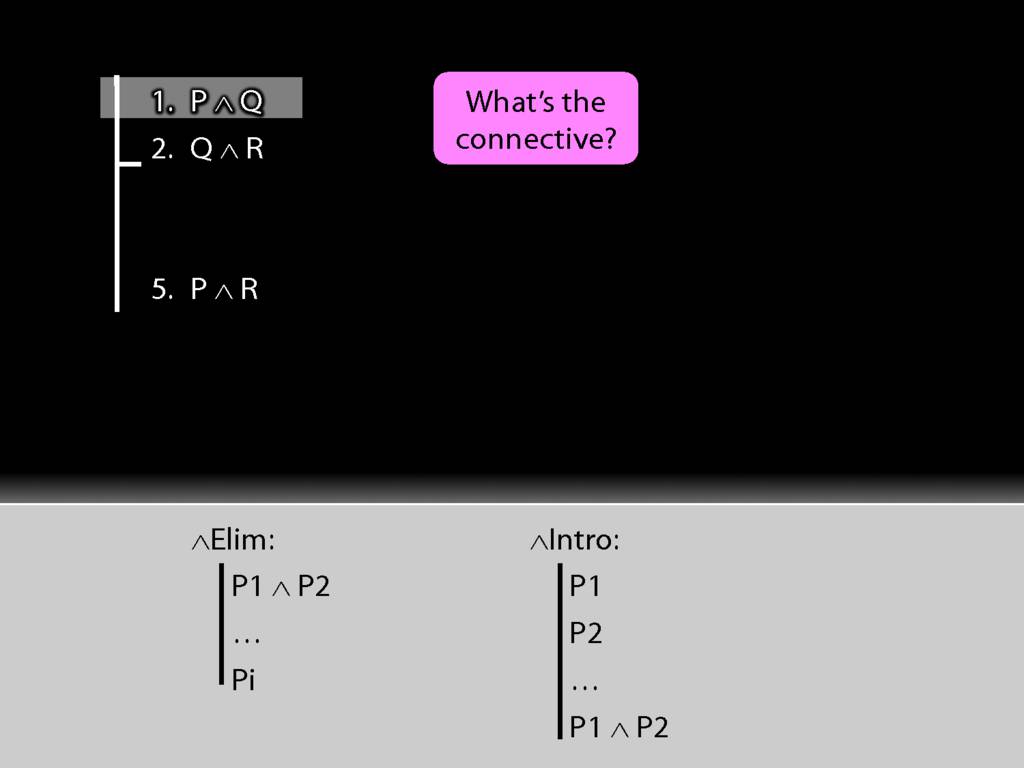
First we have to ask, What's the connective?

The connective is conjunction. This tells us we want to use a conjunction-rule. But is it the introduction or elimination rule that we need?

It's elimination. Nearly always we need elimination when we're acting on premises.
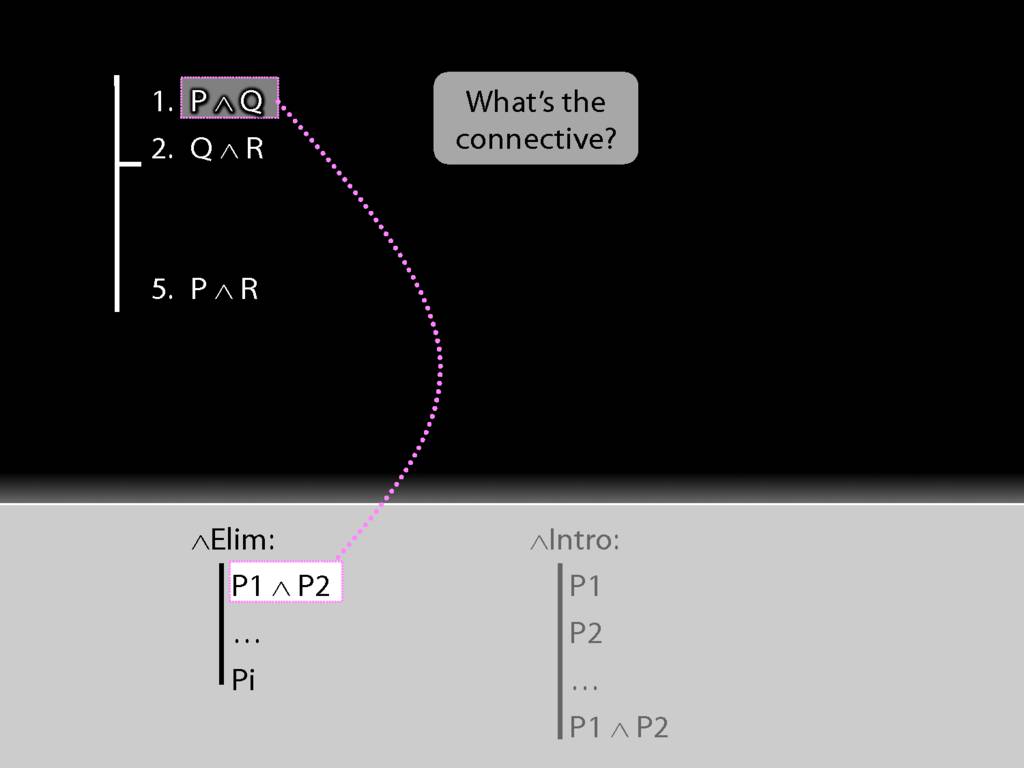
See how the rule matches our premise.

Because we have a match, we can use this rule to add a line to our proof.
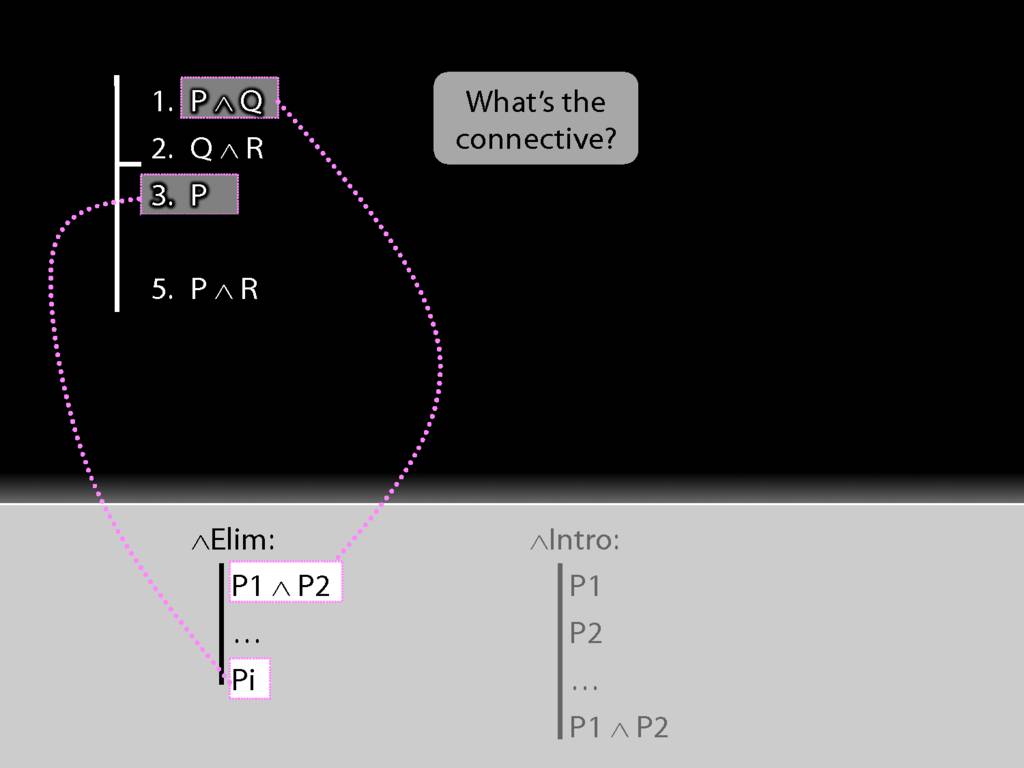
The rule allows us to add 'P' or 'Q' to the proof, but I've chosen to add 'P'.
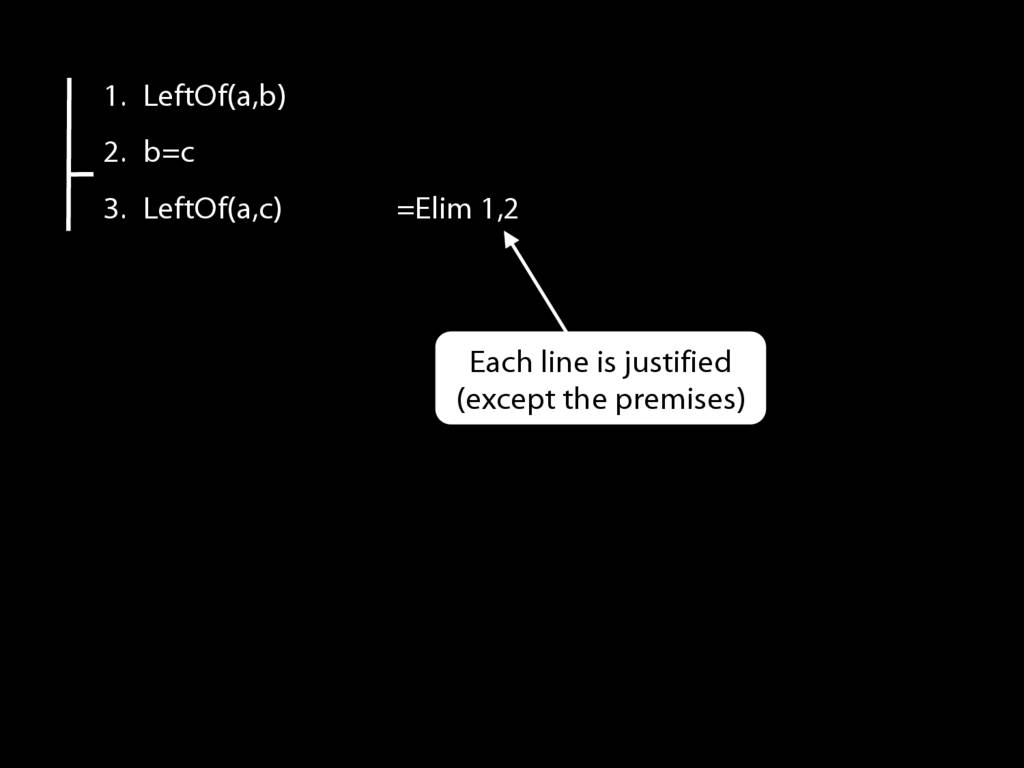
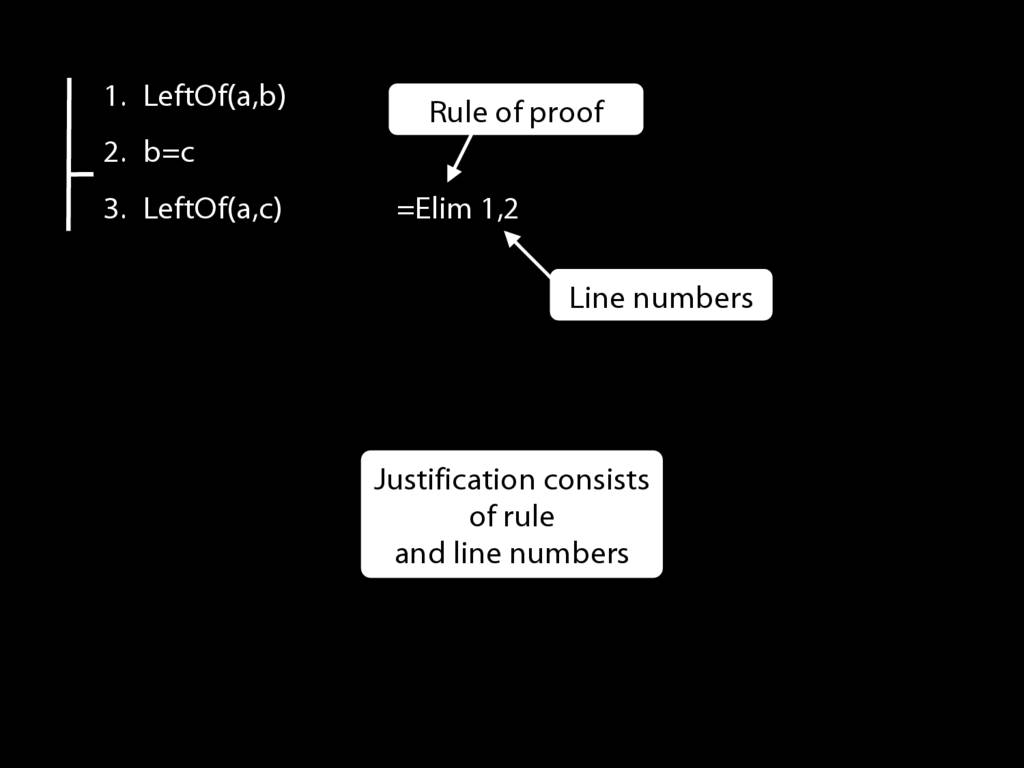
Now having used the rule we have to explain exactly what we've done. This requires two things ...
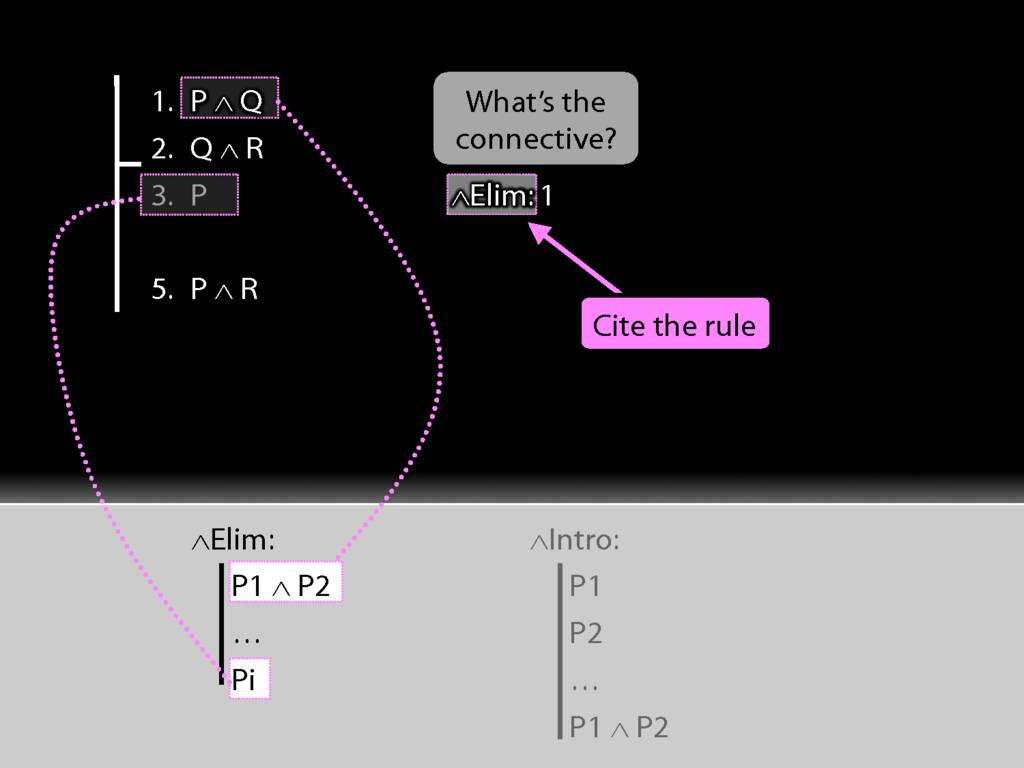
We must cite the rule used.
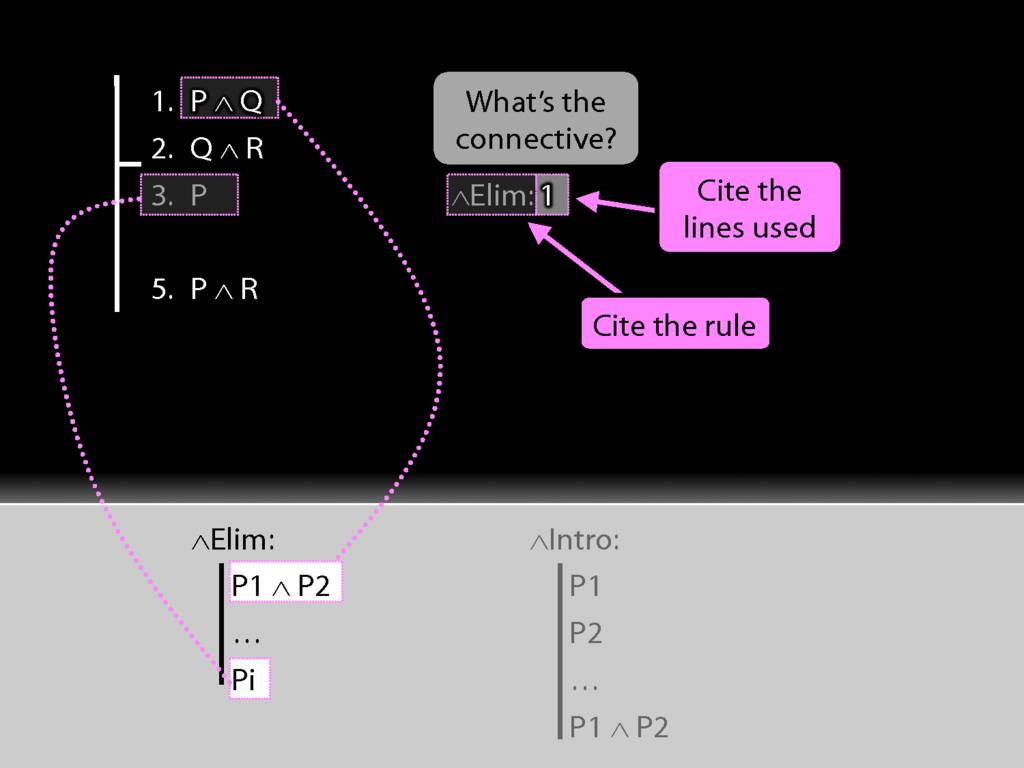
And we must cite the lines we applied the rule to.
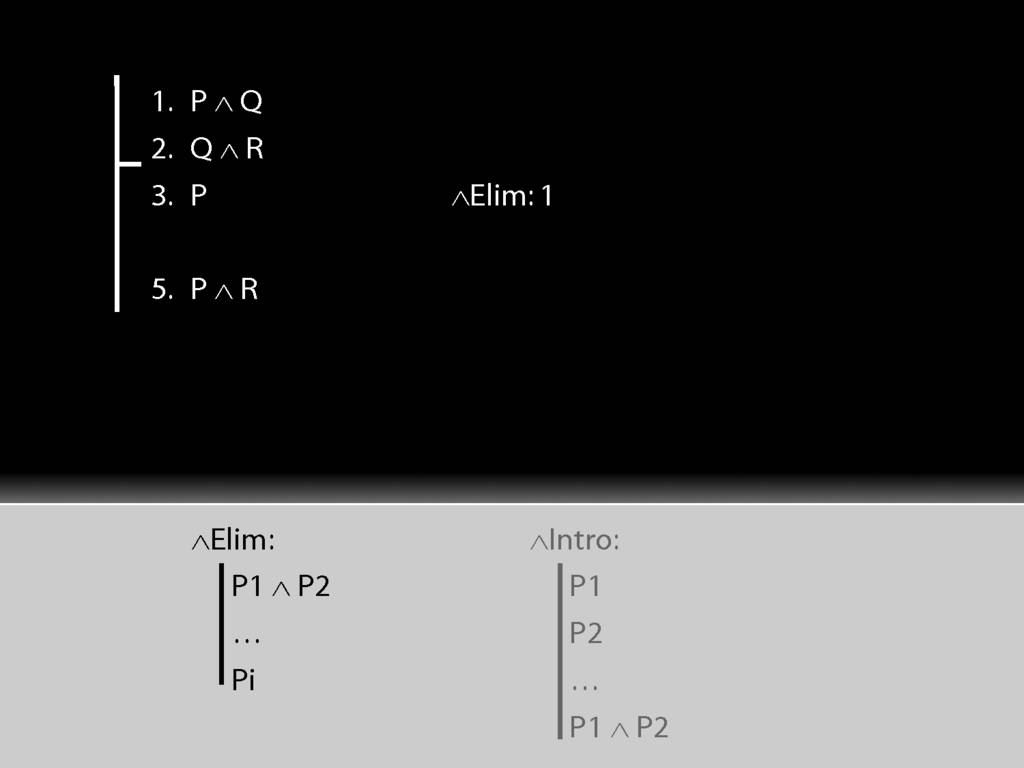
So far so good. Can you see what we should do next?
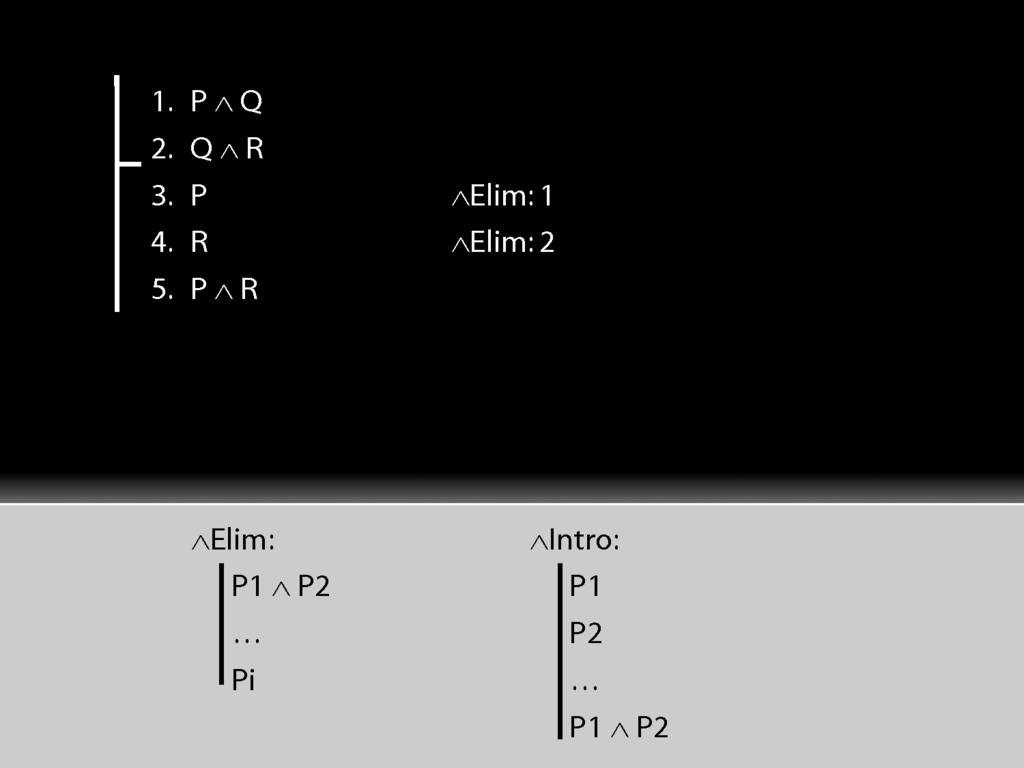
Getting the R out of the second premise can be done in exactly the same way.
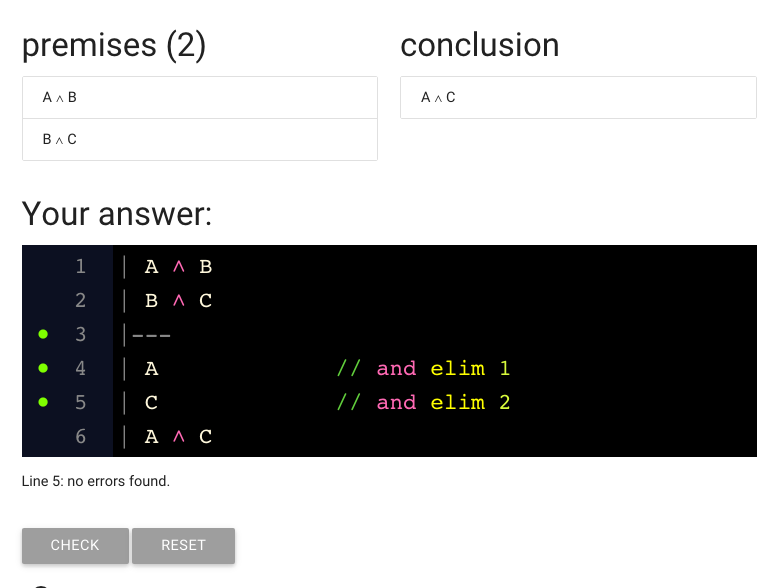
Now, how are we going to get to the conclusion?
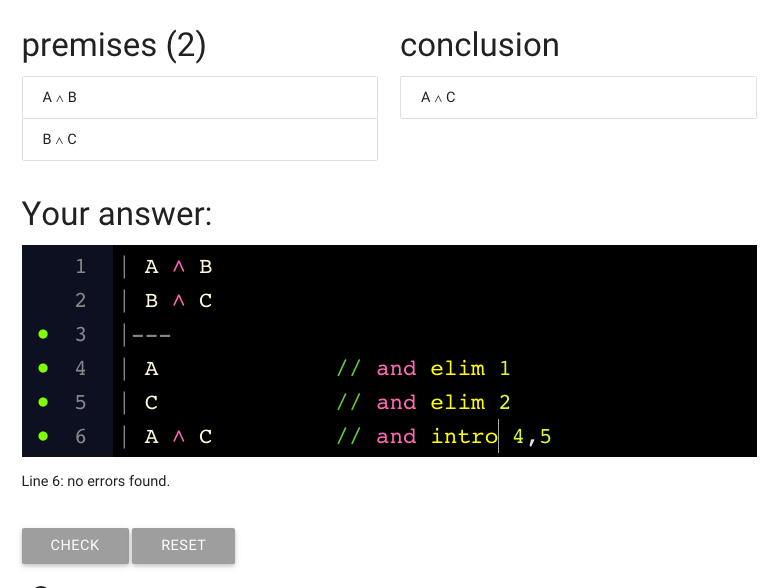
In general, we use introduction rules to get to the conclusion. And since this conclusion is a conjunction, we'll use conjunction-intro to get to it.
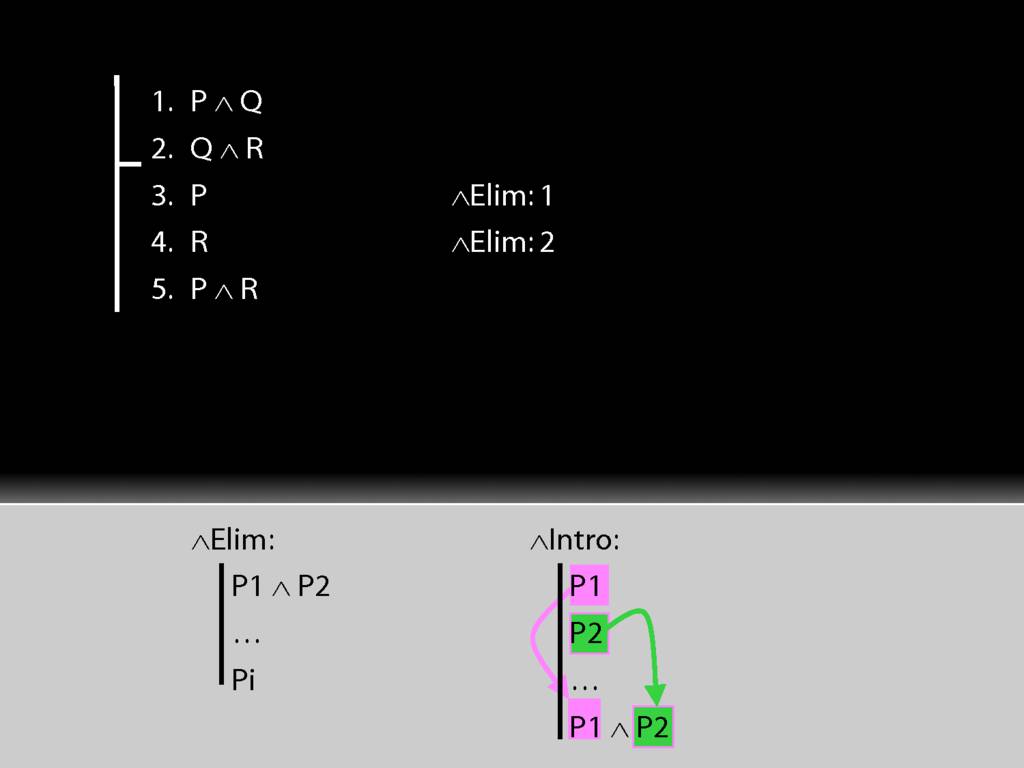
Look at the rule for conjunction intro.
See how our proof fits the pattern of the rule.
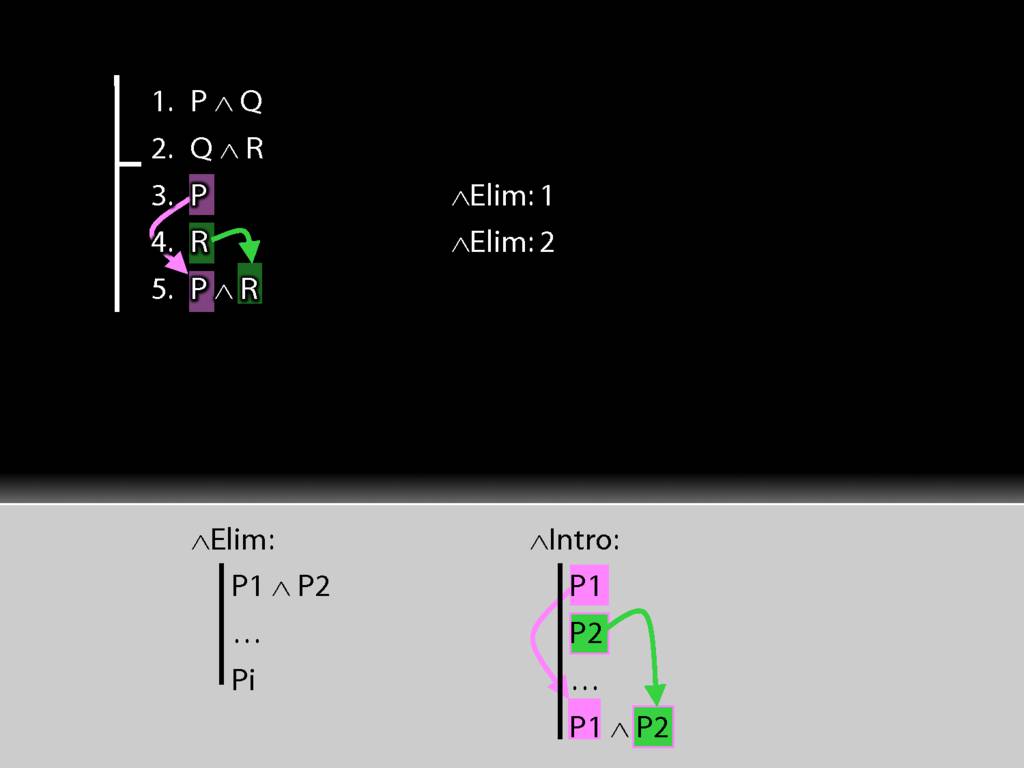
So it turns out we already did what we need for conjunction intro.
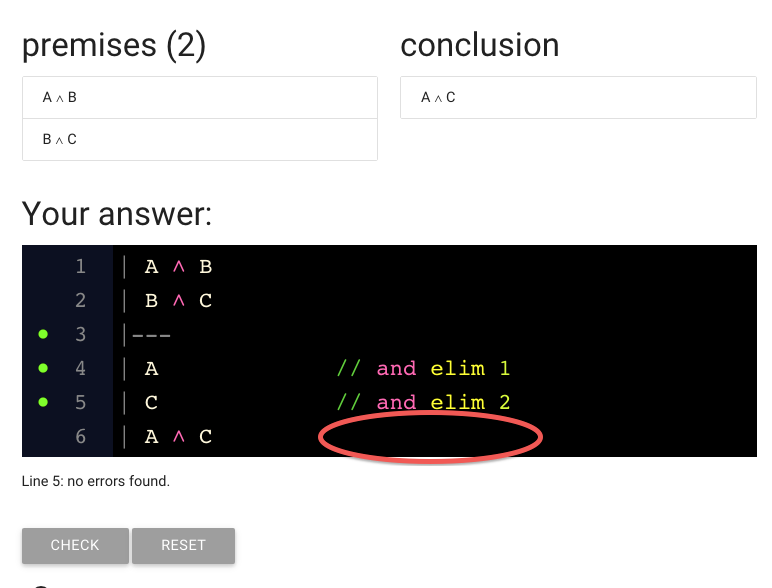
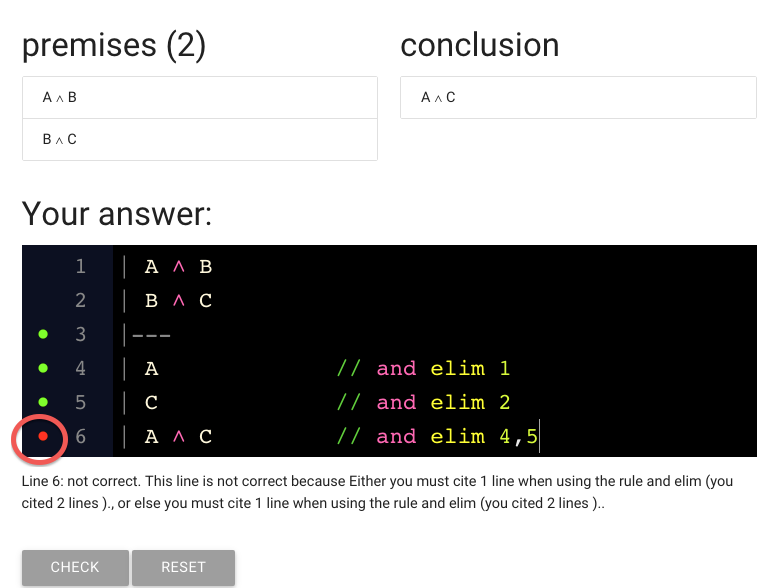
All that's left is to explain what we've done. As before this requres two things.
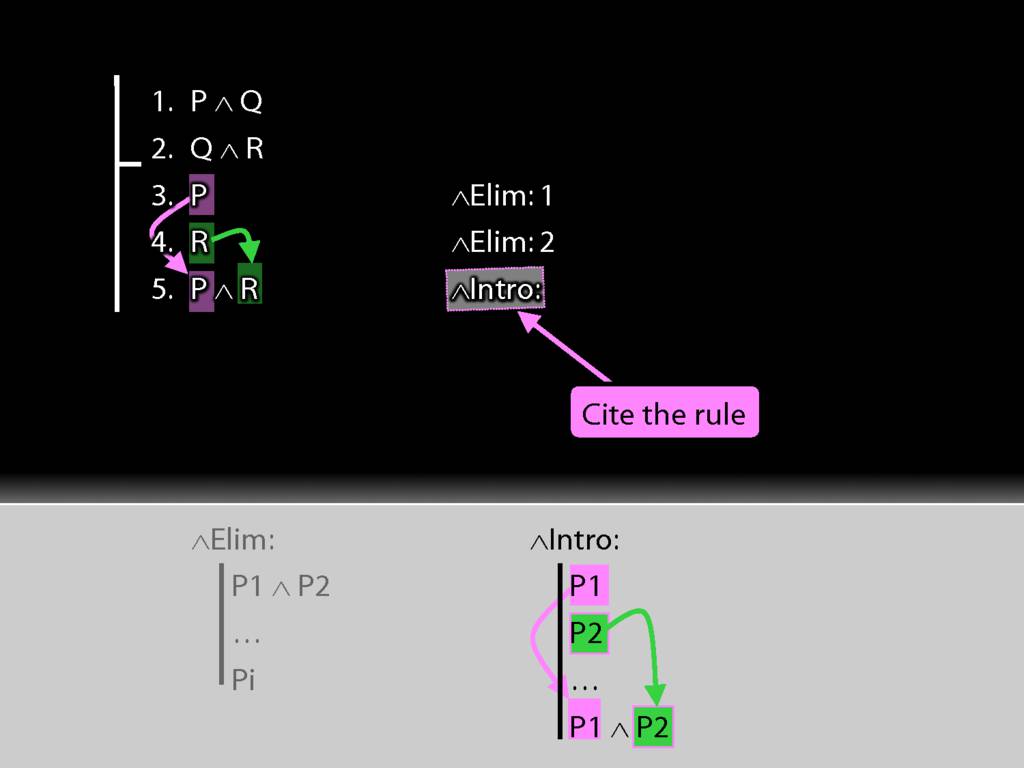
We must cite the rule used.
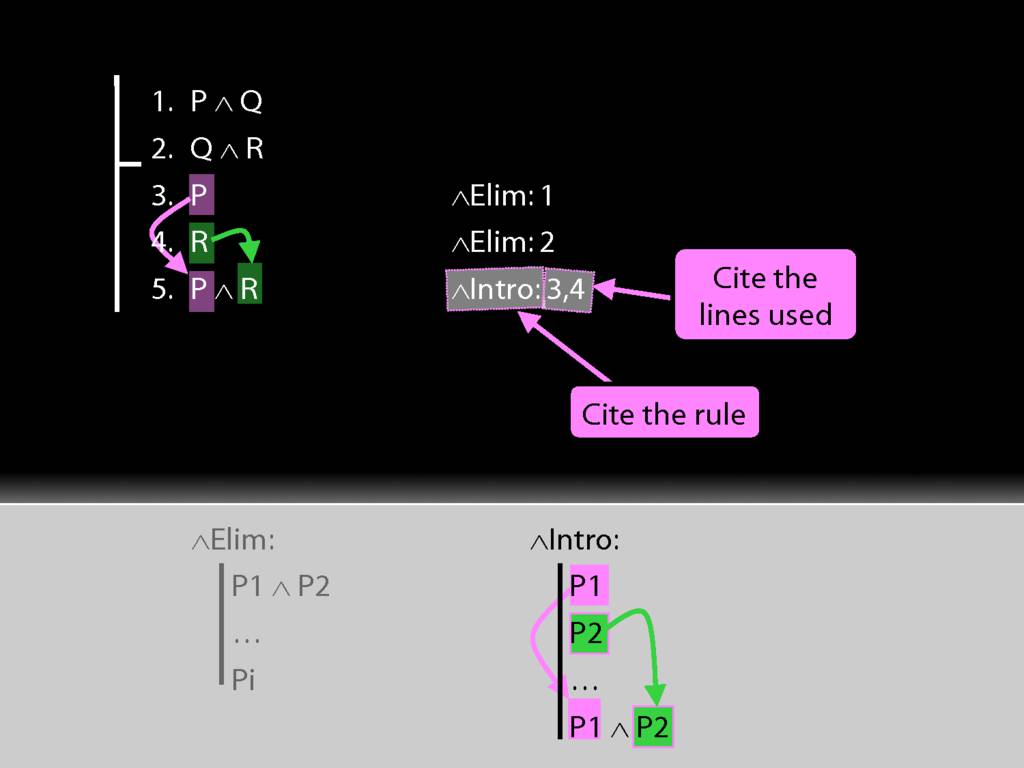
And we must cite the lines we applied the rule to.
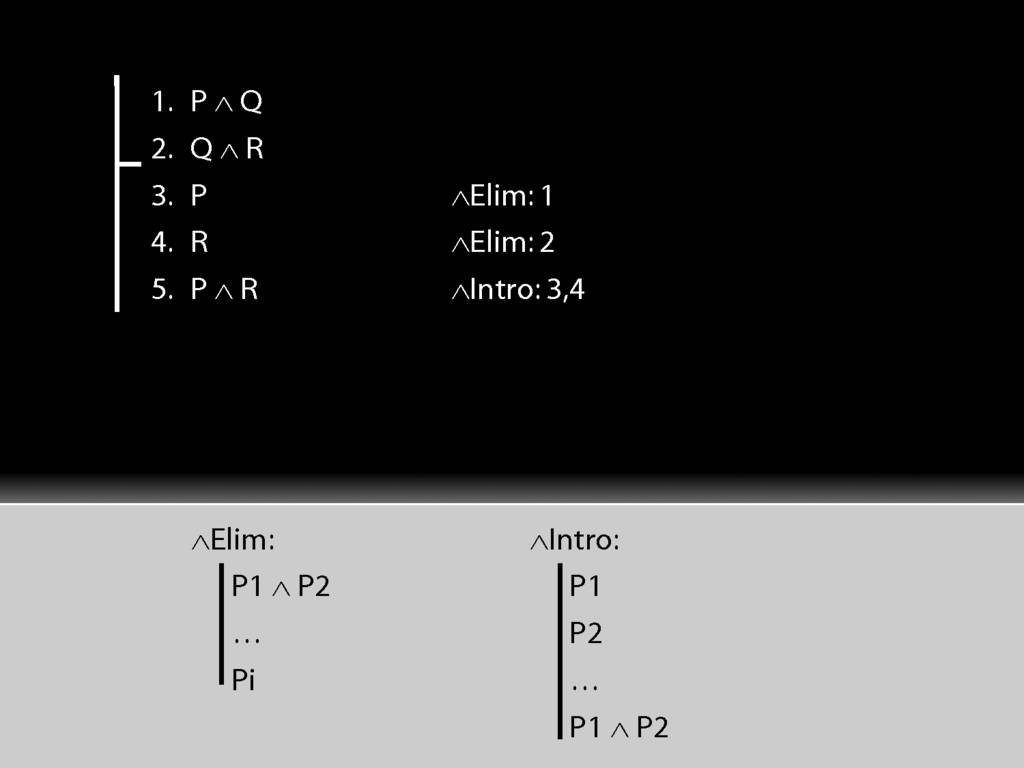
Note the pattern of rules that we have for conjunction: introduction and elimination.
For each connective we'll have such a pair of rules, one introduction rule and one elimination rule.
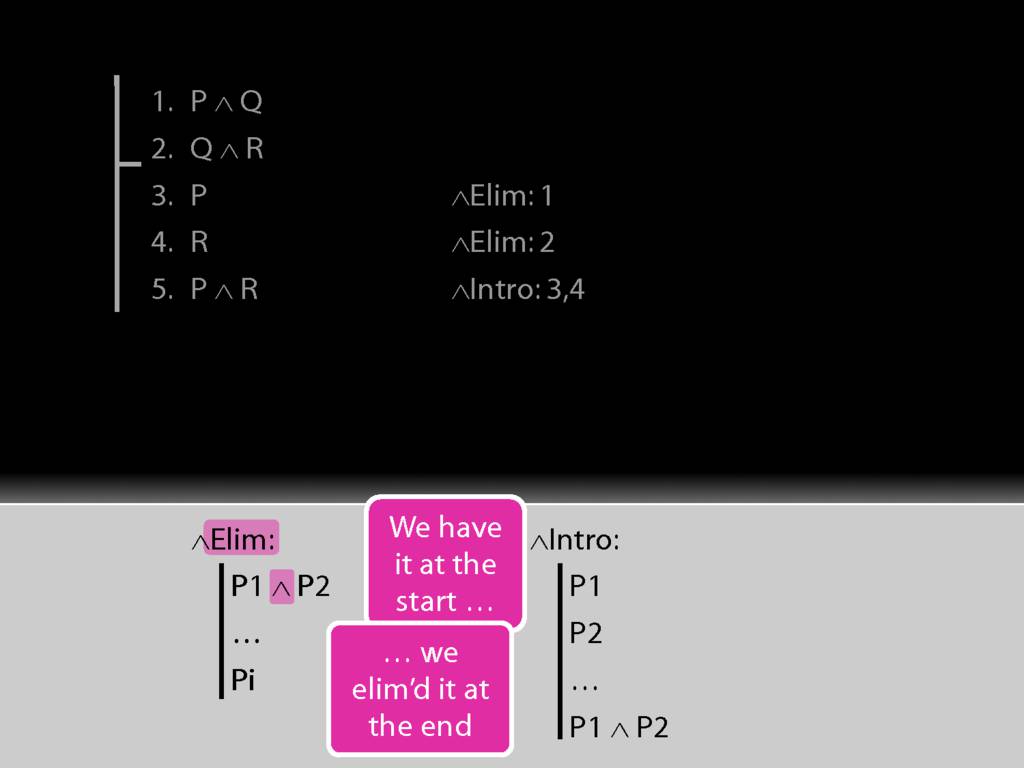
With the elimination rule, we have the connective at the start and we eliminate it in applying the rule.
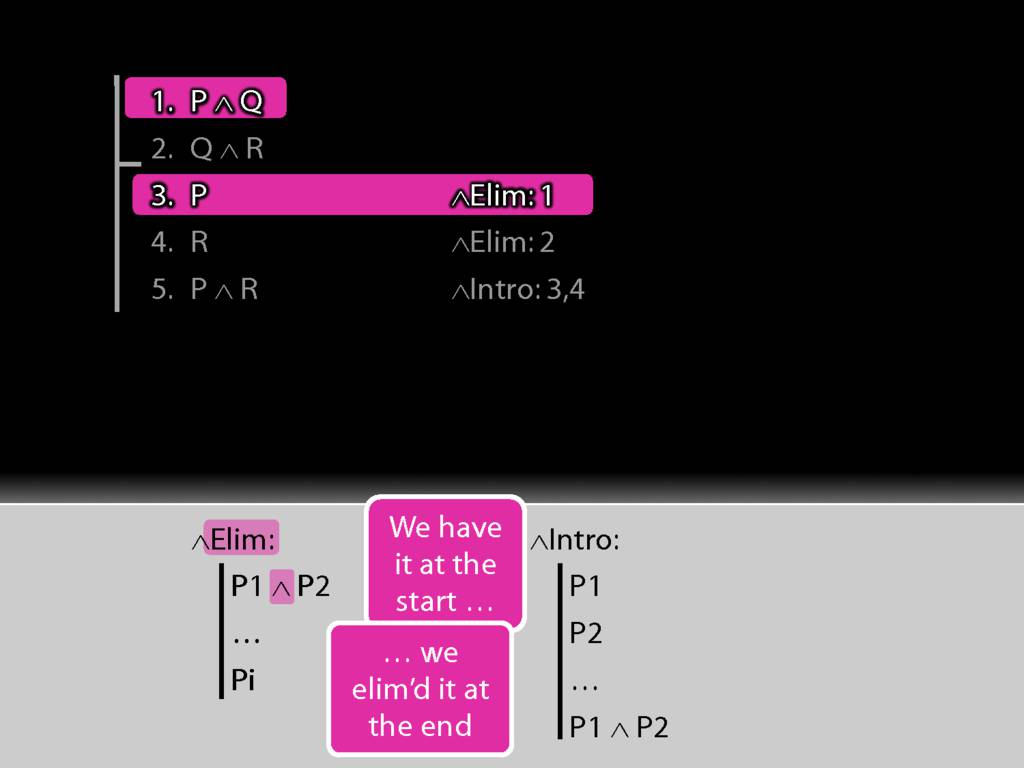
See how this worked in our proof.
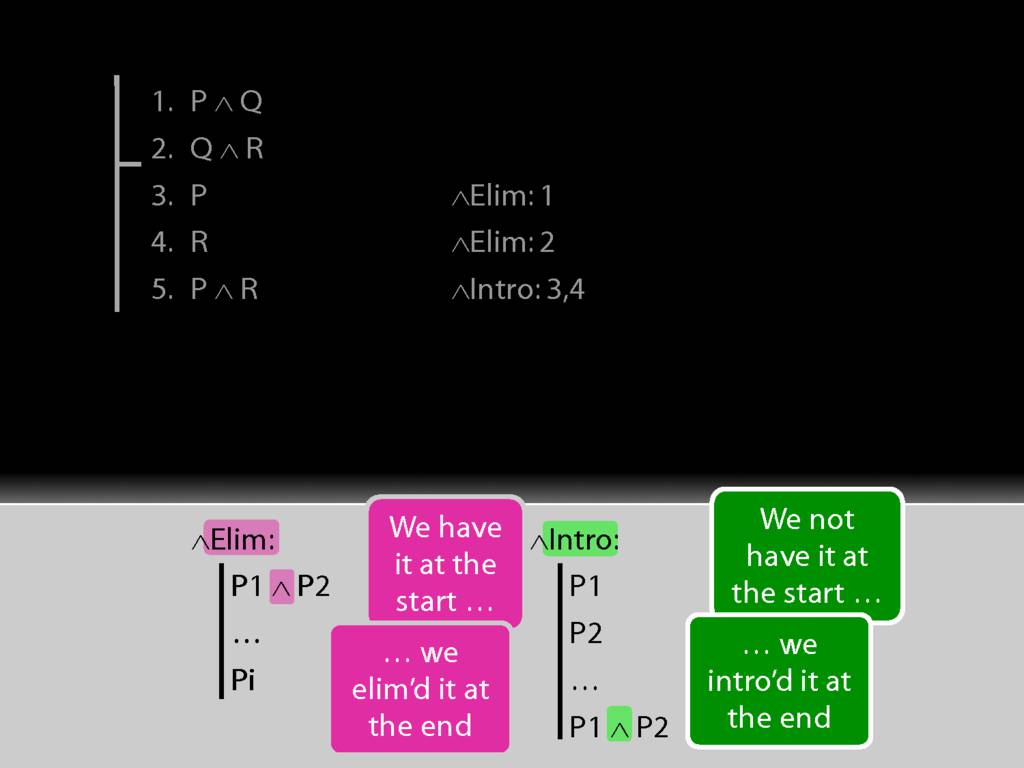
With the introduction rule, we don't have the connective at the start and we introduce it by appling the rule.
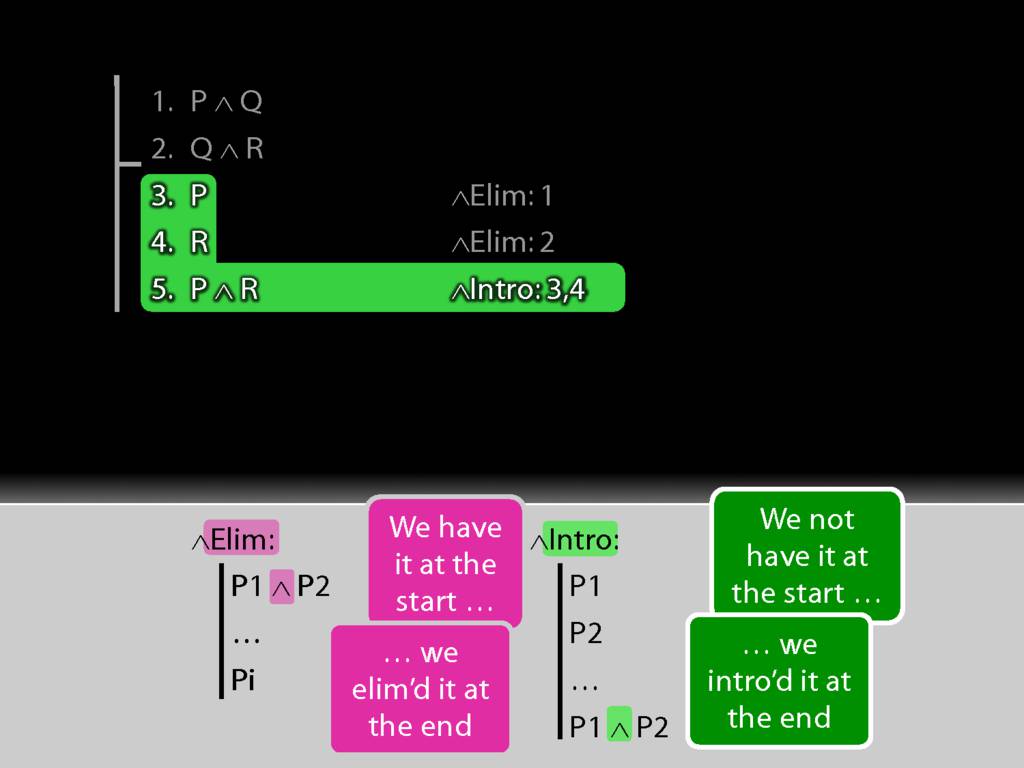
Here's how we did it in the proof.
If you've been following all this, you know everything you need to know to use conjunction intro and conjunction elim in proofs.
You also know how to do Fitch proofs. The rest is just a matter of learning more rules.
Now it's possible you haven't entirely been following all this ...

... When I was learning logic, I often didn't immediately understand the lectures and needed
to go back over my notes after each lecture.
Hopefully you will do the same because I don't really have the patience for spoon feeding.
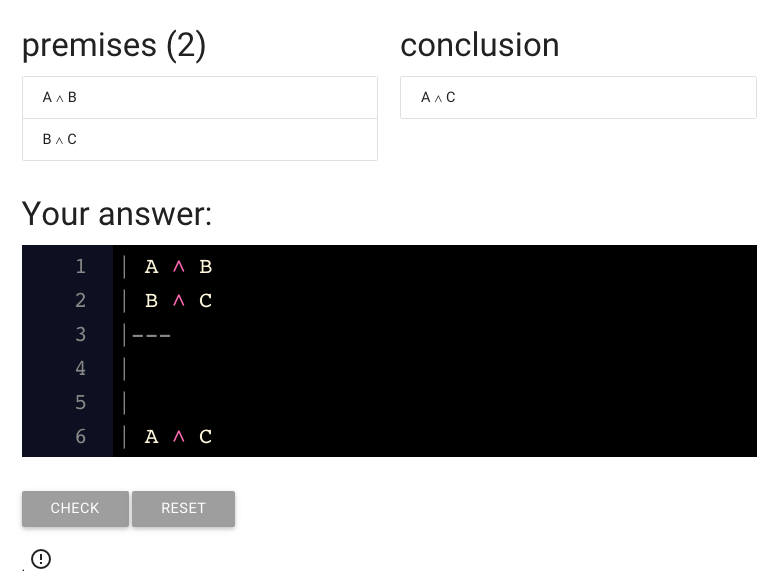
When you start an exercise, you’re already given the basic form of
the proof, with a couple of blank lines.
The box you’re working in is just a text editor.
You can add lines by pressing ‘return’ and delete lines
just like you would in any text editor.
To repeat: the proof is just some text that you edit in the normal way.
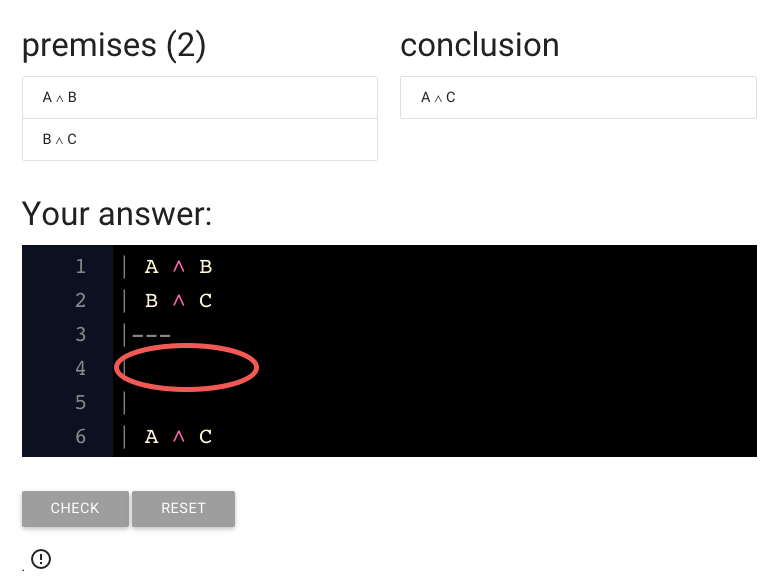
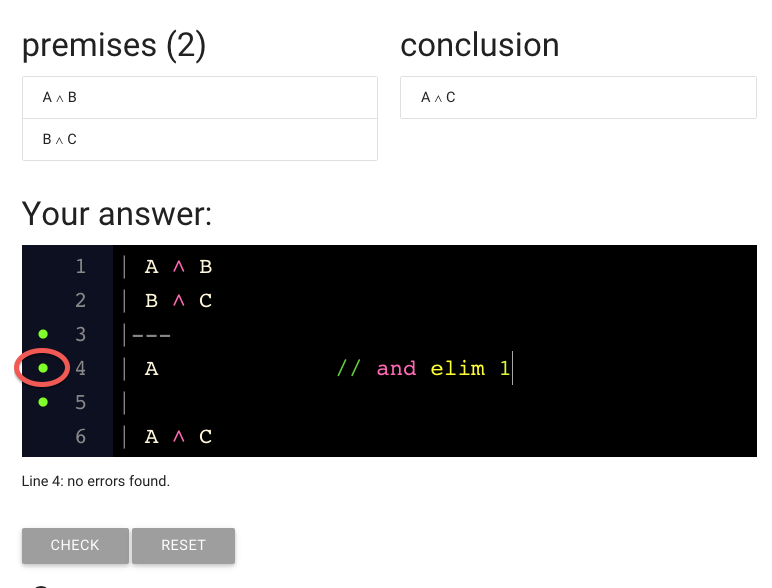
We just need to a step here.

I’ve gone ahead and typed A because we need to derive A from the premises.
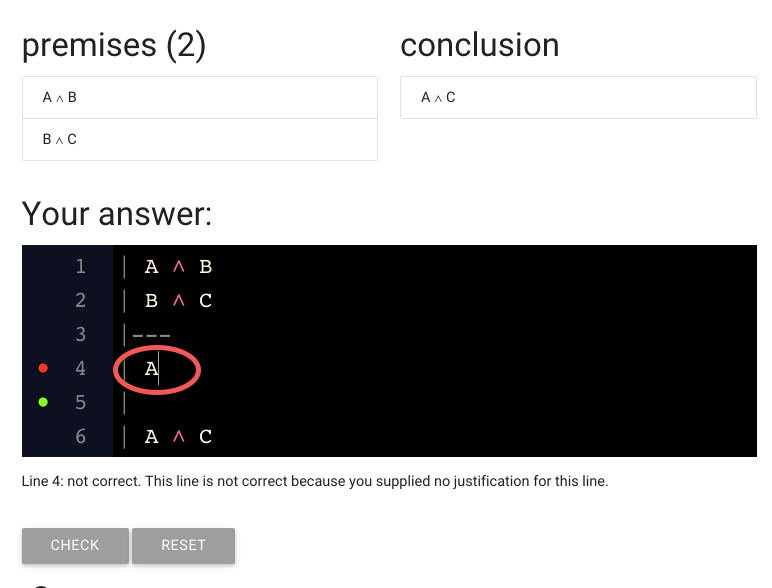
Here’s the A I typed.
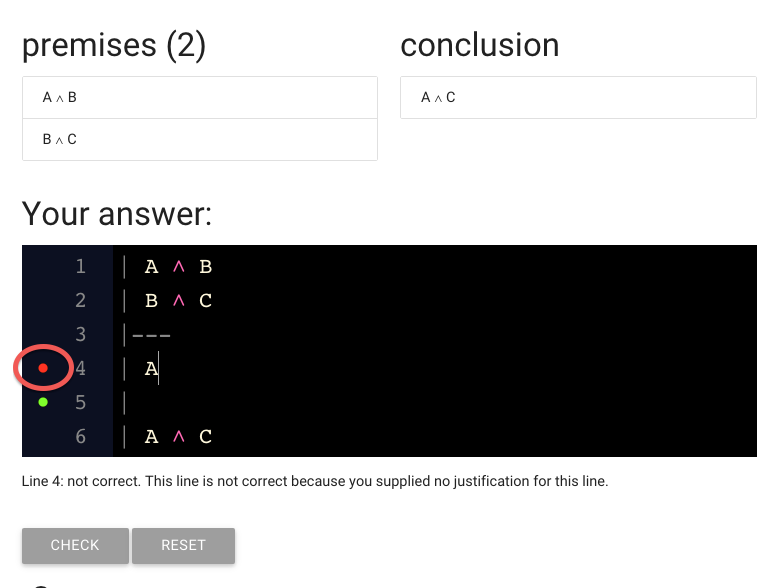
This red dot suggests that there is a problem with the line.
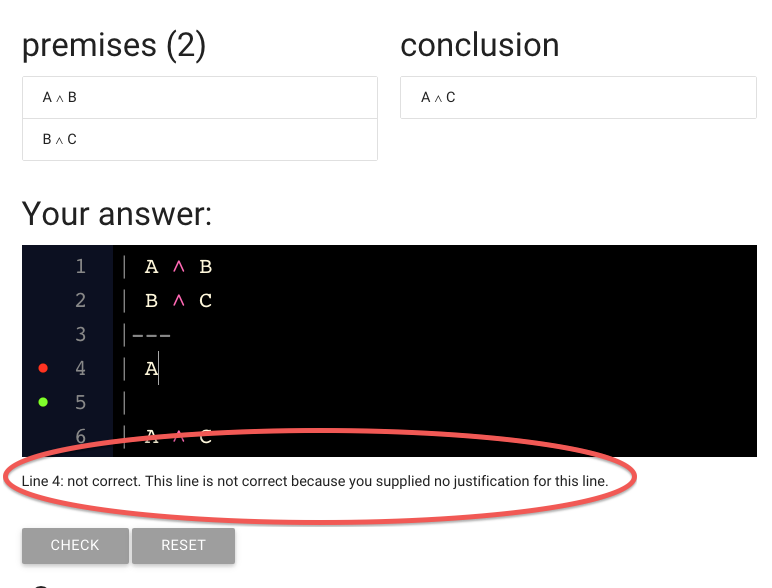
The text under or proof is giving us a clue: we didn’t justify the step yet.
Let’s do that now.
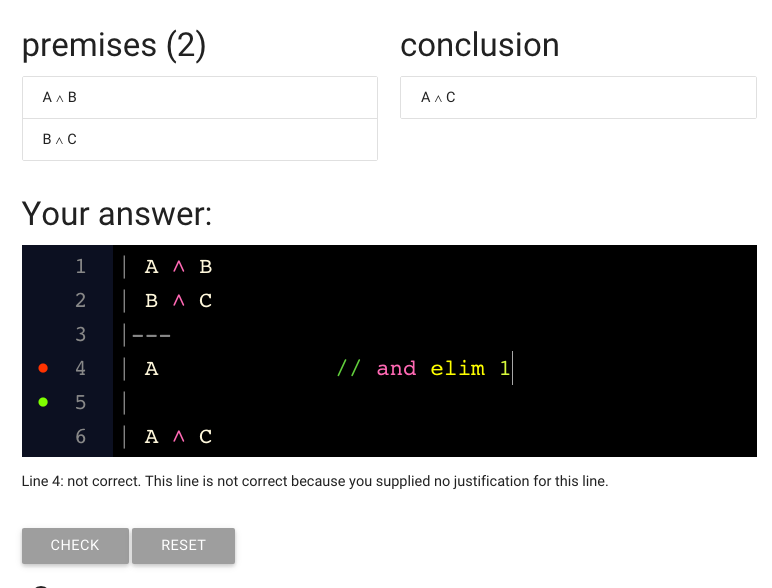
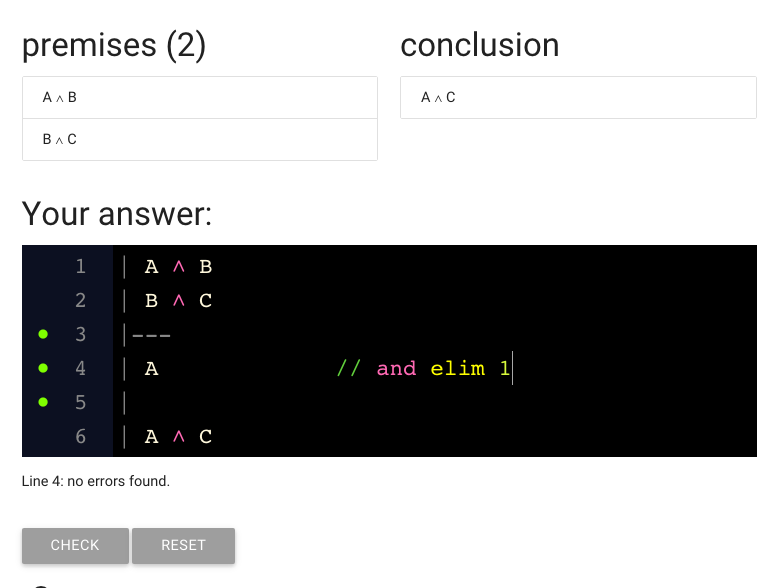
Here I’ve added justification.
It’s over here on the right (I just added spaces to move it away from the sentence ‘A’).
I want to mention a couple of conventions.
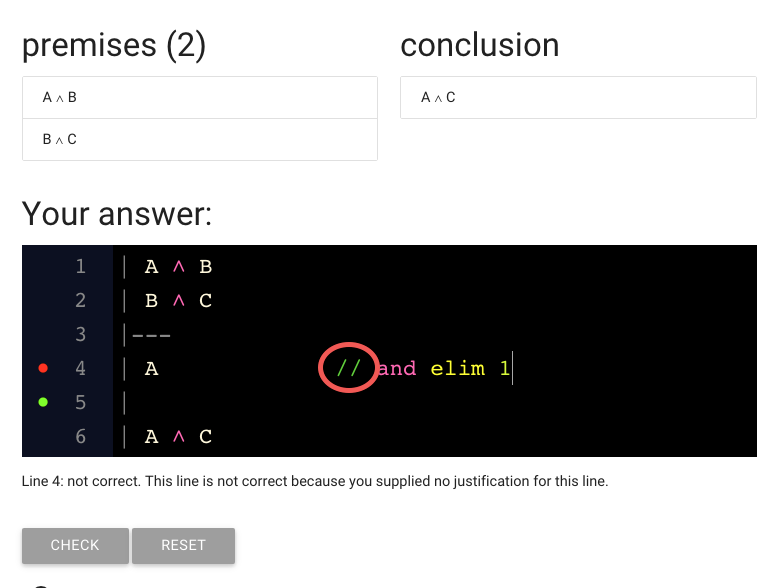
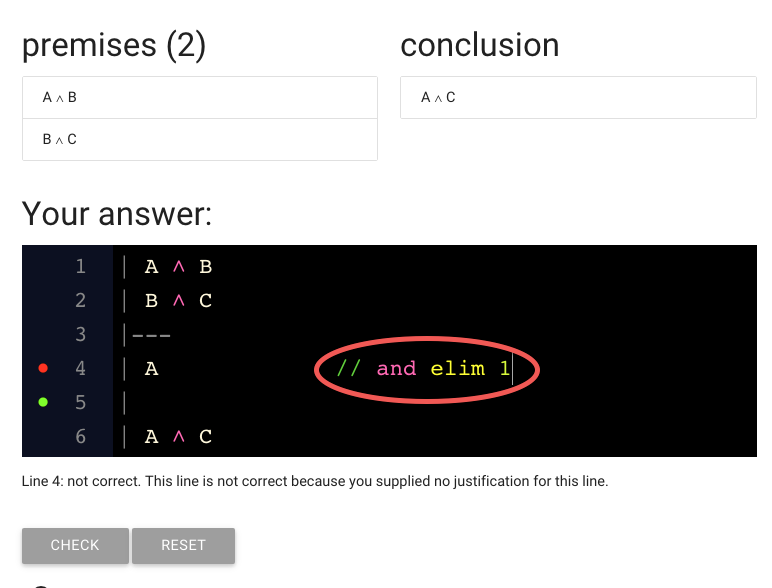
First, justification needs to start with ‘//’. This is to separate justification
from the sentence itself.
If you forget the ‘//’, zoxiy won’t be able to understand your proof and won’t
be able to explain to you what went wrong.
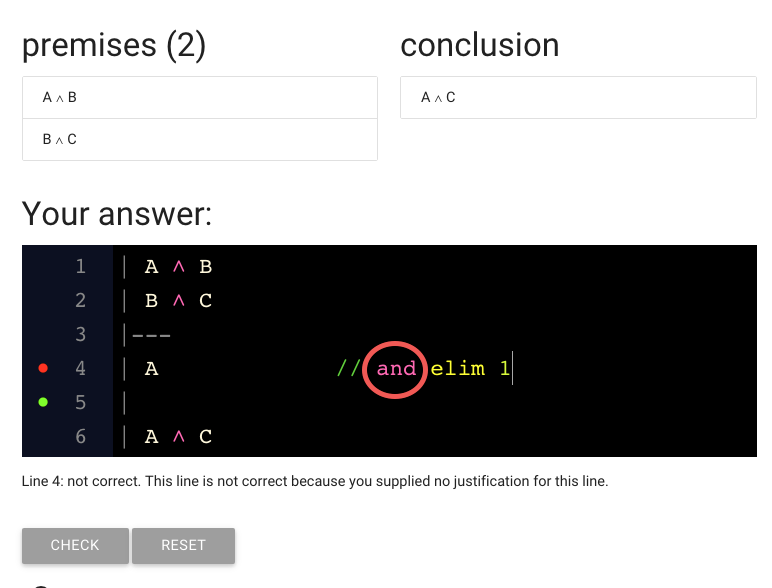
The next thing to note is that I typed the word ‘and’ rather than the symbol
for conjunction (‘∧’). As a convenience, zoxiy will let us use words
rather than making us type symbols. But we can type the symbols if we prefer.
The same is true when we’re writing sentences: you can type ‘A and B’ instead of
‘A ∧ B’ if you like.
This is a handy feature of awFOL vs the language of the textbook we’re using.
awFOL let’s you use words where really there should be a symbol, just to make
it easy to type things.
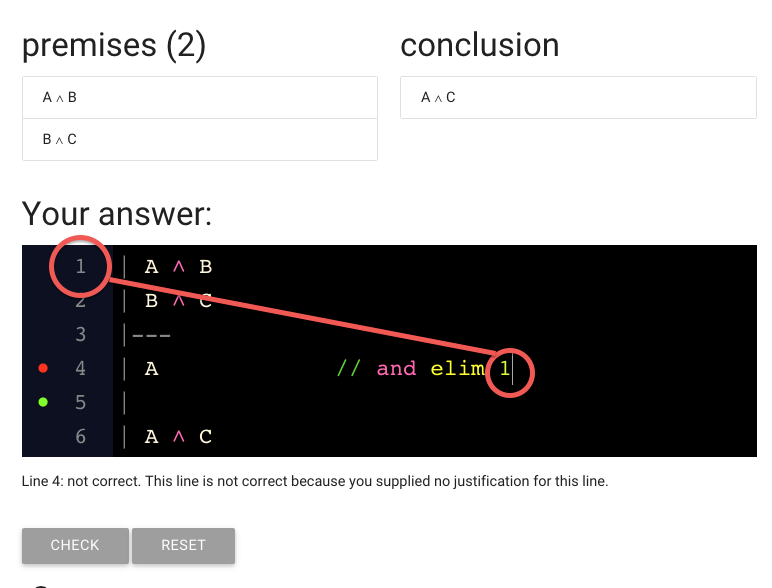
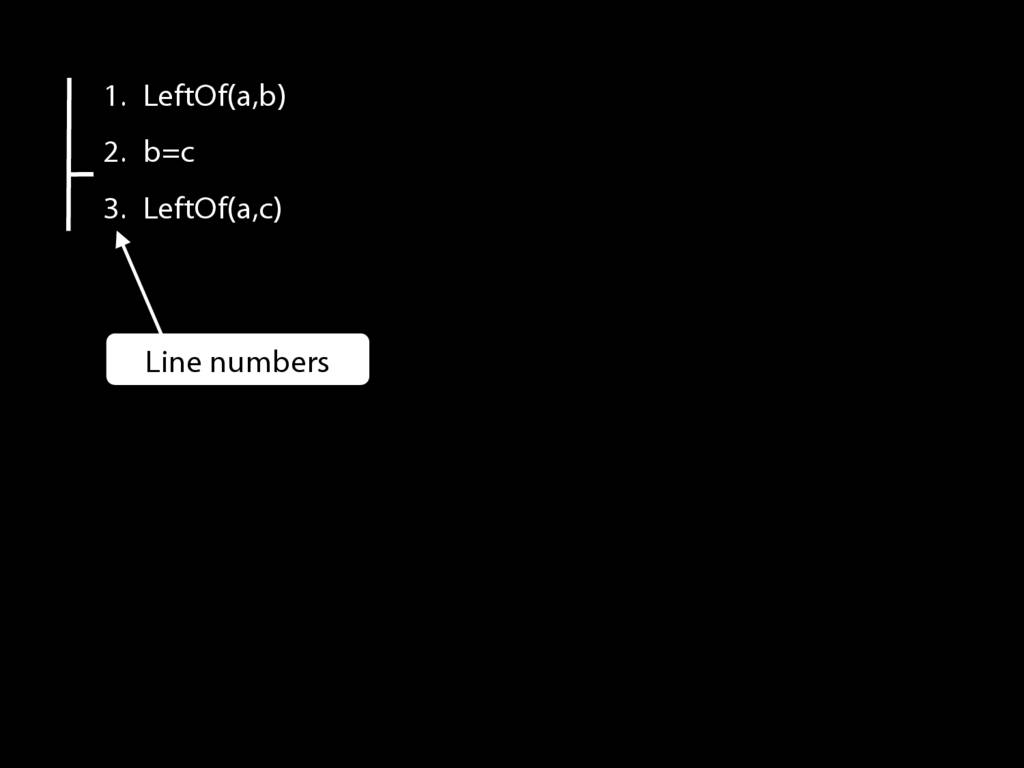
Finally, note that we put a number at the end. This is the number 1,
which refers to the first line.
zoxiy provides line numbers for us (you can add your own
if you prefer, but then you have to be really consistent about
starting each line with a number).
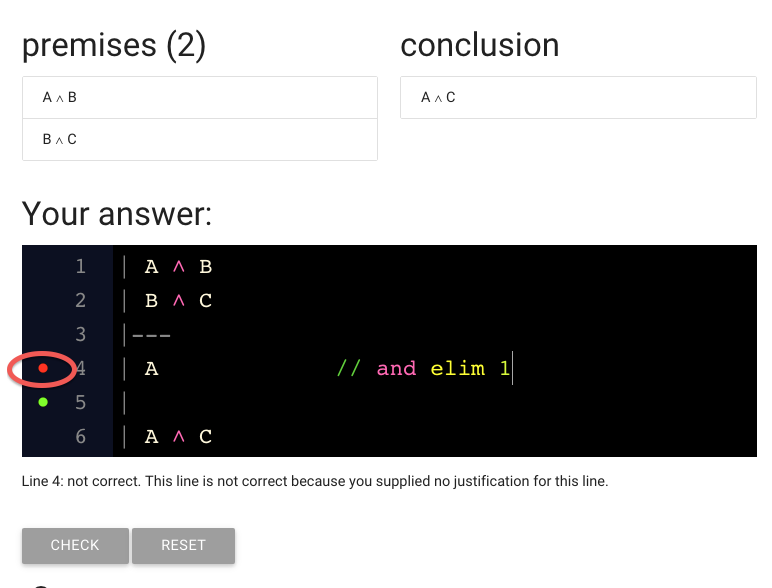
Wait a minute. We still have that red dot and the error message
telling us our line is not justified. But we have added the justification.
What’s going on?
zoxiy might be a bit slow to update. In this situation, just move your
cursor up and down to get zoxiy to check your line again.
Let me do that now ...
... and the dot has turned green, indicating that this line is ok.
What’s next?
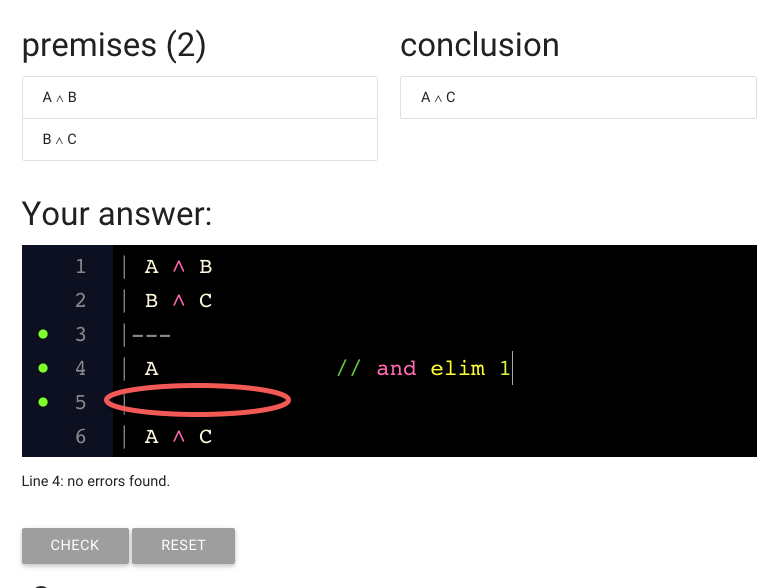
We need to add another step to the proof.
(It just happens that we have the right amount of space for this proof,
but generally you are going to have to add lines to your proof. Do this
with the return key, as mentioned above.)
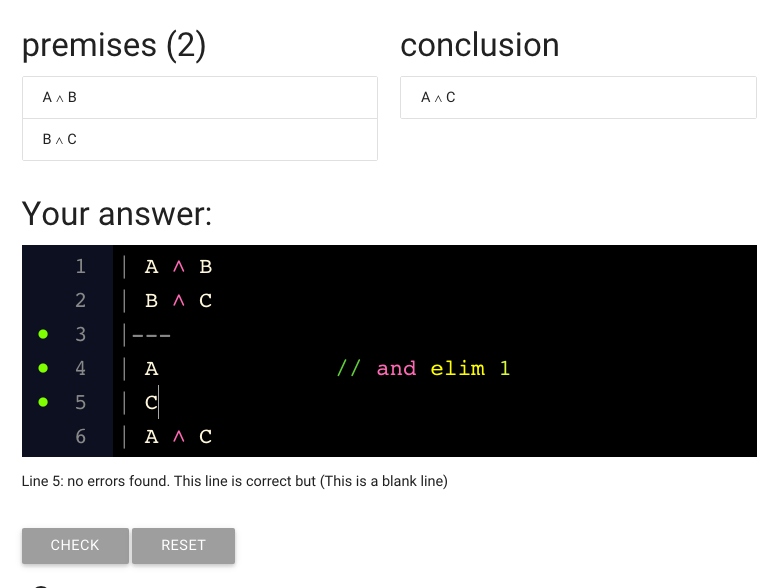
Here I’ve added the setntence we need (‘C’).
And here’s the justification as well.
But wait, the red dot is back.
That means there’s something wrong with the line.
What has gone wrong?
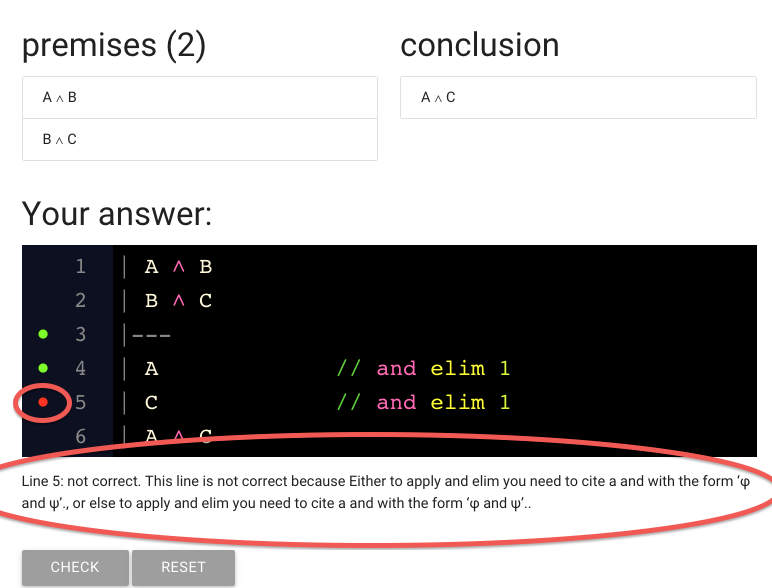
The status message is really unhelpful in this case, as it often will be.
(Maybe it will be improved at some point.)
Sorry about that.
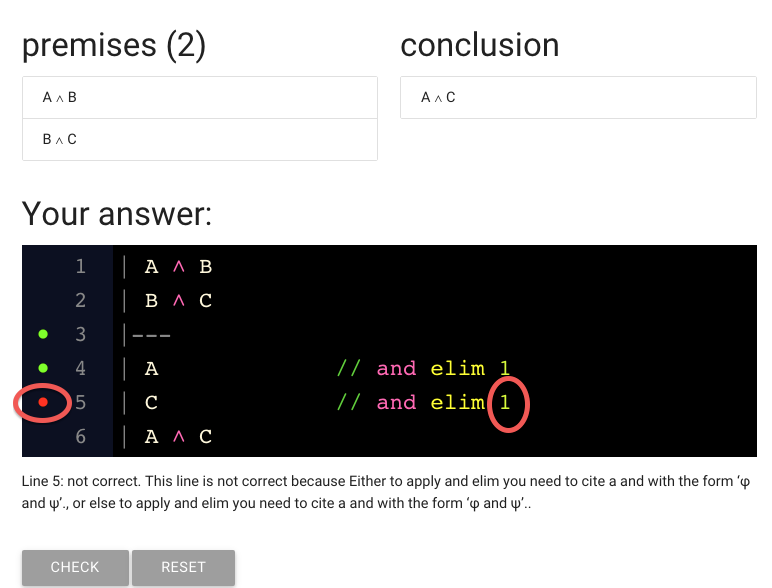
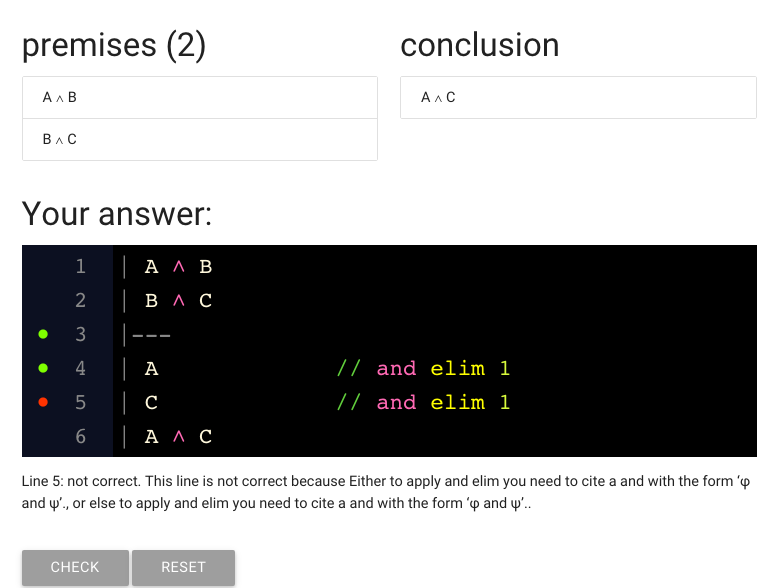
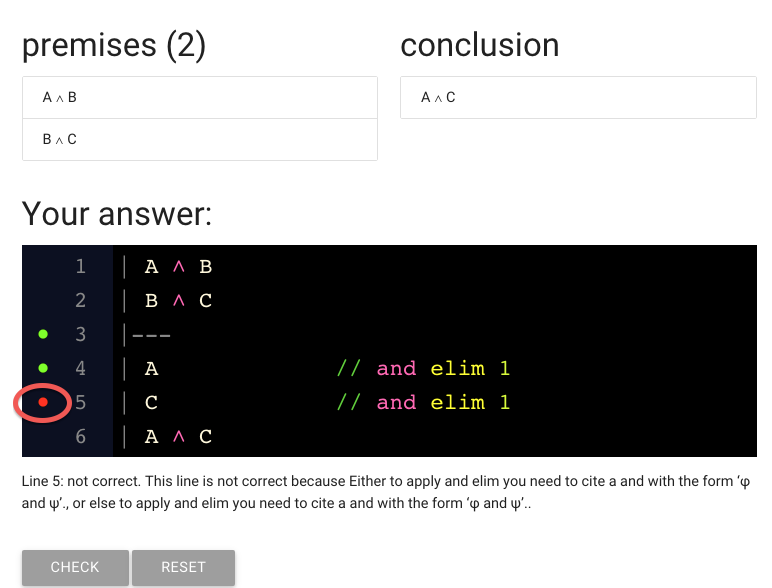
What could have gone wrong? Note that we’re citing line 1.

So let’s have a look at line 1.
This line contains ‘A and B’.
But actually we’re trying to derive C.
And you can’t derive C from A and B.
The C we want to derive is actually here, in line 2.
So we have to edit the line number.
(This kind of mistake tends to happen to me quite a bit because
I like to copy and paste justification to save typing)
Here I’ve fixed the line number.
What’s next?
There’s a big whole where the justification for the last line should be.
(Remember that every line of the proof is either a premise or needs justification.)

So I’ve gone ahead and added the justification.
But it hasn’t worked: we’ve got the red dot again.
Unless you’re really good at logic, you’re going to be seeing a lot of the red dot
for a few weeks.
Here’s the mistake: we’re still citing and elim.
But at this point we’re supposed to be *introducing* a conjunction
rather than eliminating one.

We can fix this just by deleting ‘elim’ and replacing it with ‘intro’
And here’s the finished proof.
This is correct; if you submit it, zoxiy should say your proof is correct.
6.1
5.3--5.6
\section{Symbols and Words}
\section{Symbols and Words}

∧Intro and ∨Intro: Compare and Contrast
\section{∧Intro and ∨Intro: Compare and Contrast}
\emph{Reading:} §6.1
\section{∧Intro and ∨Intro: Compare and Contrast}
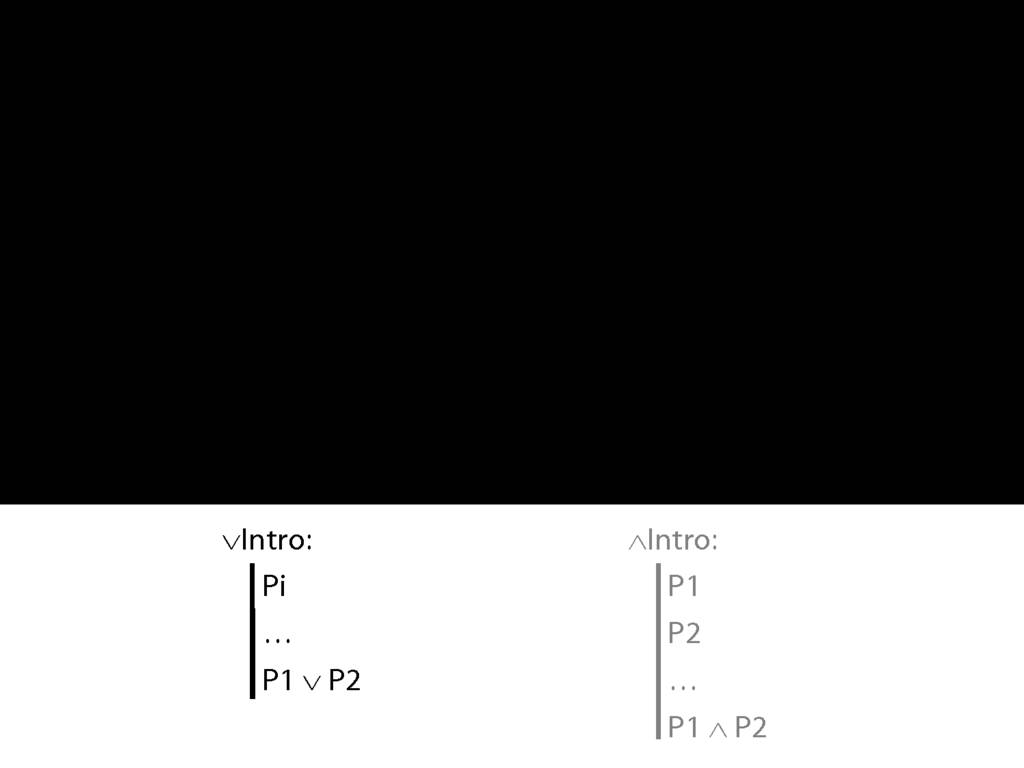
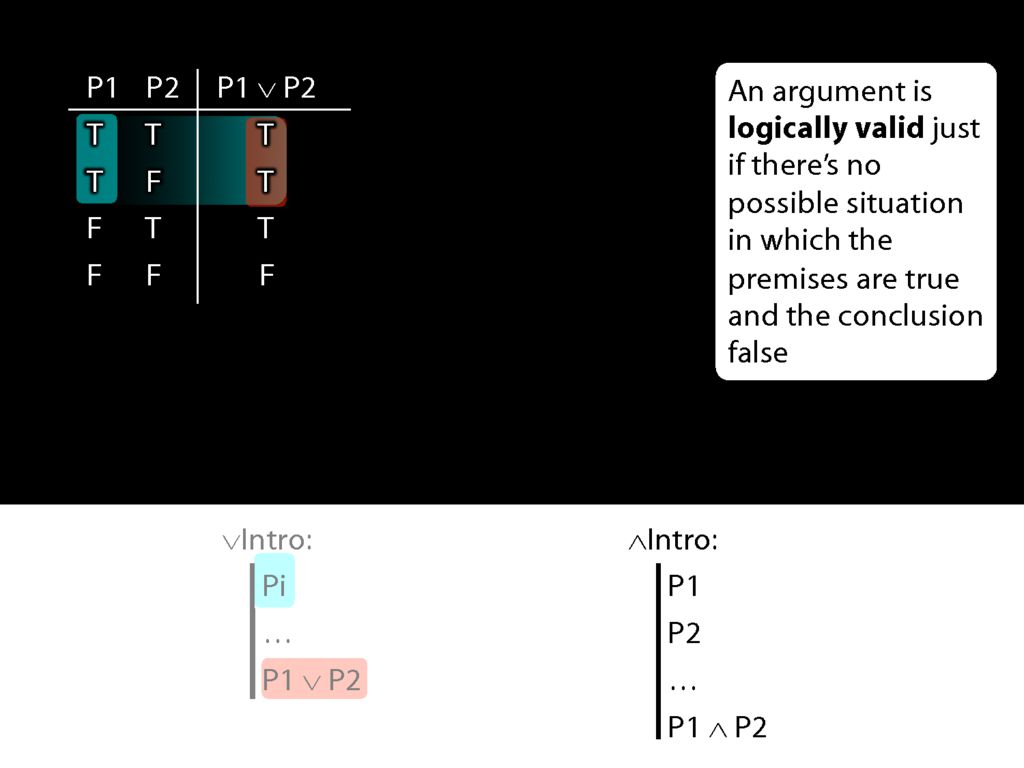
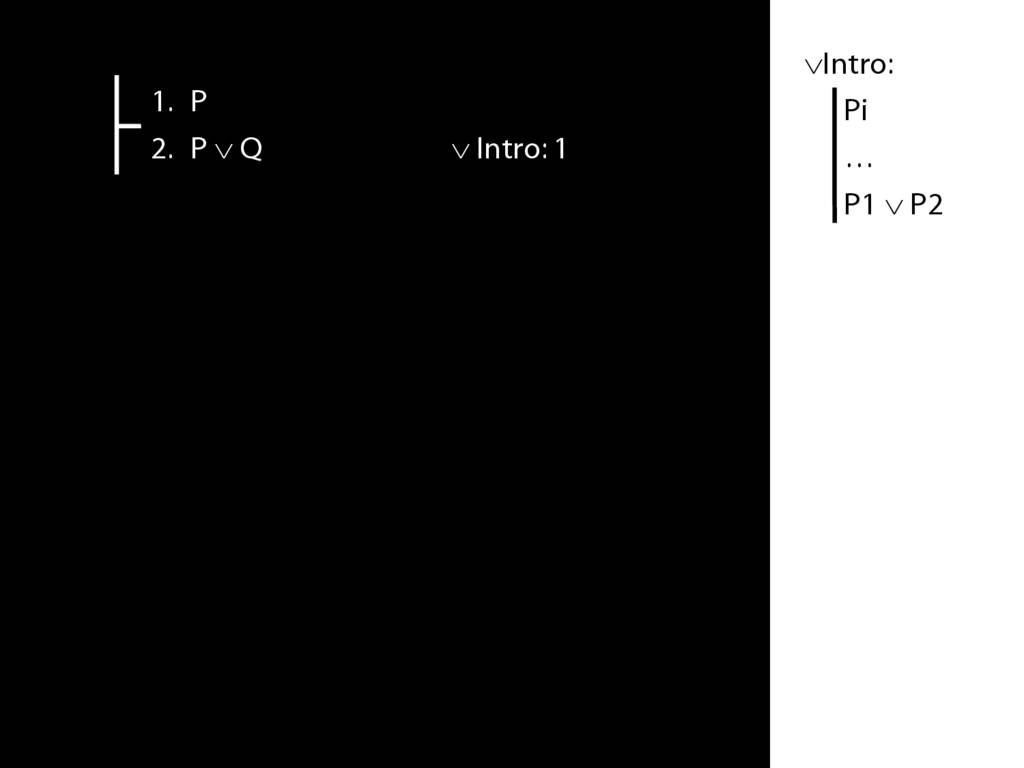
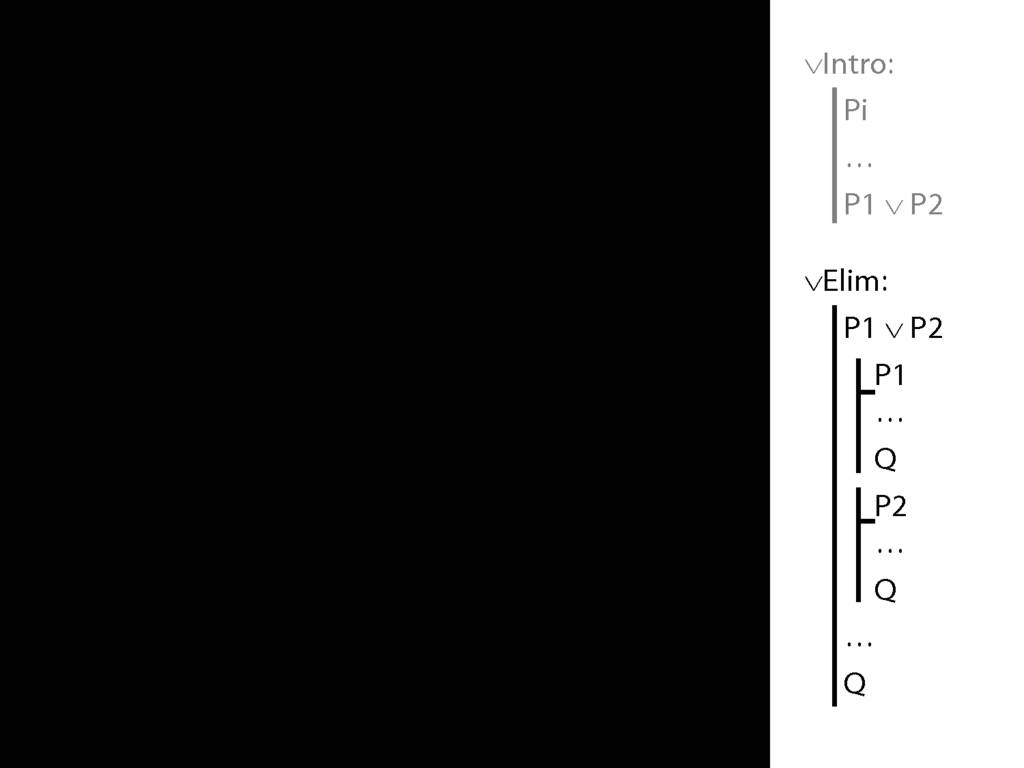
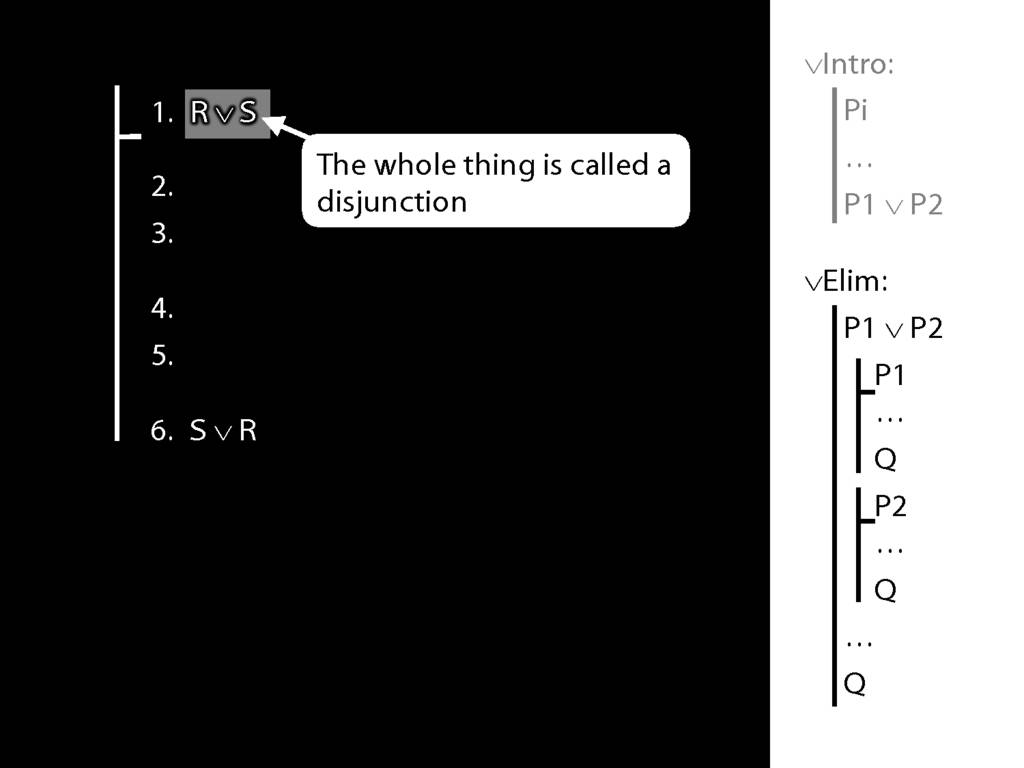
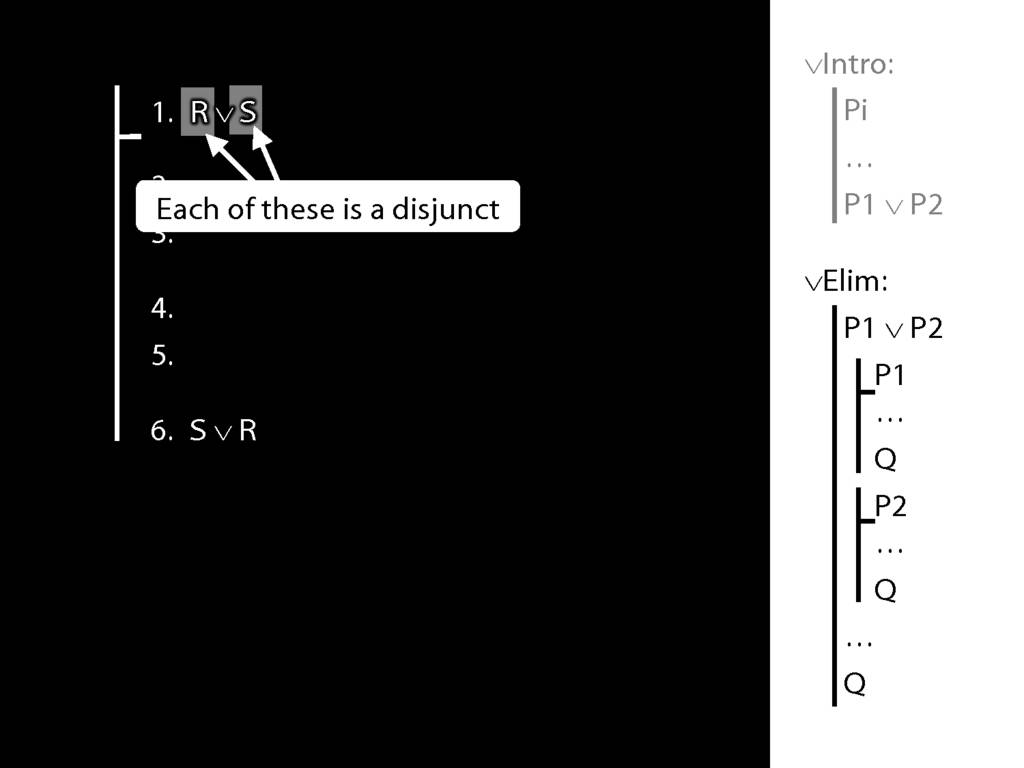
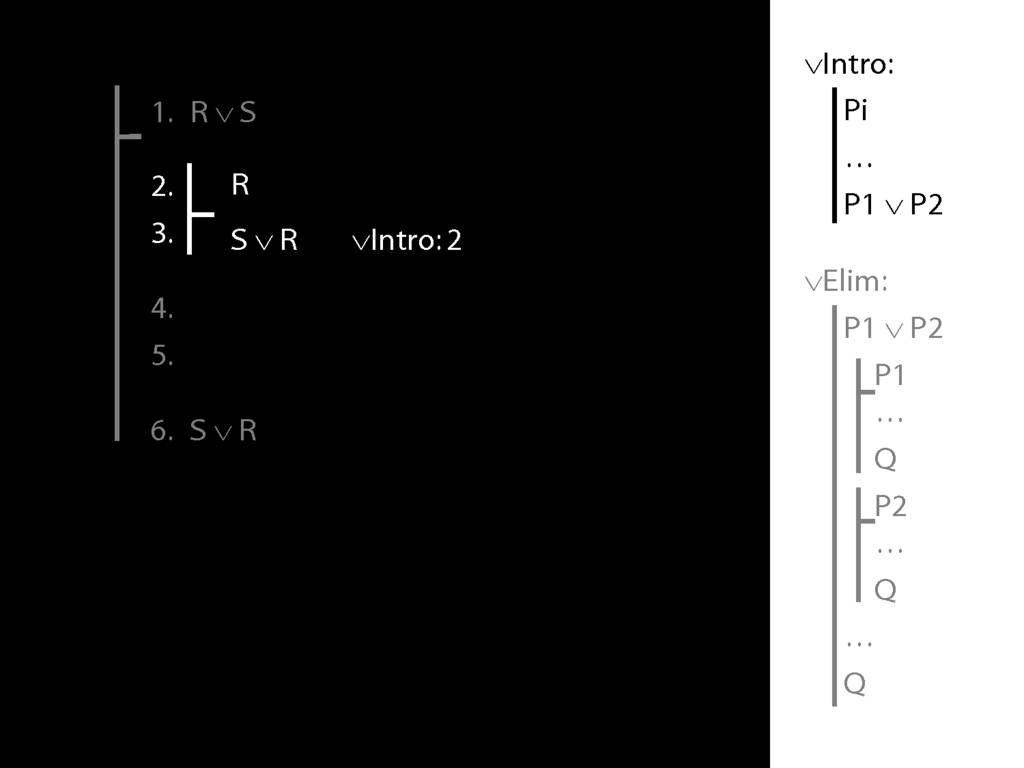
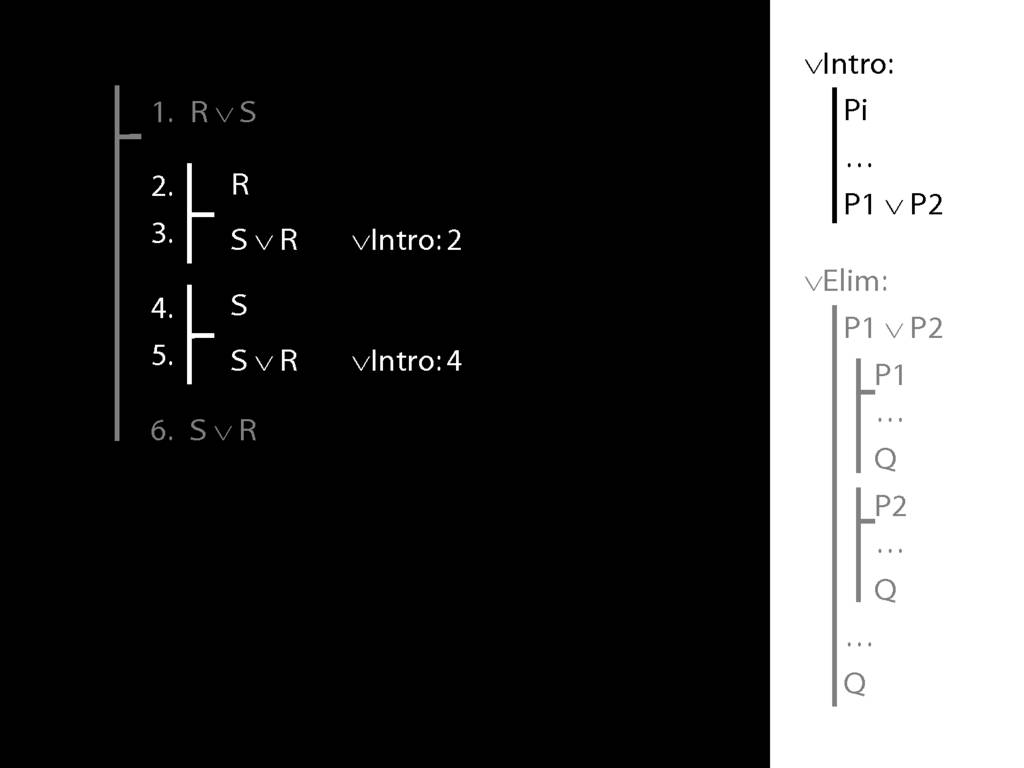
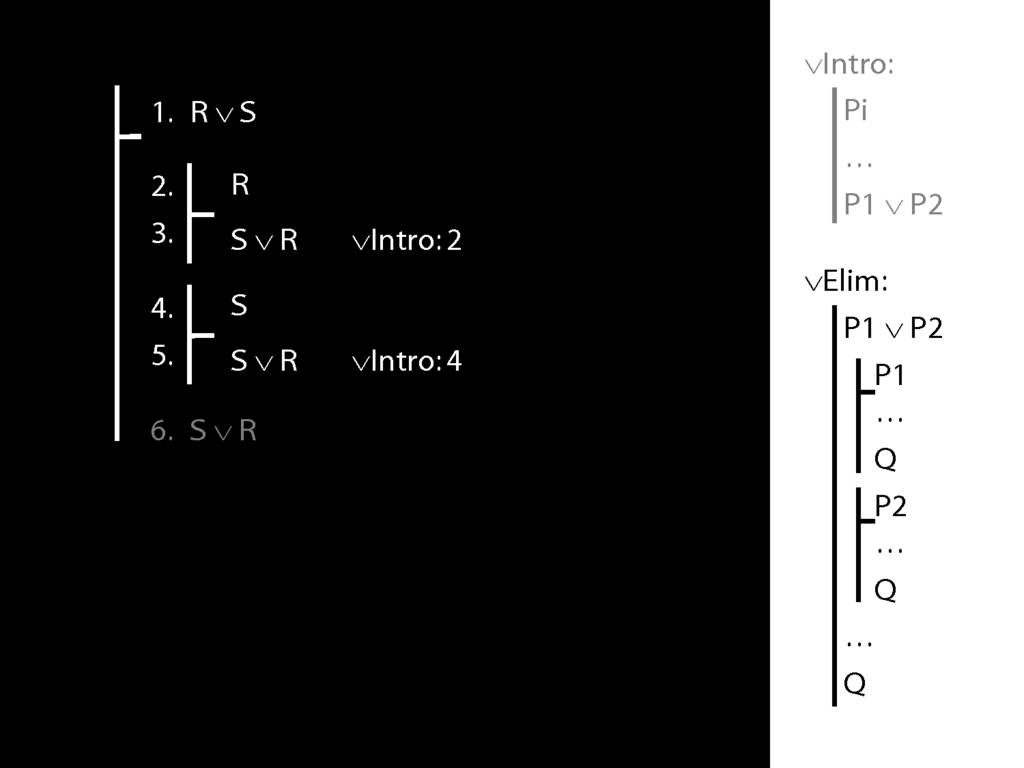
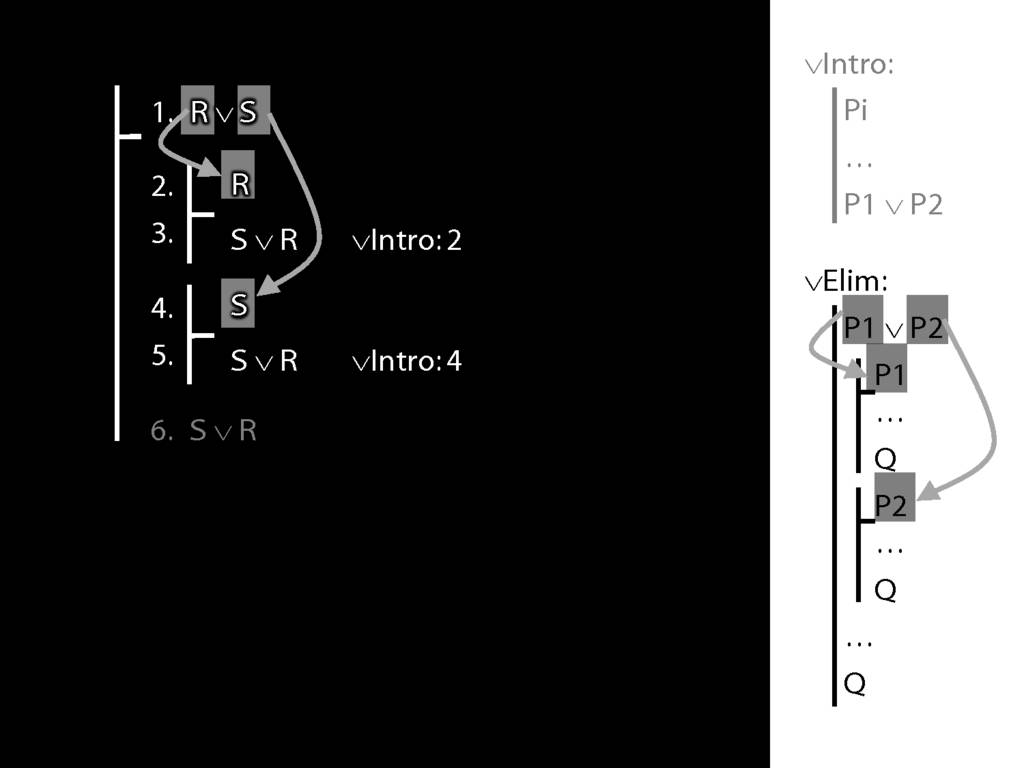
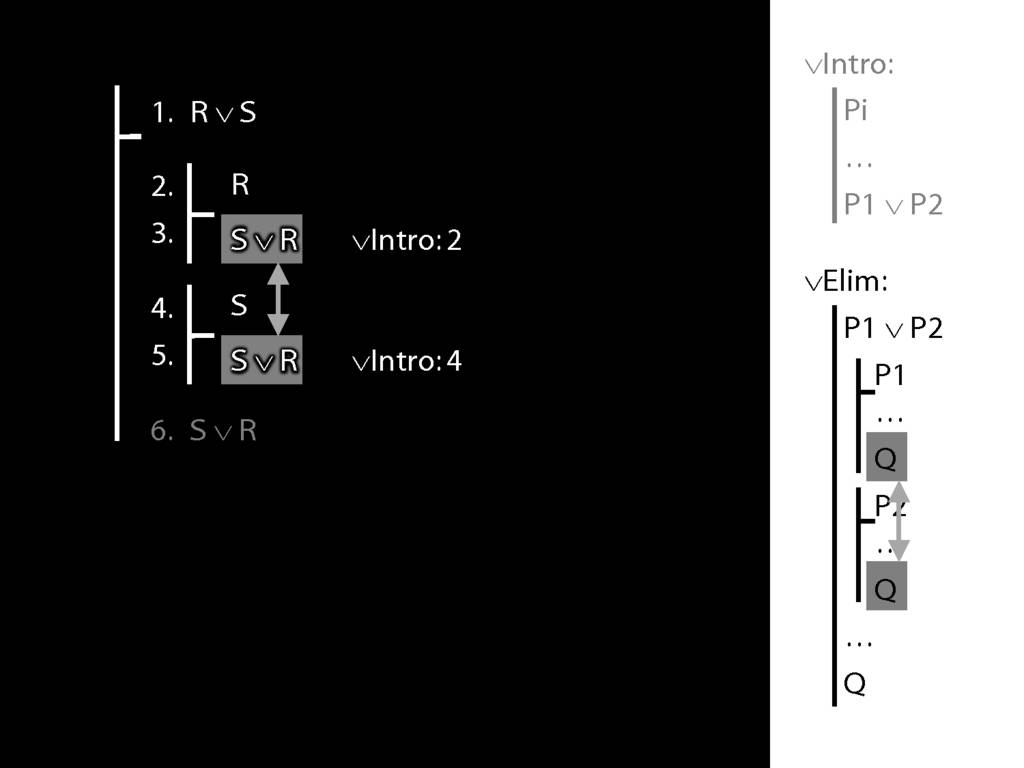
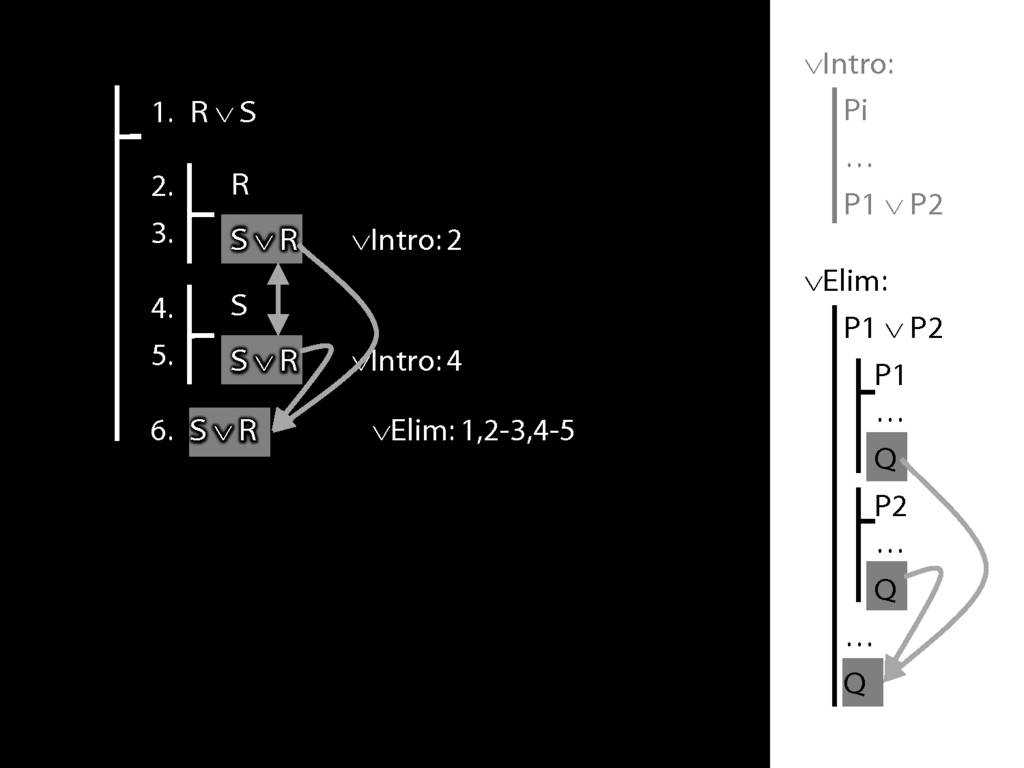
Here is a new rule of proof, called disjunction intro.
∨Intro is saying that if you have any sentence, you can add a line to your proof containing a disjunction of that sentence and any other sentence you like.
Explain ∨Intro with an example: if you know Ayesha is in the garden but don’t want to give this away but do want to speak the truth you can say “Ayesha is in the library or Ayesha is in the garden”.
The transition from 'Ayesha is in the garden' to 'Ayesha is in the garden or Ayesha is in the library' is the transition that disjunction intro allows you to make in formal proofs.
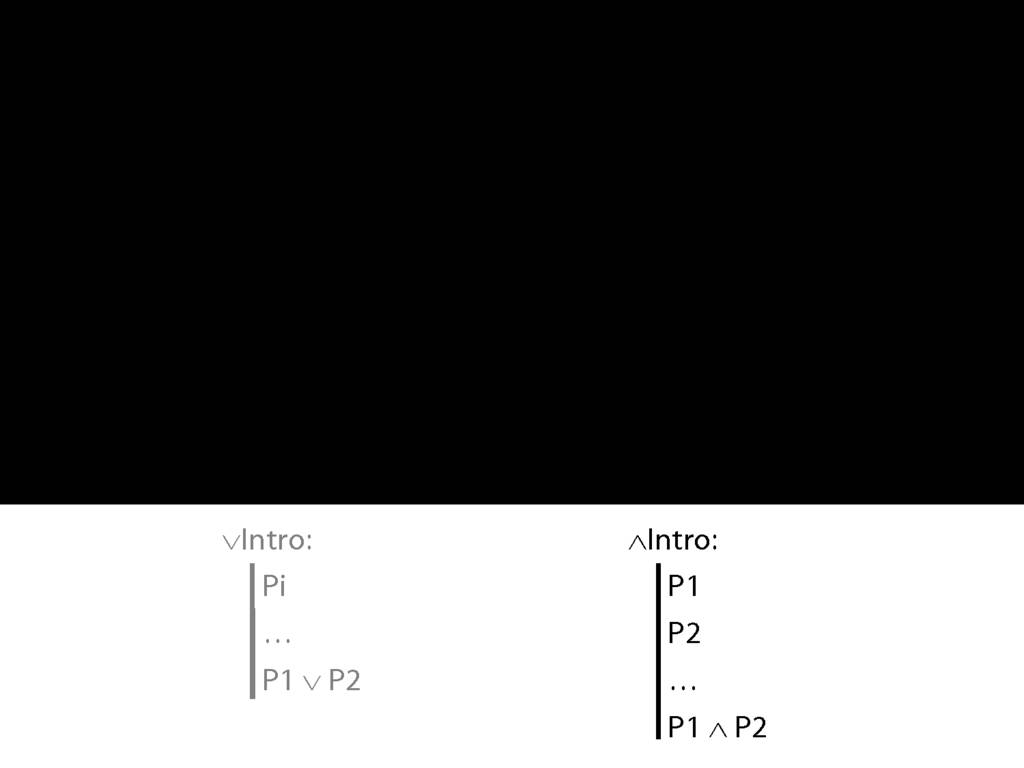
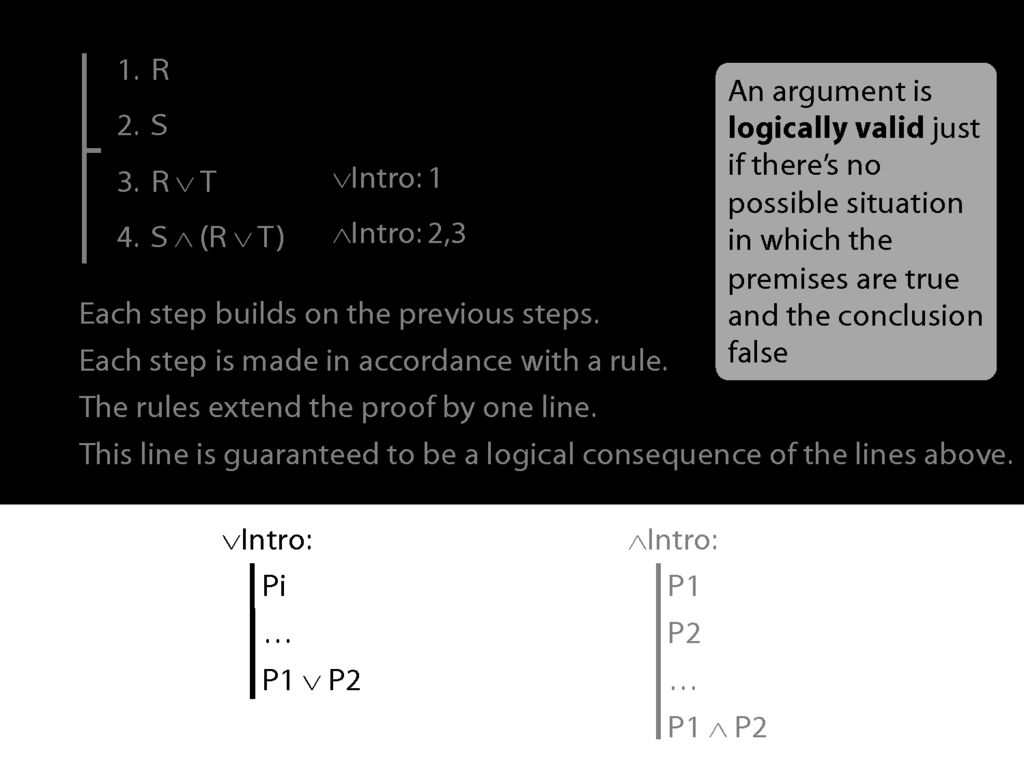
Contrast ∧Intro ...
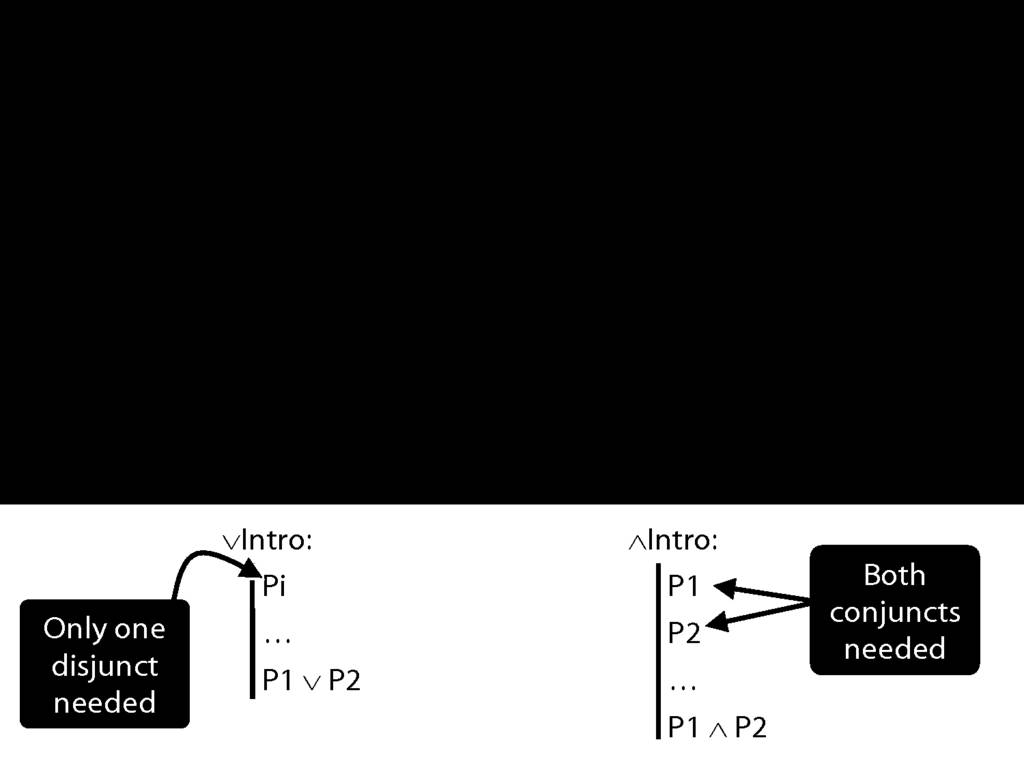
∧Intro is just like ∨Intro except that you need both conjuncts for ∧Intro.
Why should we have set things up like this? Why is using ∧Intro more demanding than using ∨Intro?
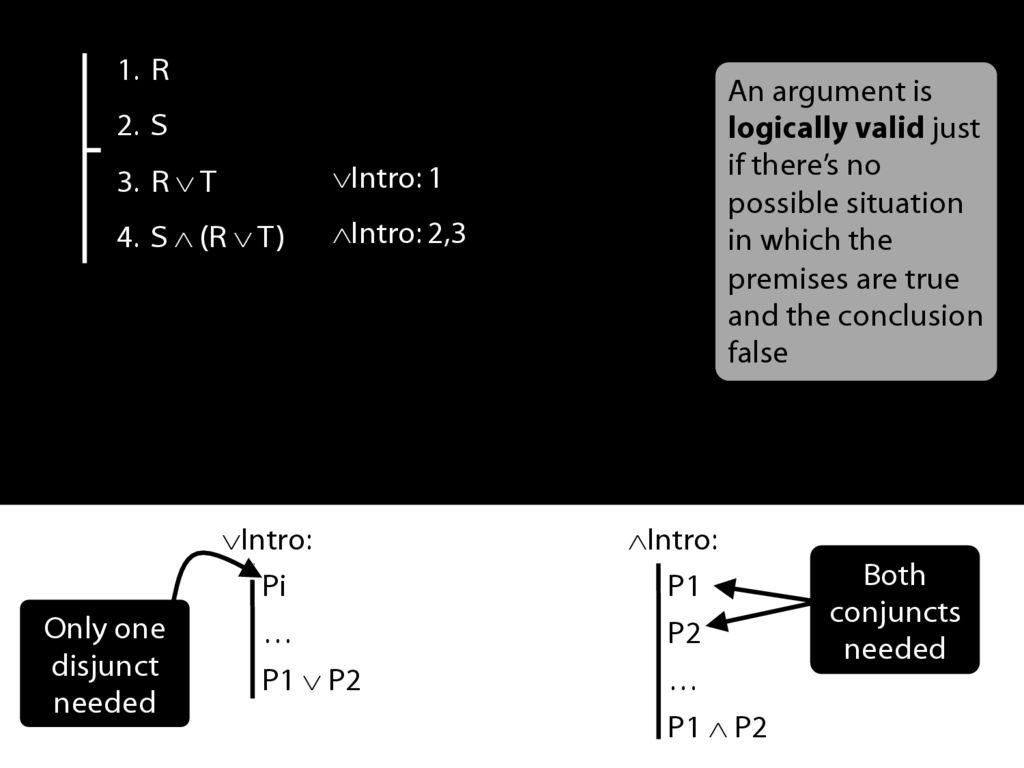
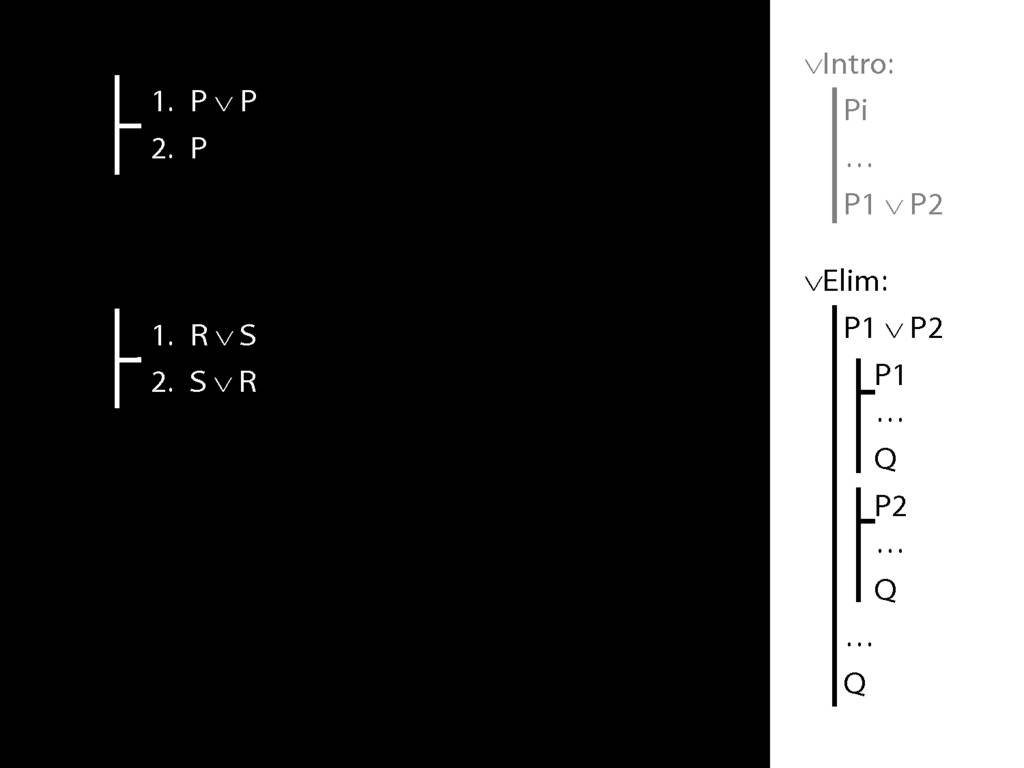
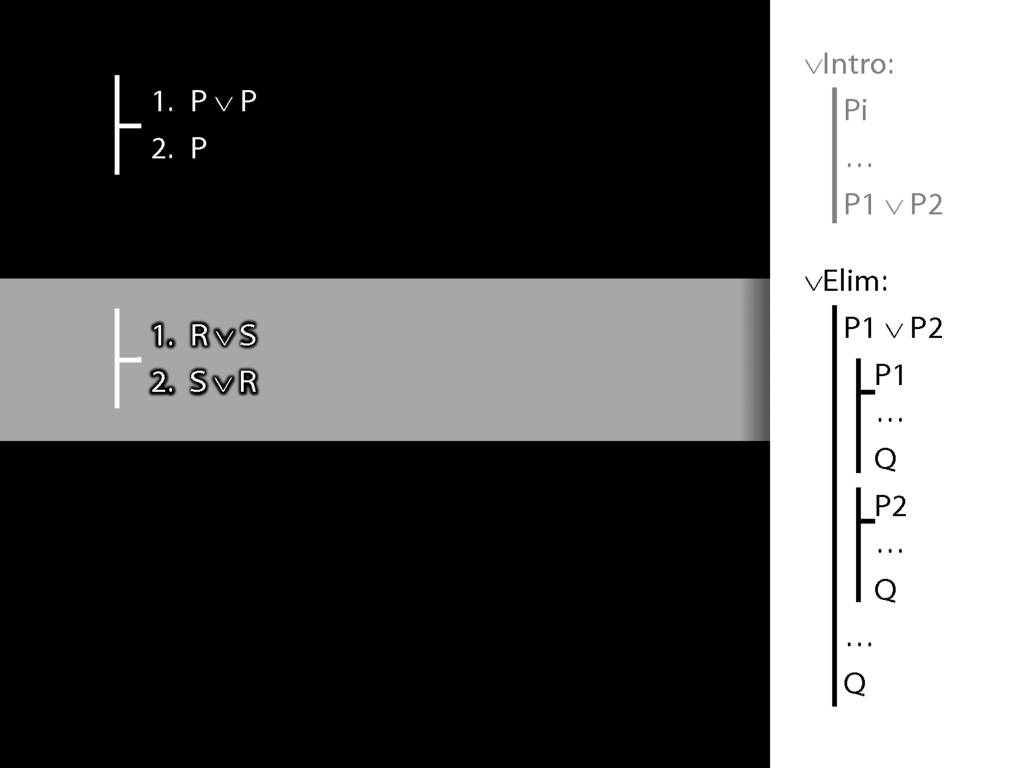
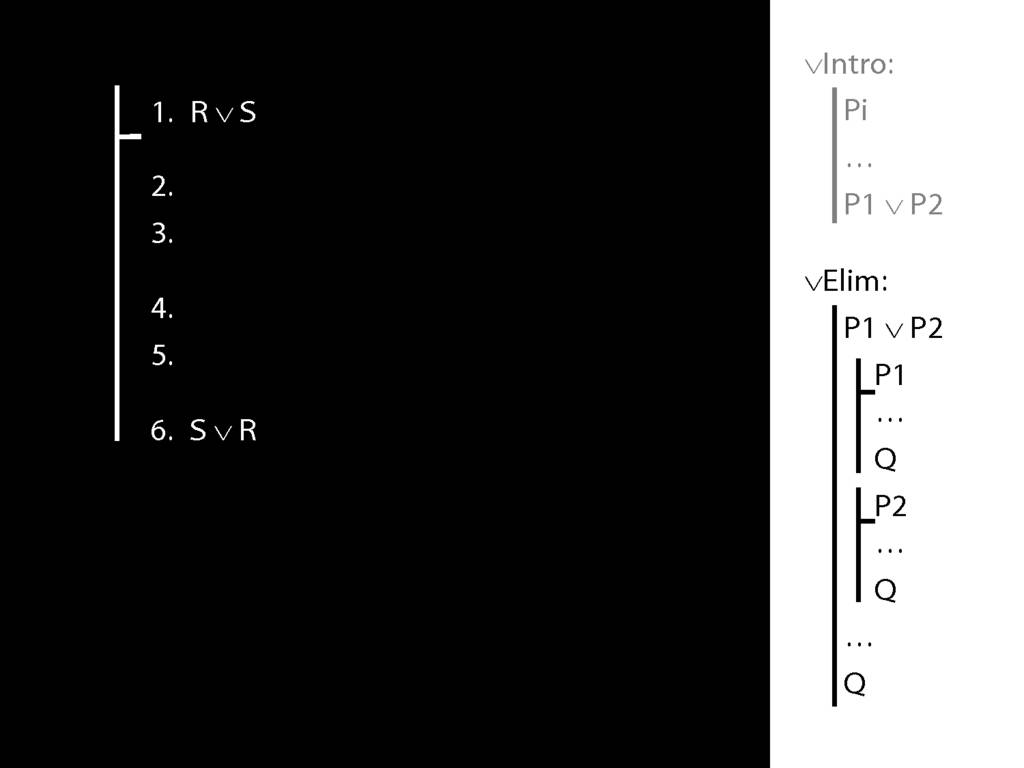
Let's have a look at a proof involving these two rules.
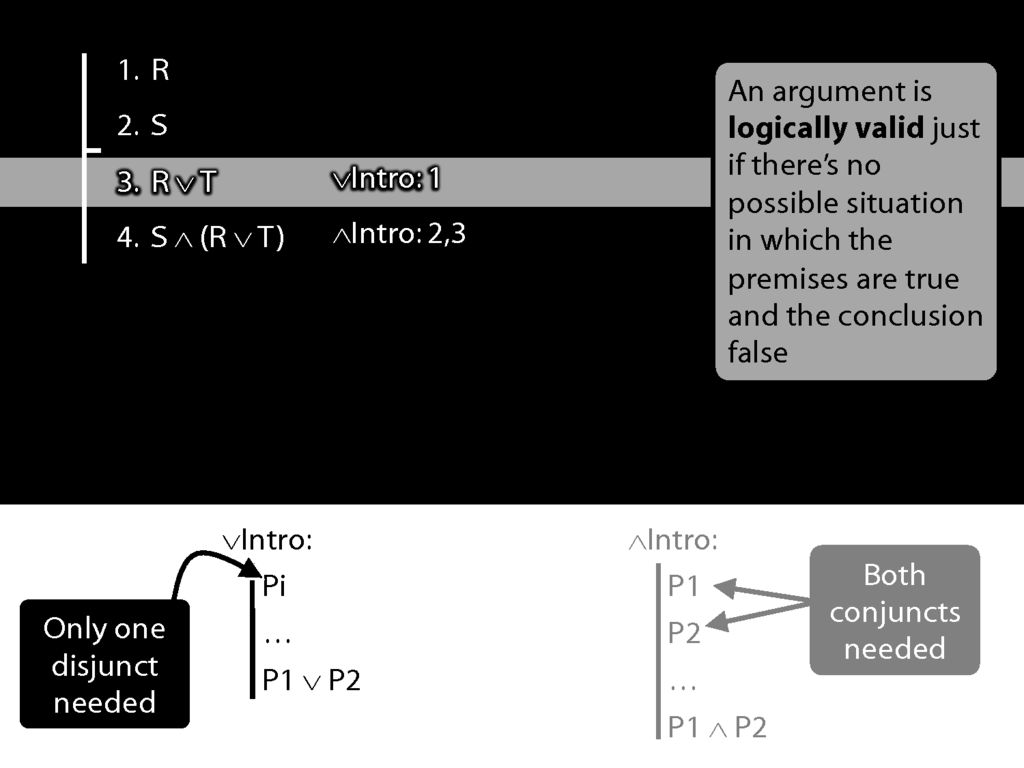
We're using ∨Intro at line 3 to get R∨T.
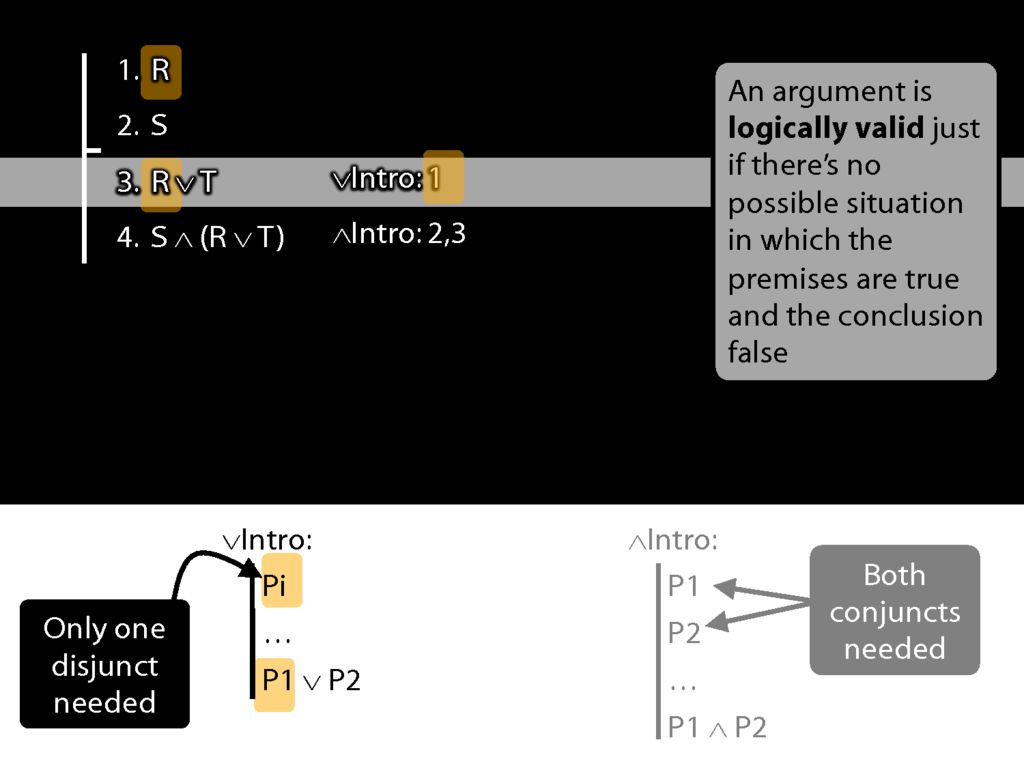
See how what we've done matches the rule. (Sometimes people ask, Where does the T come from? The answer is: it just comes from nowhere.)
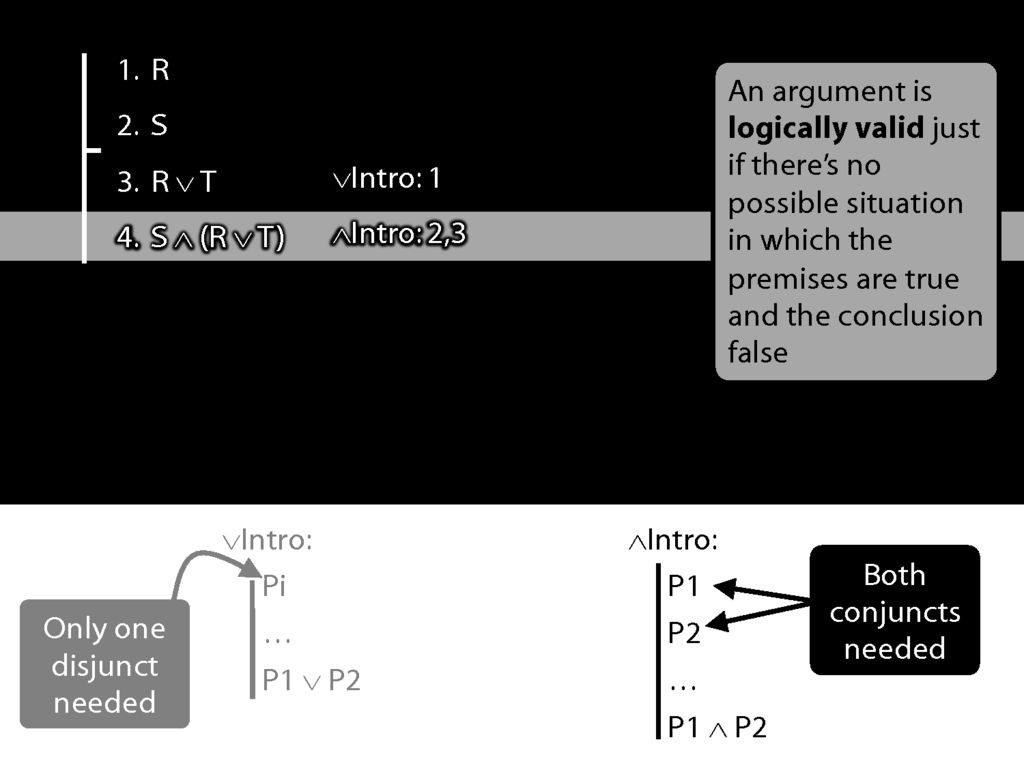
Now we're using ∧Intro.
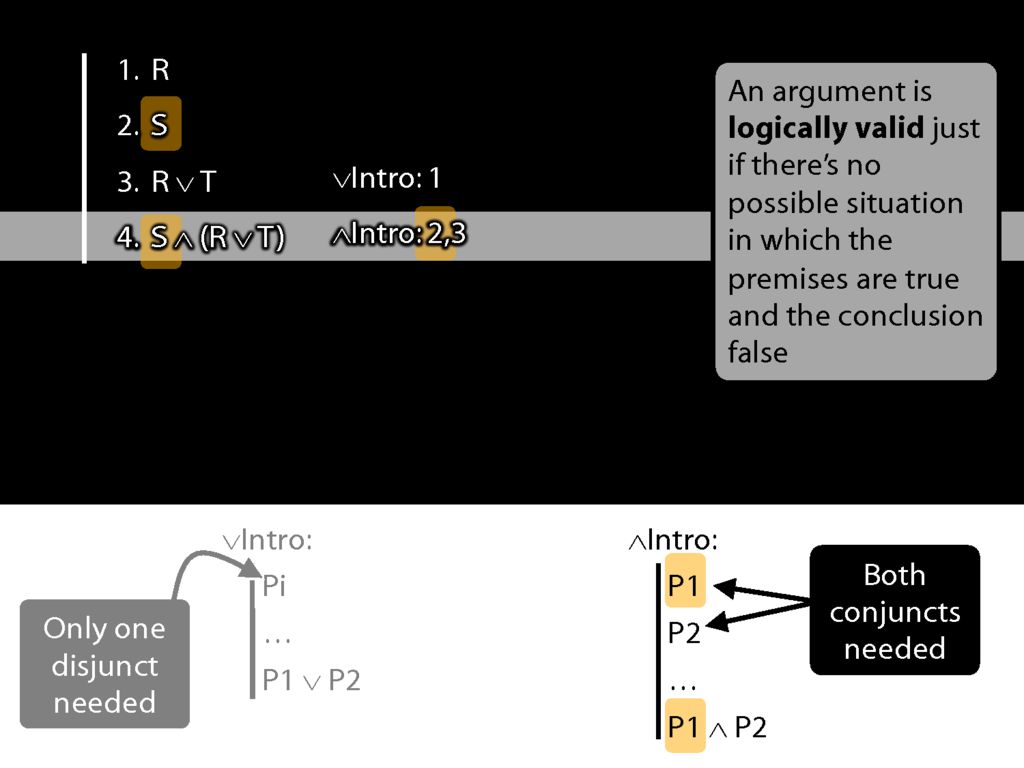
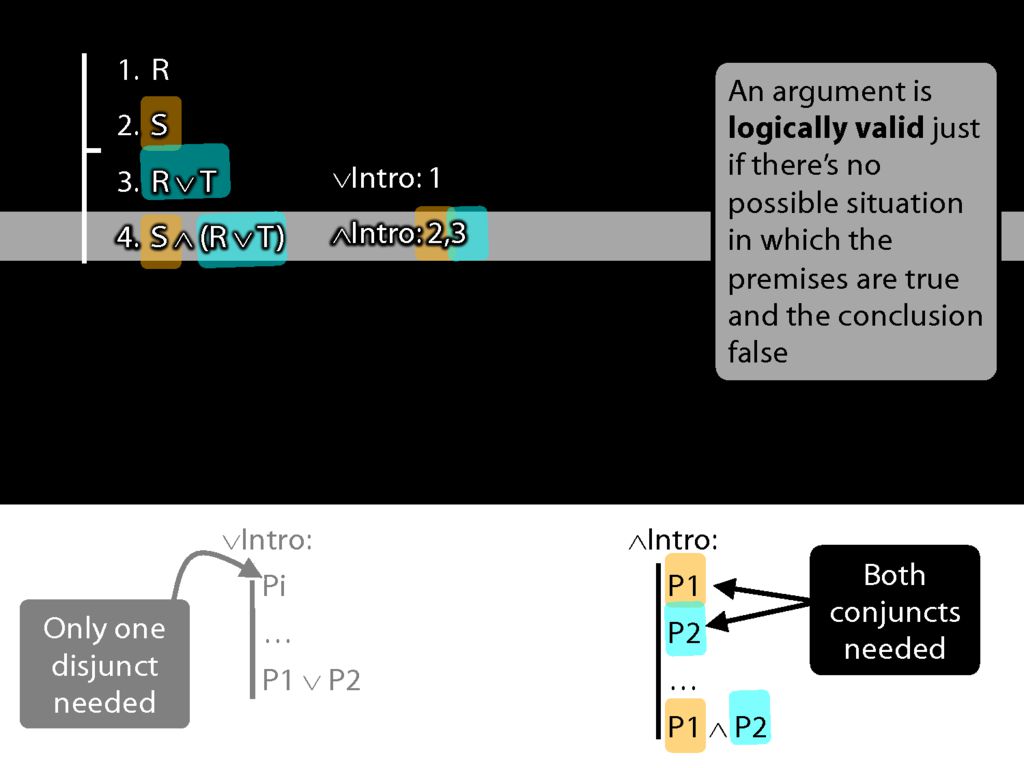
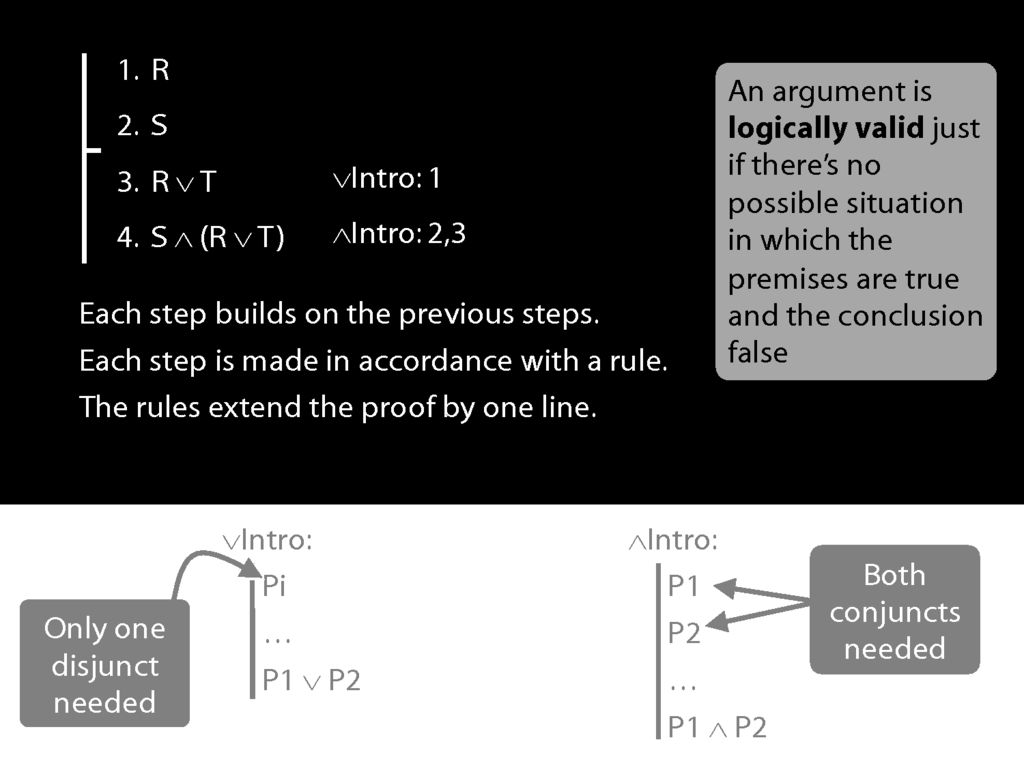
Note some properties of the proof:
Each step builds on the previous steps; each step is made in accordance with a rule; and the rules we've seen so far extend the proof by one line.
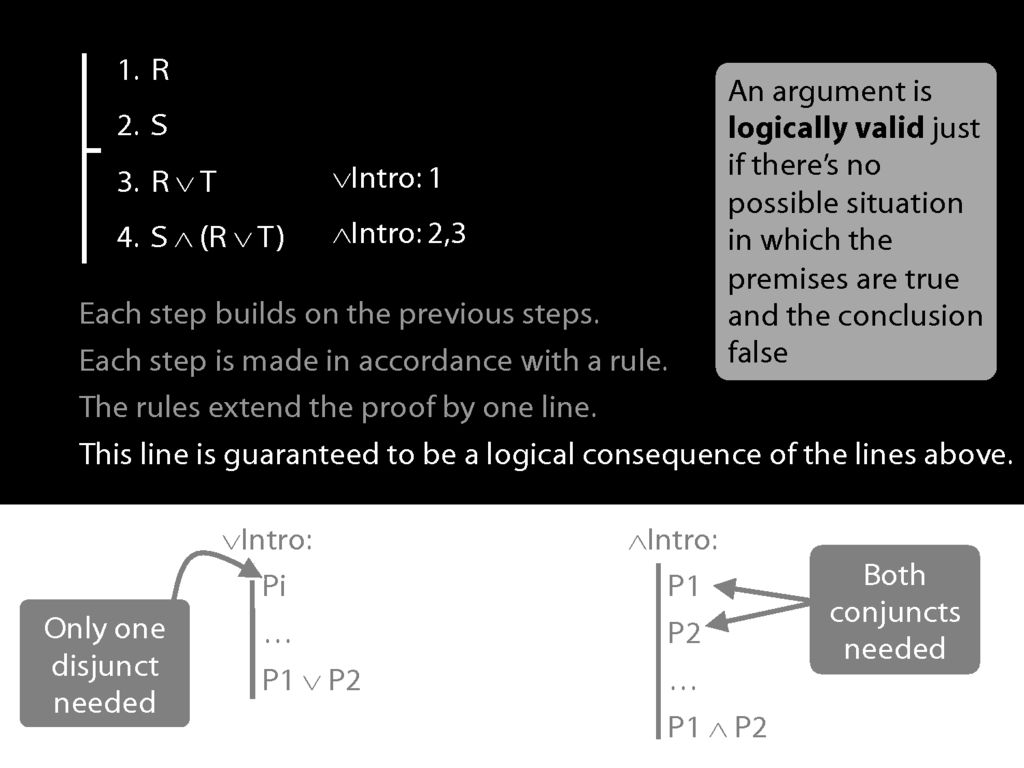
The most important property, though is this: The new line is guaranteed to be a logical consequence of the lines above.
Let me illustrate ...
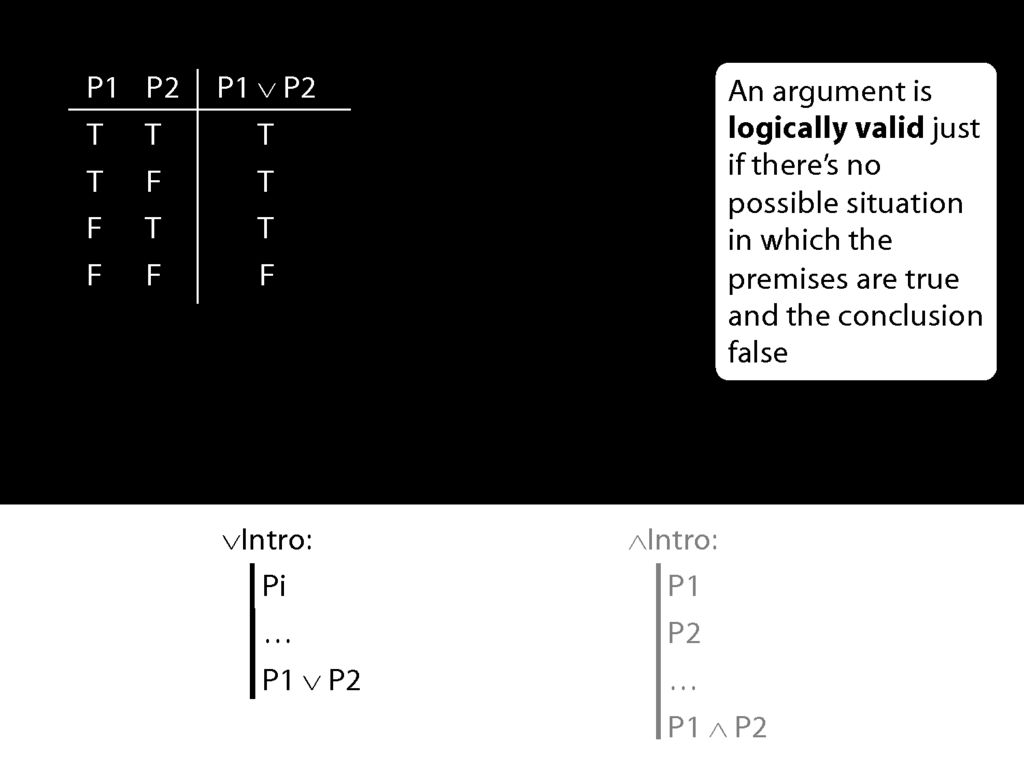
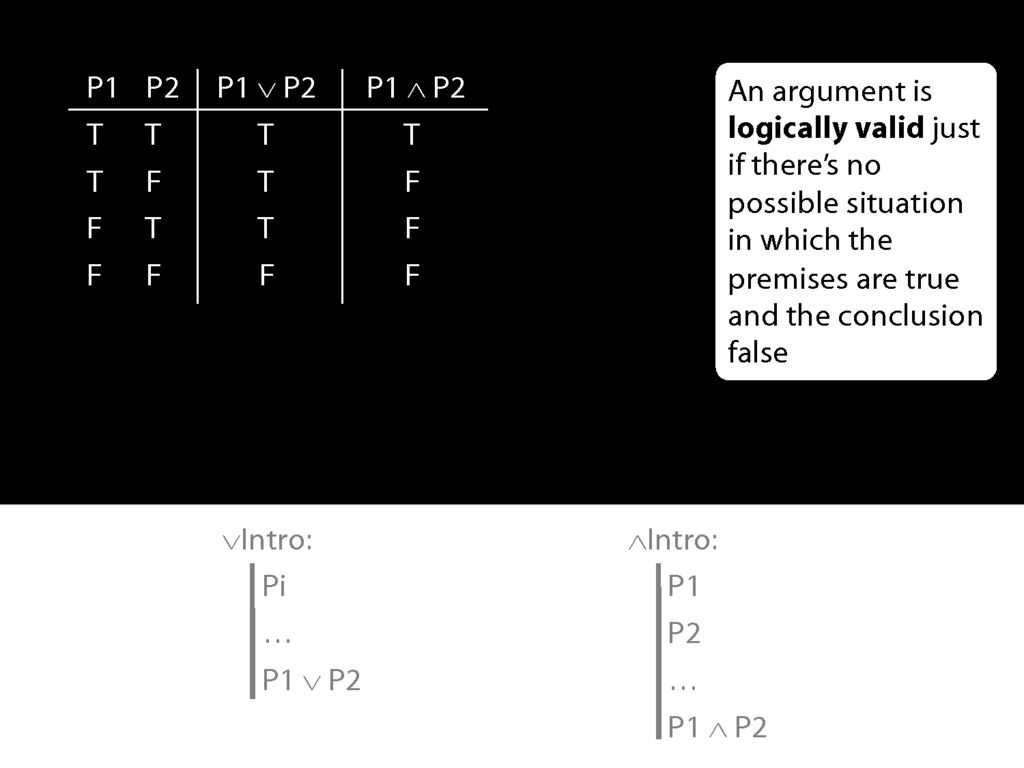
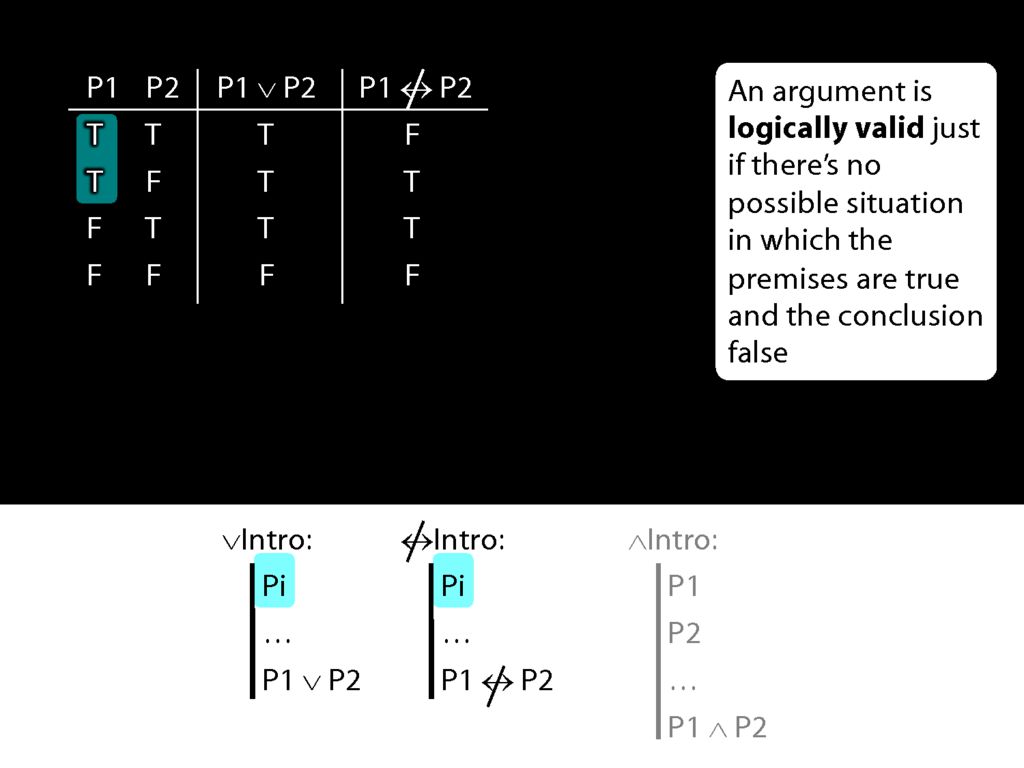
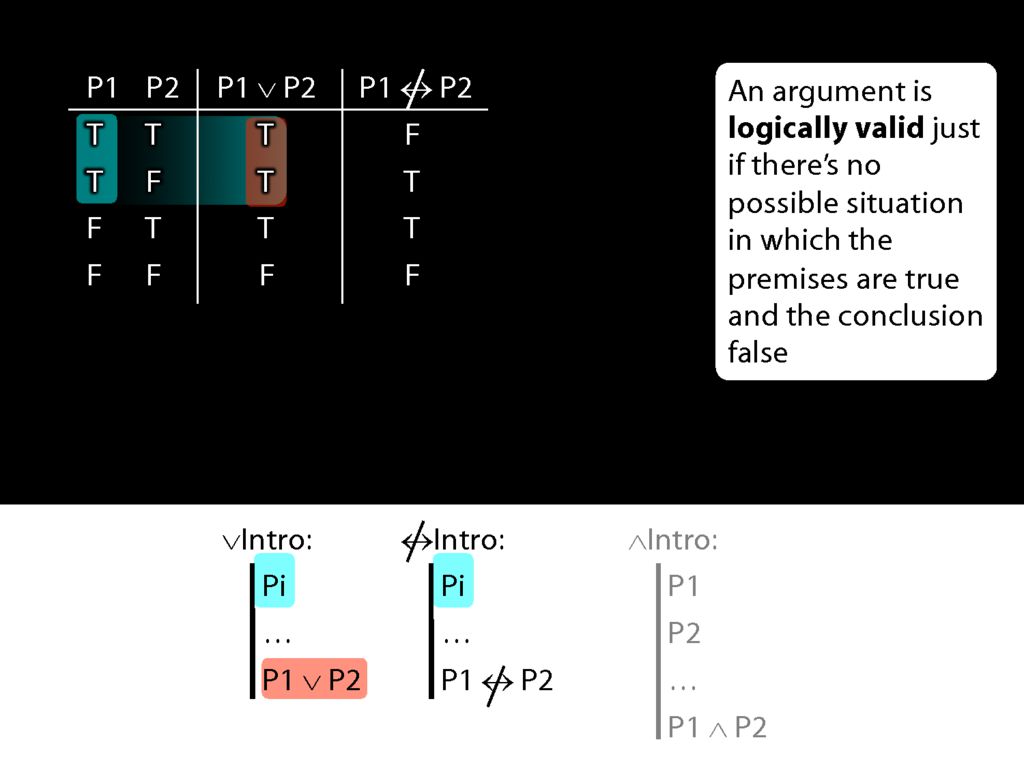
Consider the truth table for disjunction.
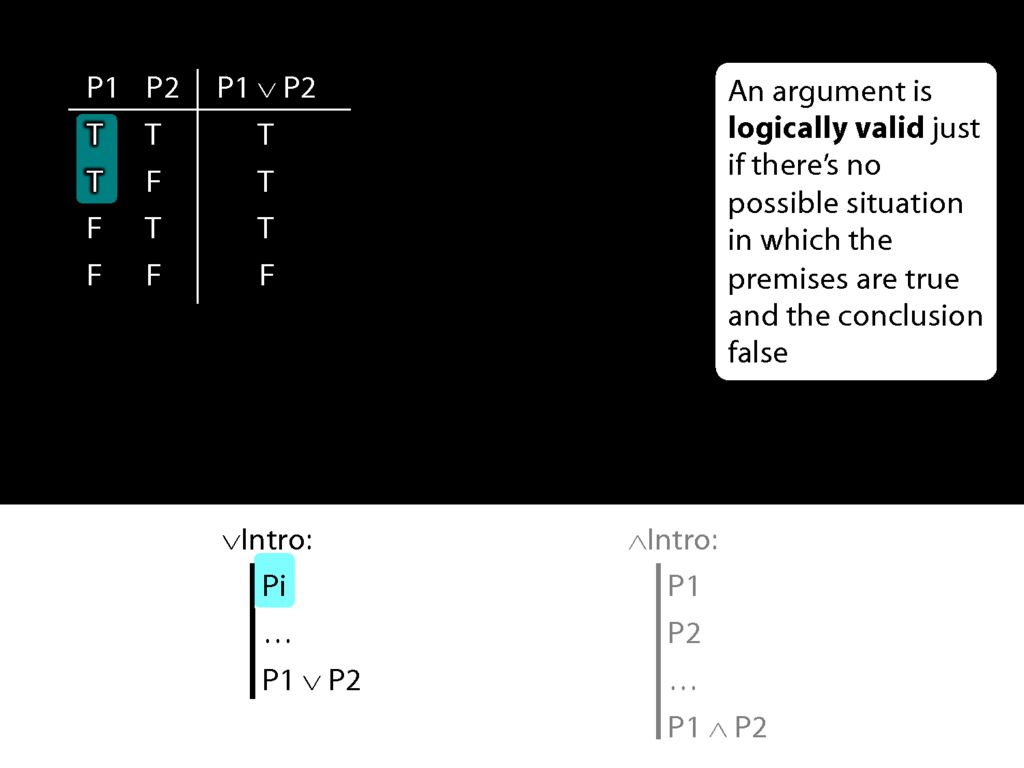
What happens when the prerequiste for the disjunction-intro rule is true? In that case, we're in the first two rows of the truth table.
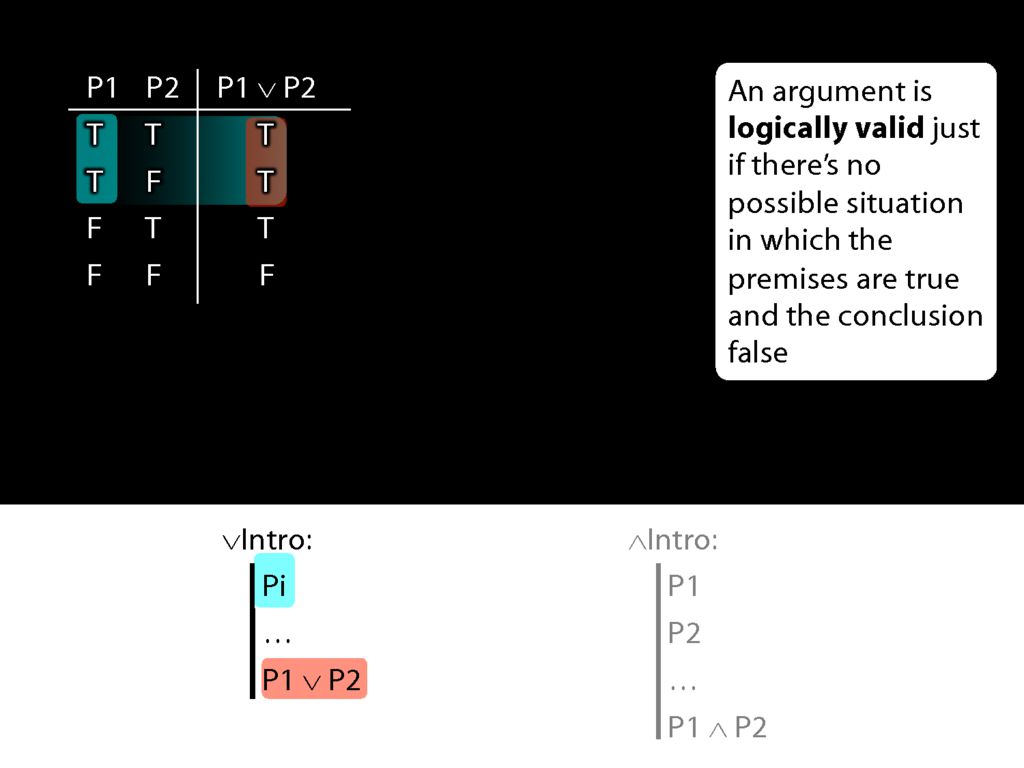
And in those first two rows, the disjunction which the rule adds to the proof is true.
So given the truth table, we can see that disjunction-intro will never take us from a truth to a falsehood; from a truth we can only reach another truth using disjunction-intro.
Now look at conjunction intro.

Here's the truth table for conjunction.
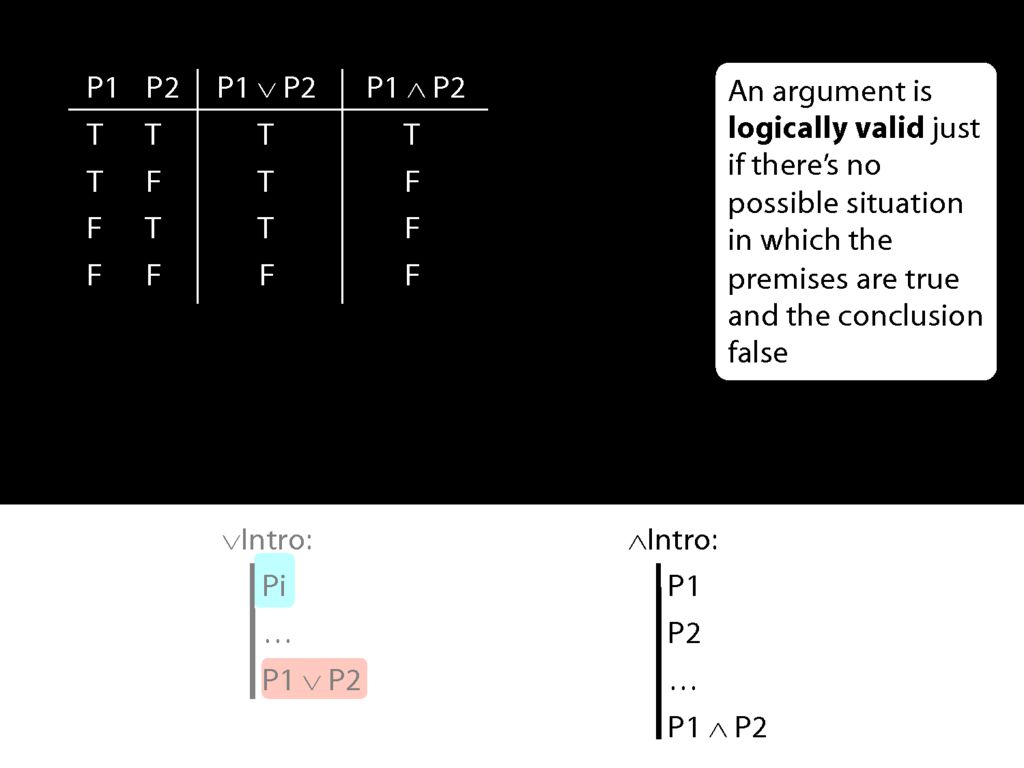
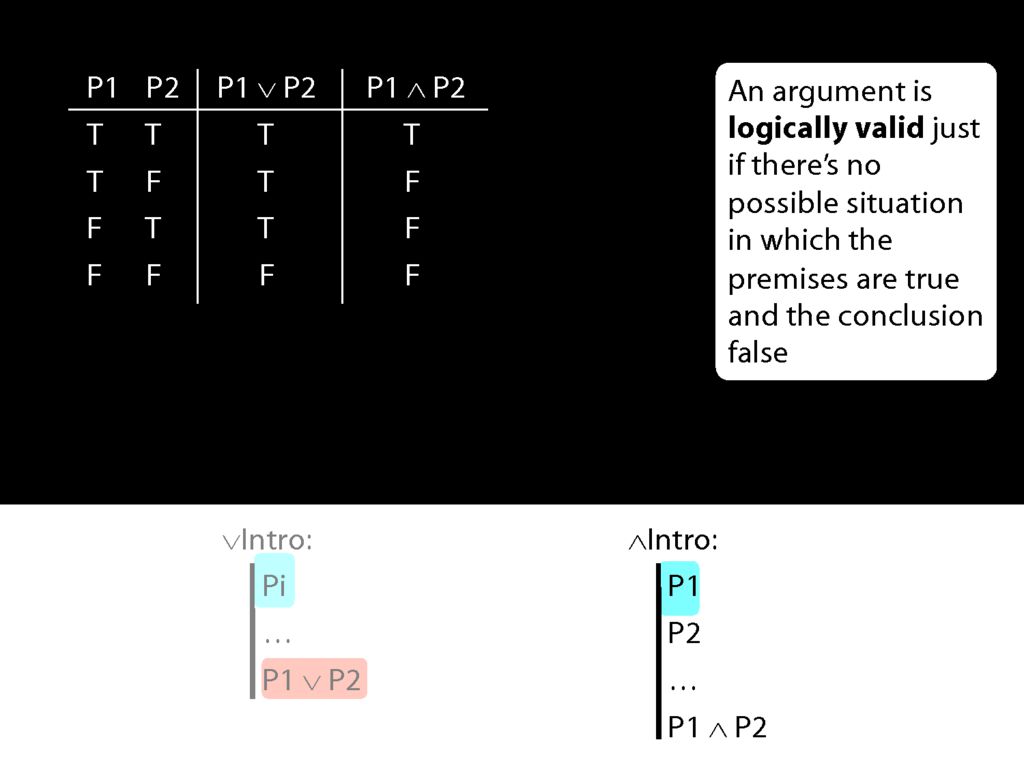
Now what happens when the first prerequisite for conjunction introduction is true?

In that case, we're in the first two rows of the truth table.
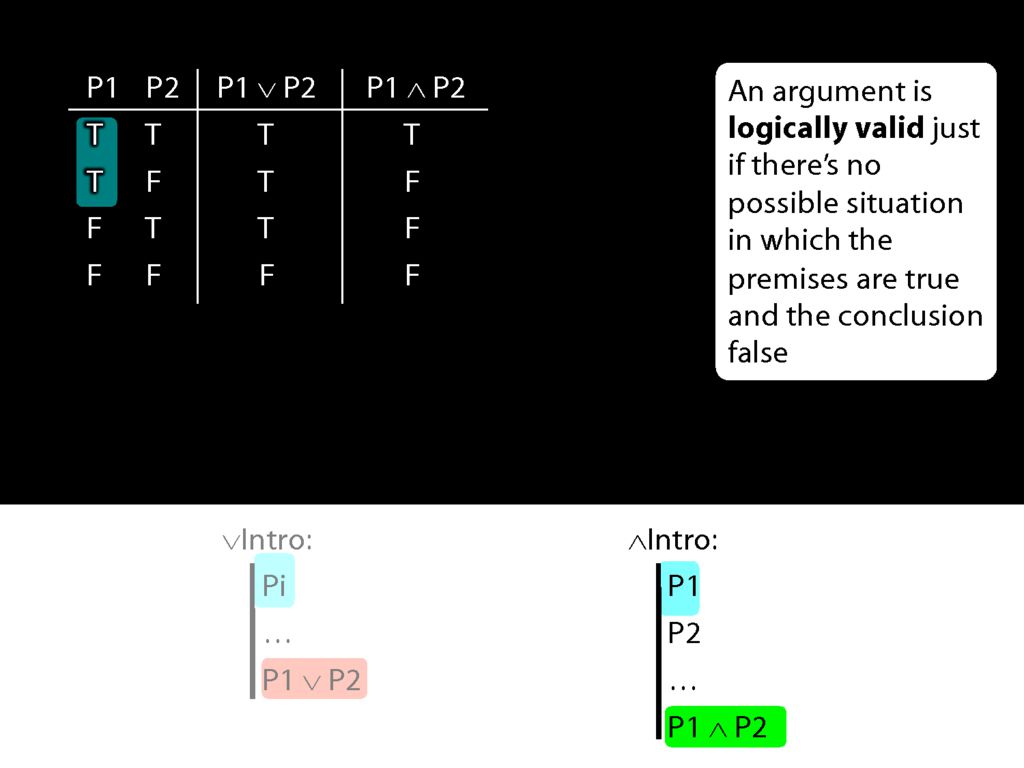
What is the truth value of the conjunction which conjunction-introduction adds to the proof in these rows of the truth table?
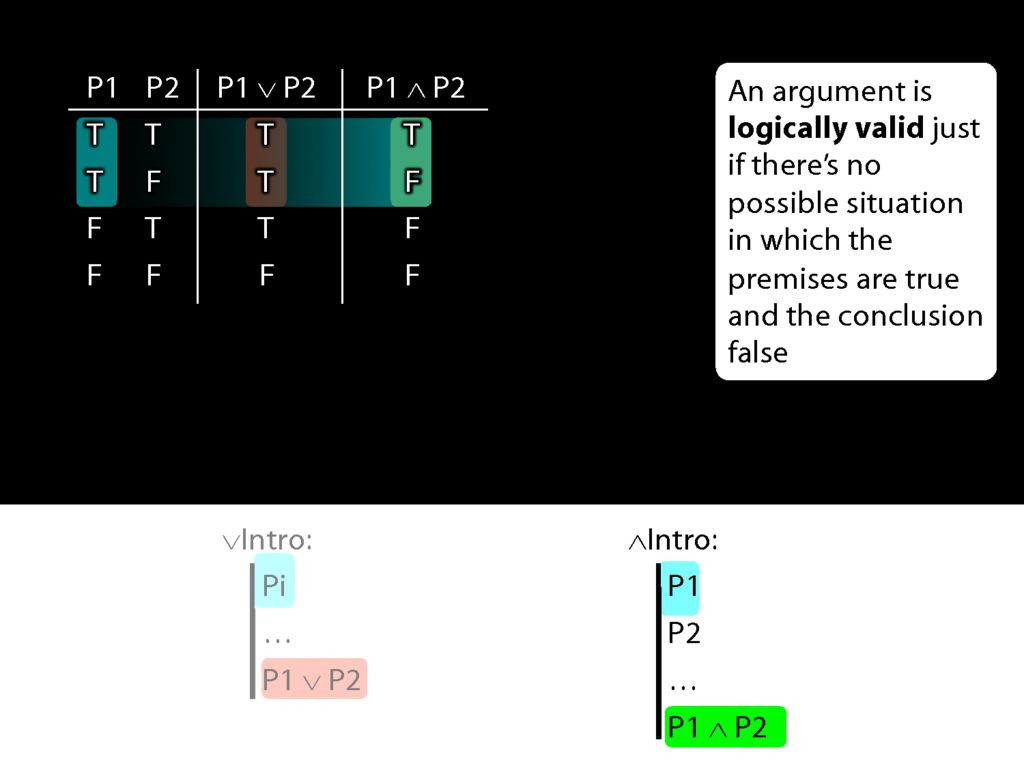
Actually this conjunction is true is one row and false in the other.
So when P1 is true, P1∧P2 is sometimes true and sometimes false.
This means that if conjunction-intro required just one conjunct, it would sometimes take us from a truth to a falsehood.
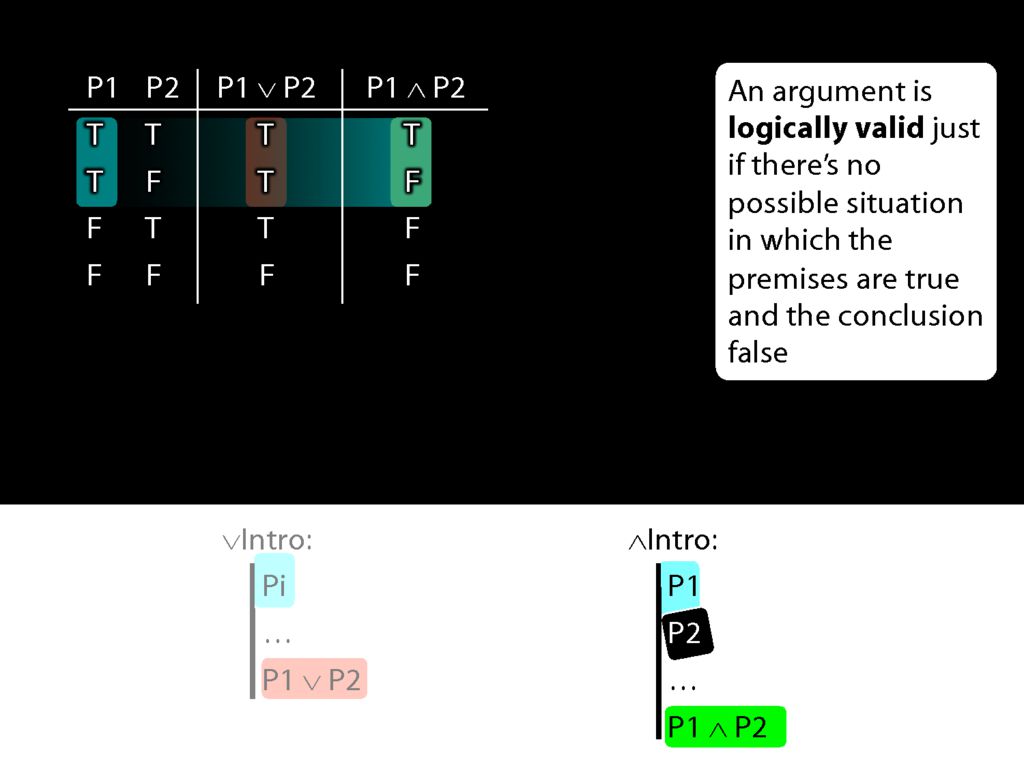
But actually conjunction-intro requires that we already have both conjuncts in our proof.
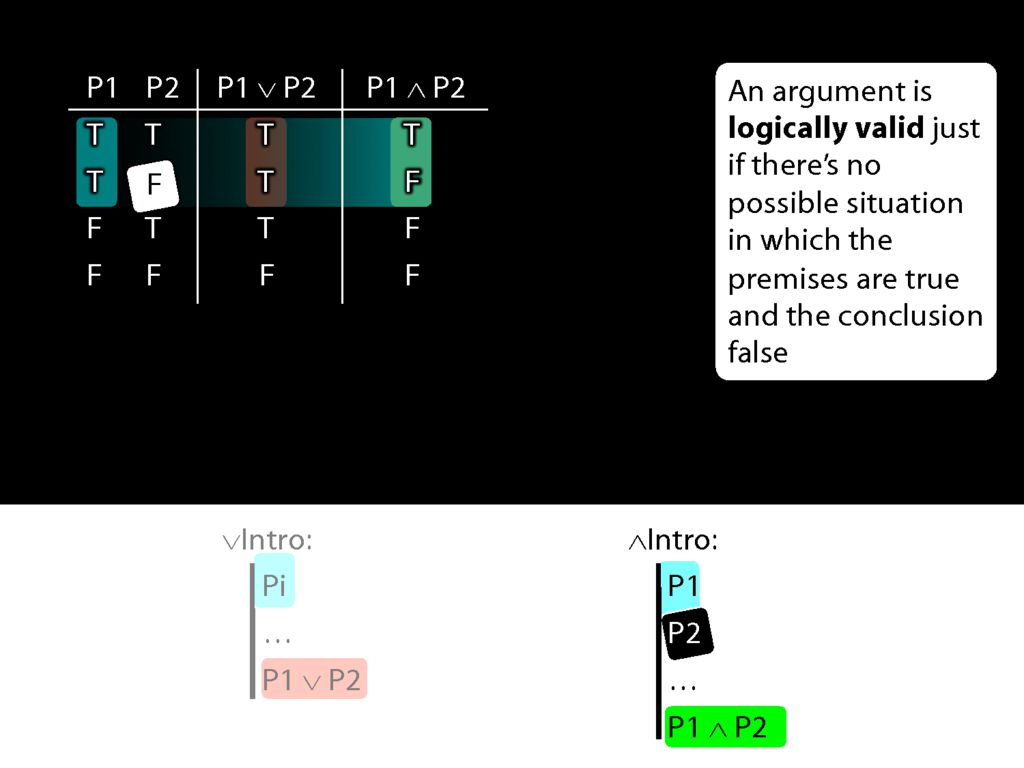
So if both pre-requisites for using conjuncton introduction are true, then we can't be in the second row of the truth table.
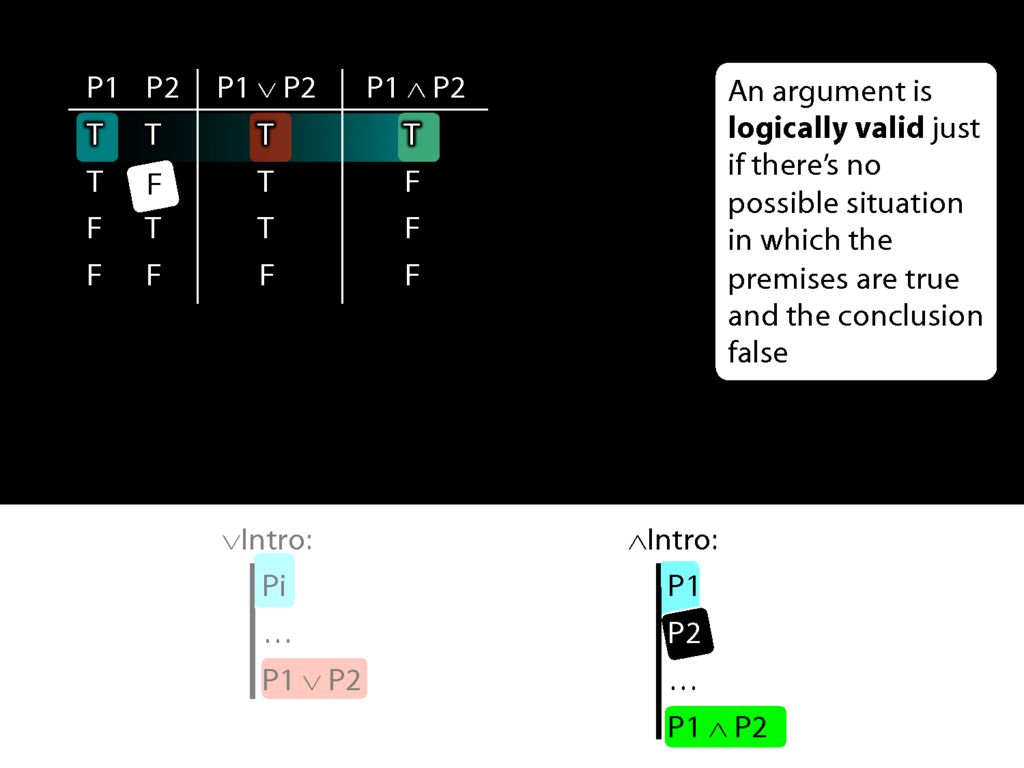
And this means that when everything conjunction-intro requires is true, then the conjunction it allows us to introduce must always be true.
Earlier I asked, Why is using ∧Intro more demanding than using ∨Intro? Now we can see exactly what the answer is.
Speaking entirely formally, we can use whatever rules we like.
But we want our rules to mirror logical validity--given truths, we want them to take us only to truths. We want them never to take us from truth to falsehood.
For this reason, given the truth table for conjunction, ∧Intro has to require that we already have both conjuncts.

Let me make the same point by introducing a new connective.

Suppose we have a connective called 'is not eqivalent' and we stipulate this introduction rule.
\begin{minipage}{\columnwidth}
Let us define a new connective with this truth table:
\end{minipage}
\begin{minipage}{\columnwidth}
The following rule is unacceptable. Why?
\end{minipage}
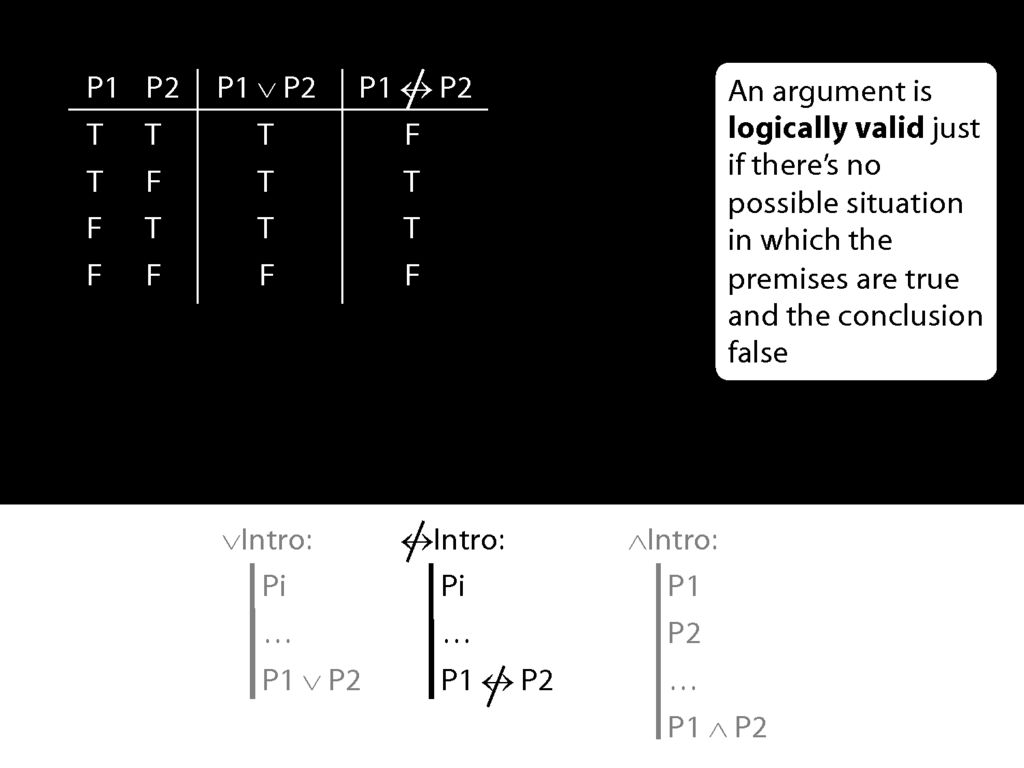
Suppose also that our new connective has this truth table, so that the 'P1 is not eqivalent to P2' is true exactly when P1 and P2 have different truth values.
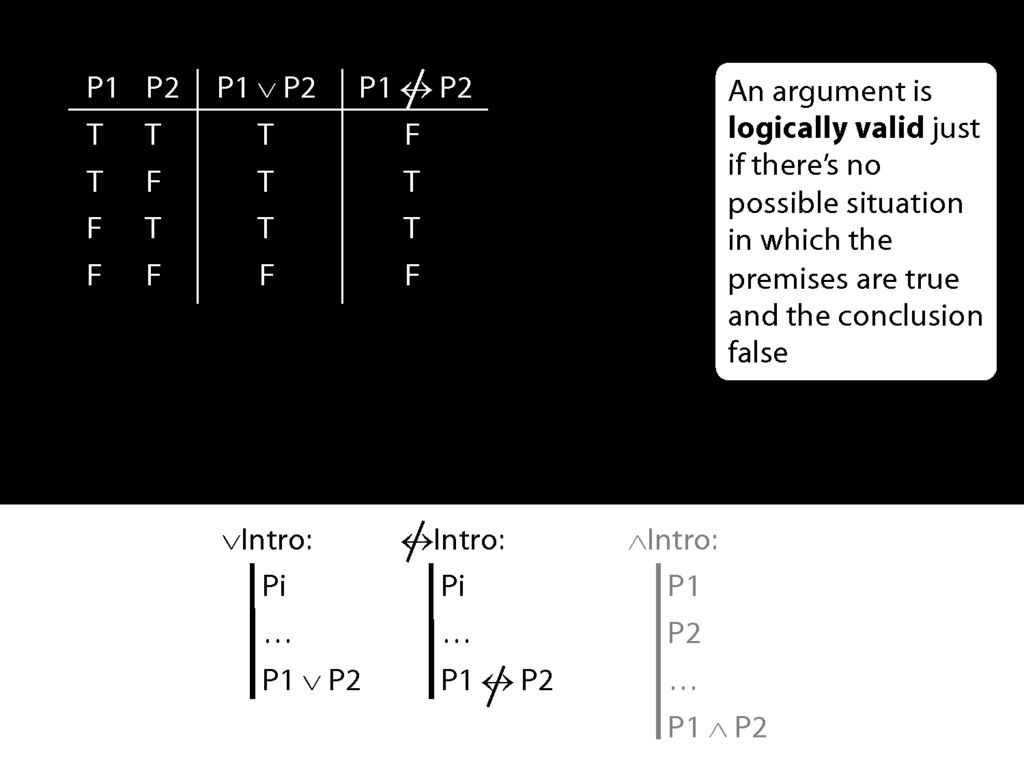
Now the rule for not-equivalent-intro is just like the rule for disjunction-intro.
What happens when the prerequsite for these rules is true?
The disjunction that we can introduce with disjunction-intro is true.
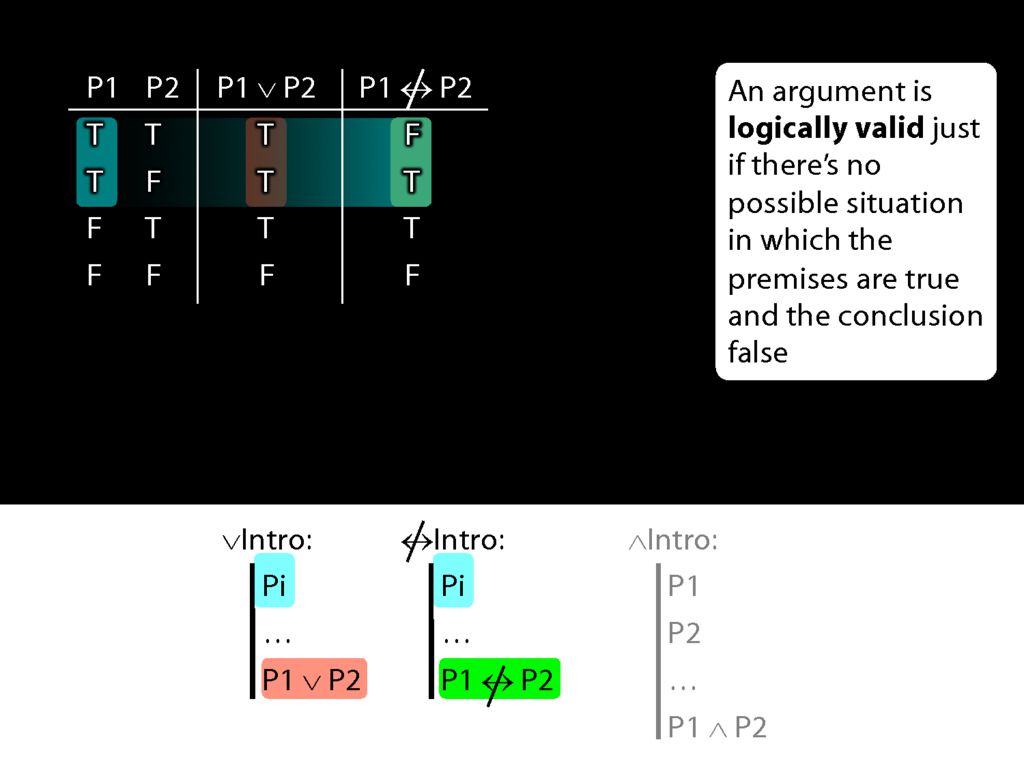
But the sentence that we can introduce with not-equivalent-intro is sometimes false and sometimes true.
So the new rule not-equivalent-intro would allow us to move from truths to falsehoods.

That's why we shouldn't have this rule.

How to Write Proofs
\section{How to Write Proofs}
\section{How to Write Proofs}

Rules of Proof for Identity
\section{Rules of Proof for Identity}
\emph{Reading:} §2.2
\section{Rules of Proof for Identity}

Earlier I said to understand identity as logicians think about it, there are just two principles you need.
These principles correspond to the identity and elimitation rules for identity.
The first principle said that if b=c, then whatever is true of b is also true of c.
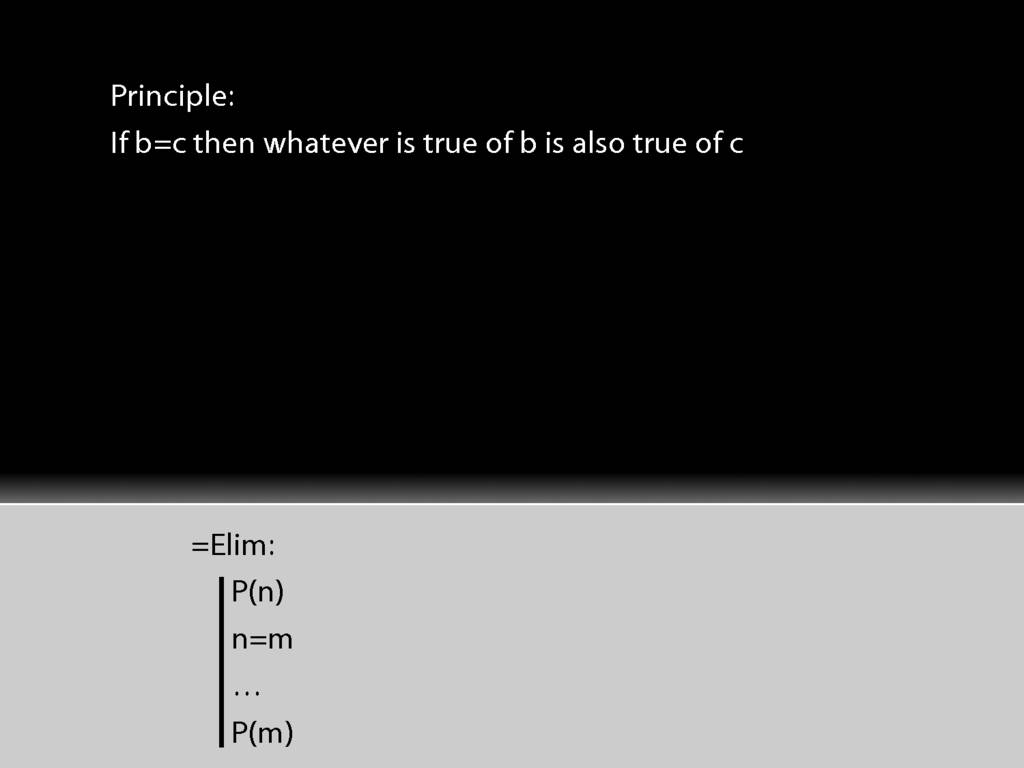
This principle is the rule =Elim.
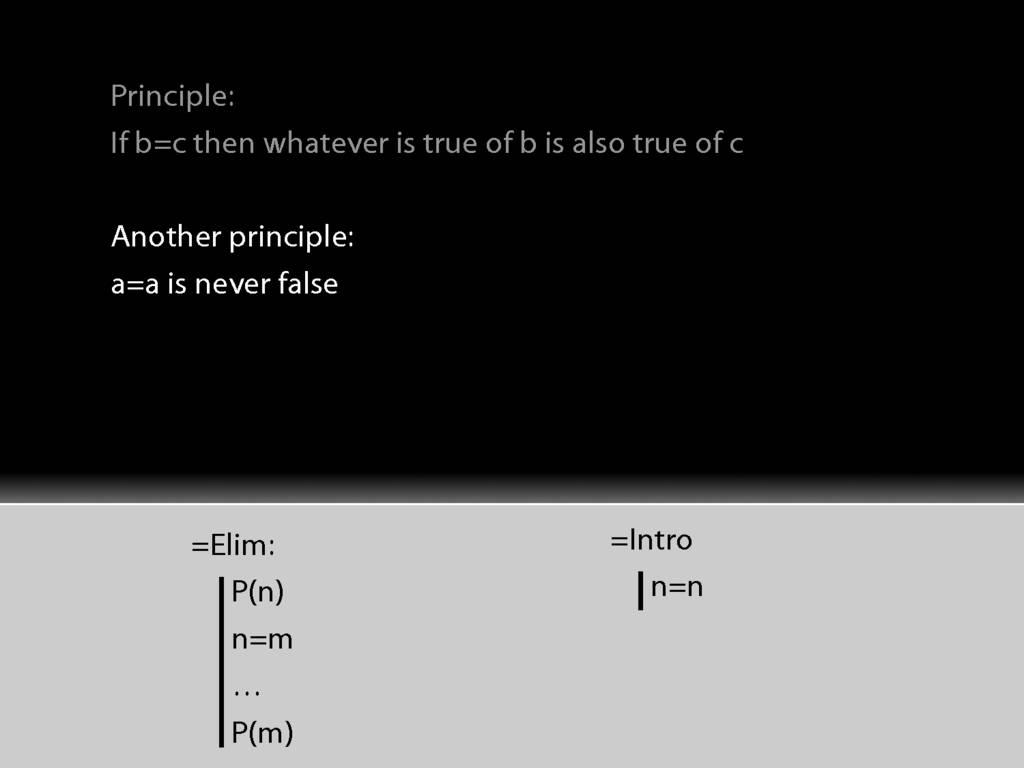
Then there was another principle, a=a is never false; this is the rule of proof =Intro.

The first rule of proof is expressed just as you would expect:
there are things you have to have already in your proof, and if you have them then you can extend the proof by adding this to it.
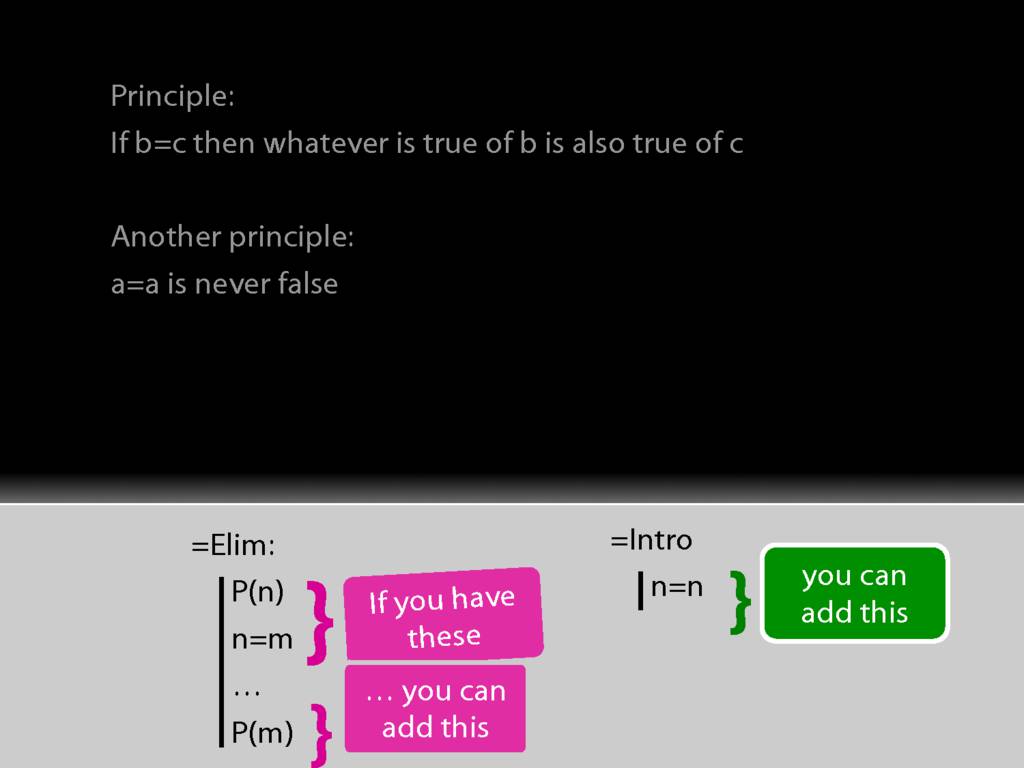
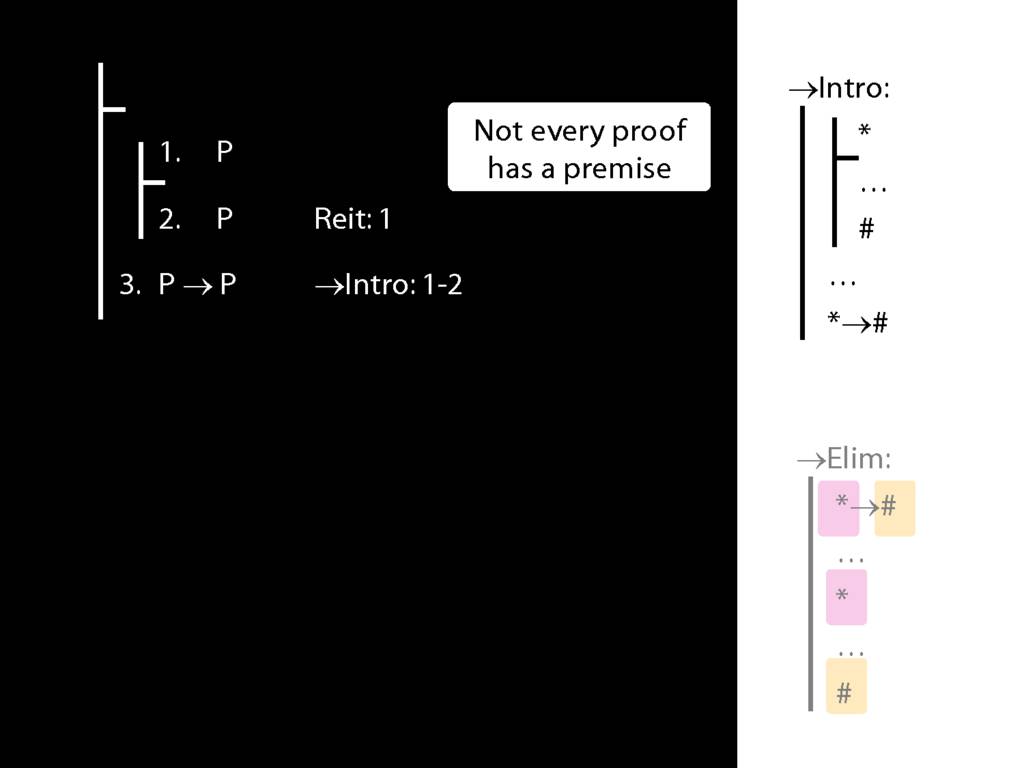
But identity intro is a bit different. In this case there are no pre-requisites.
You can use the rule regardless of what you have.
The rule says that any time you like you can add a sentence of this form, so a=a or b=b or whatever.
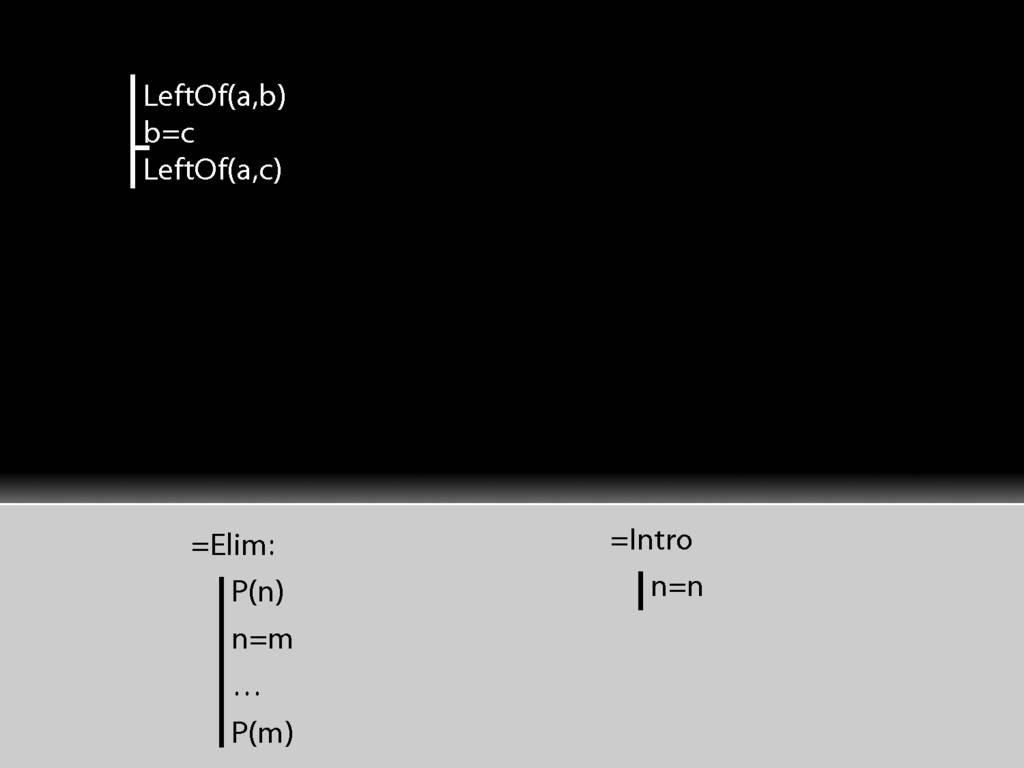
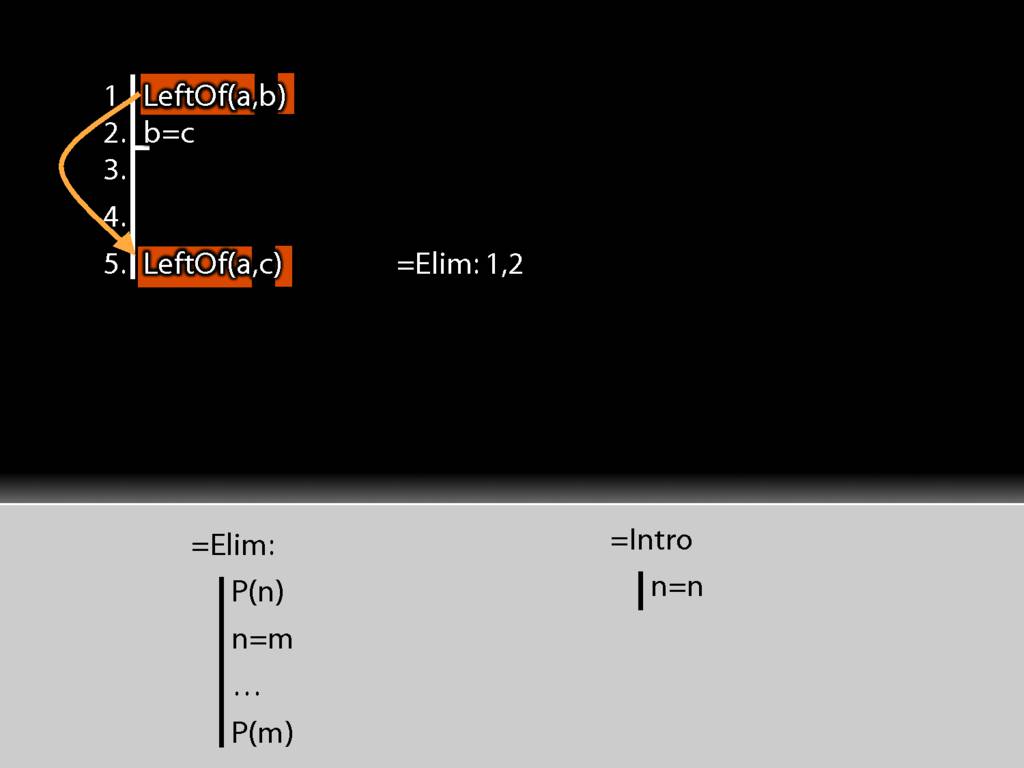
Let's see how these rules work with a simple proof.
(Everytime I show you new rules, I'll also show you an example of how they're used.)
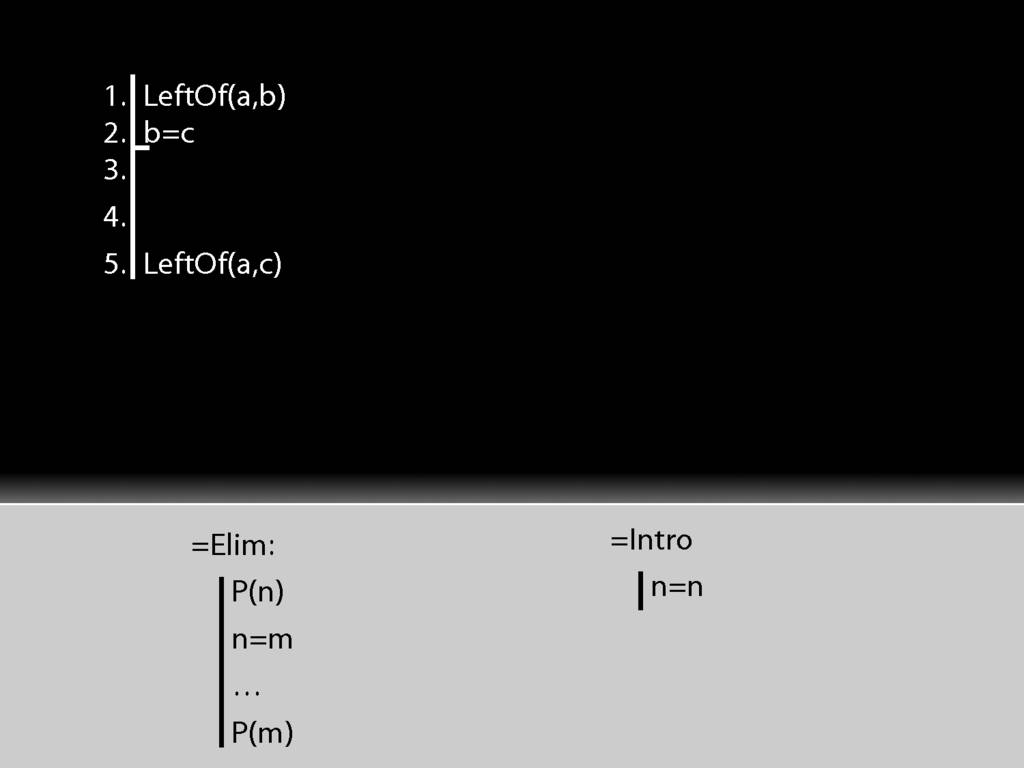
First I need some line numbers, and maybe a bit of space.
To apply =Elim I need an identity statement; and that's just what I have at line 2.
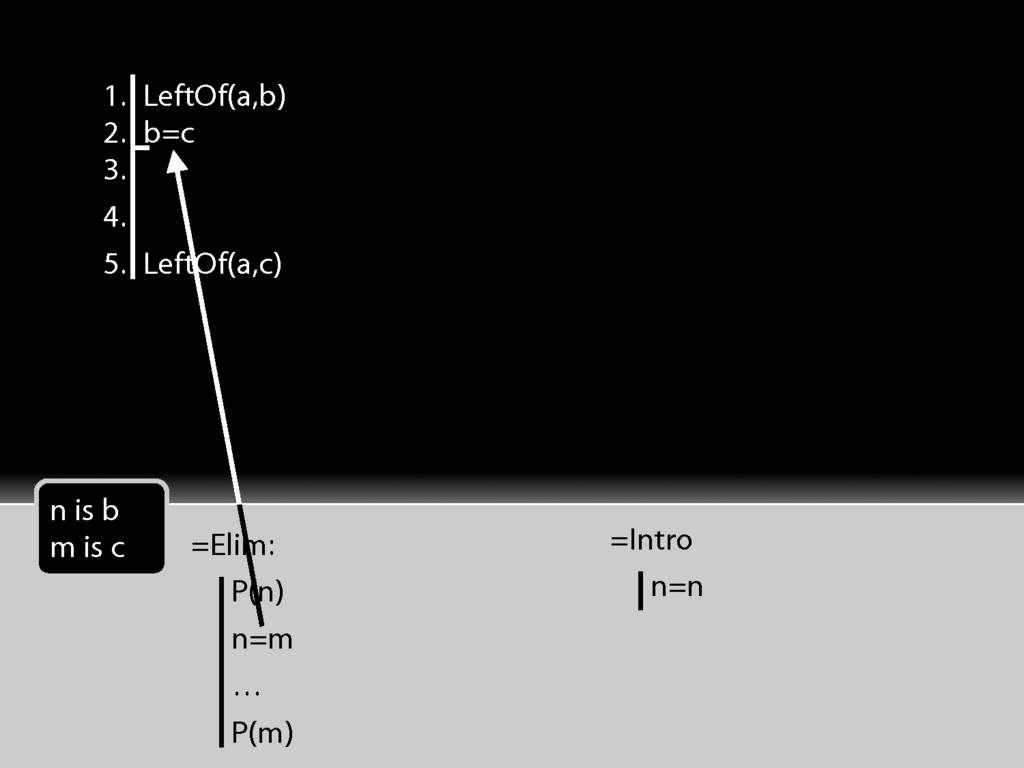
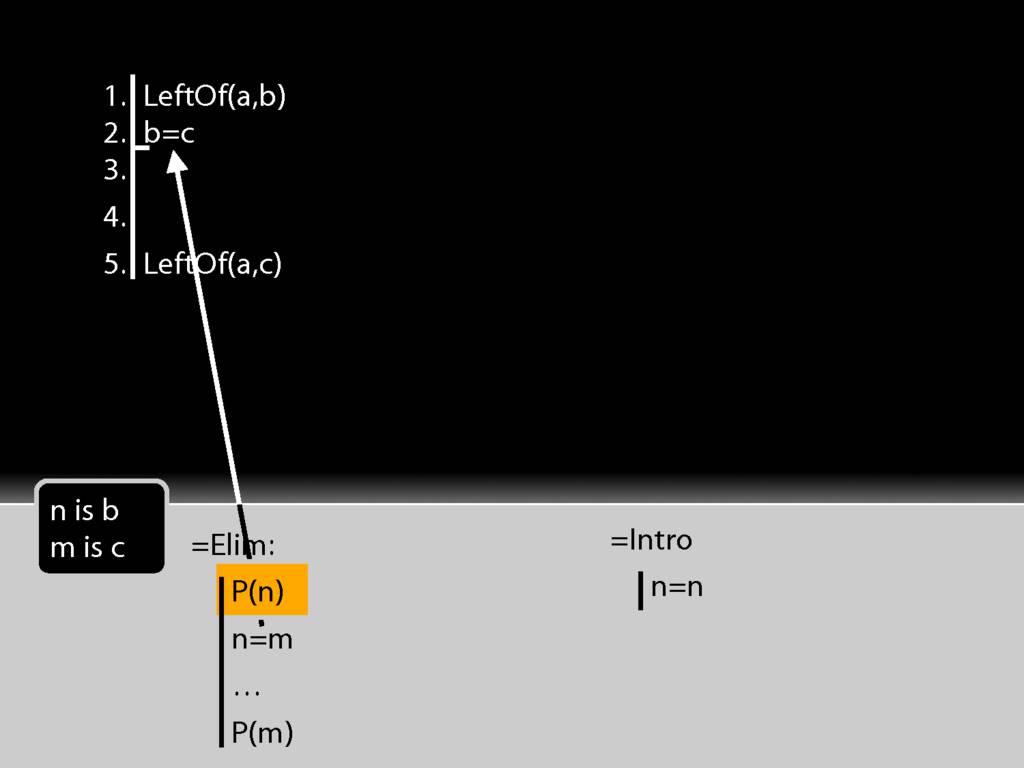
To apply =Elim I also need a statement about the thing named on the left hand side of the identity statement, in this case b.
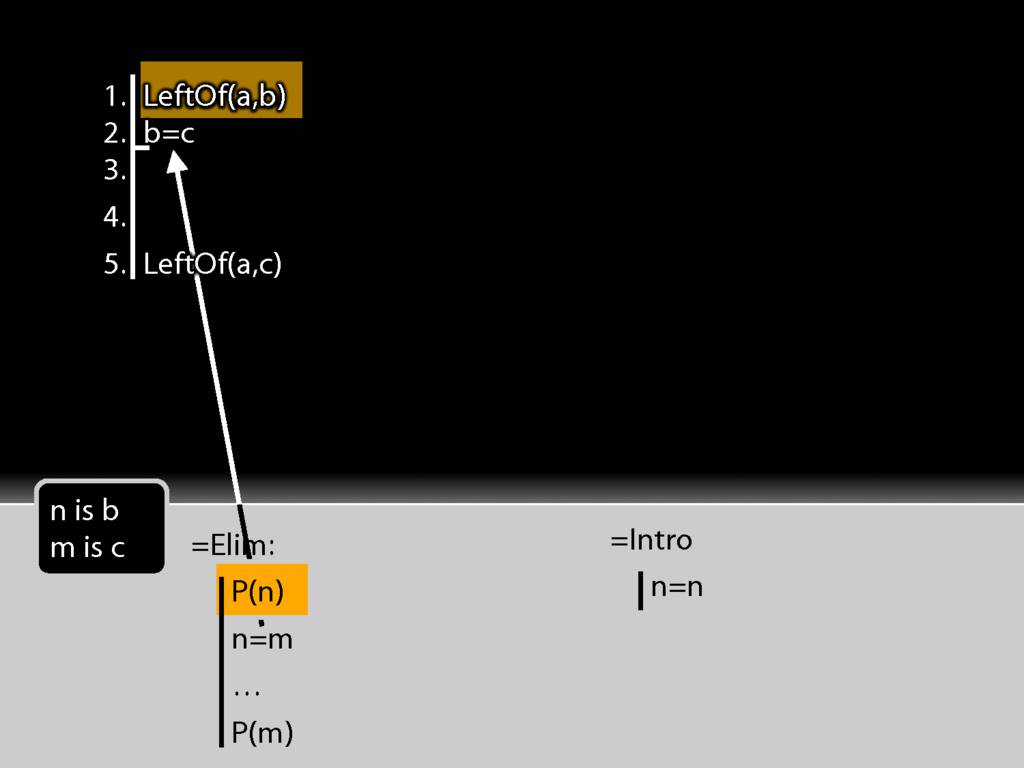
That's just what I have at line 1 of the proof.
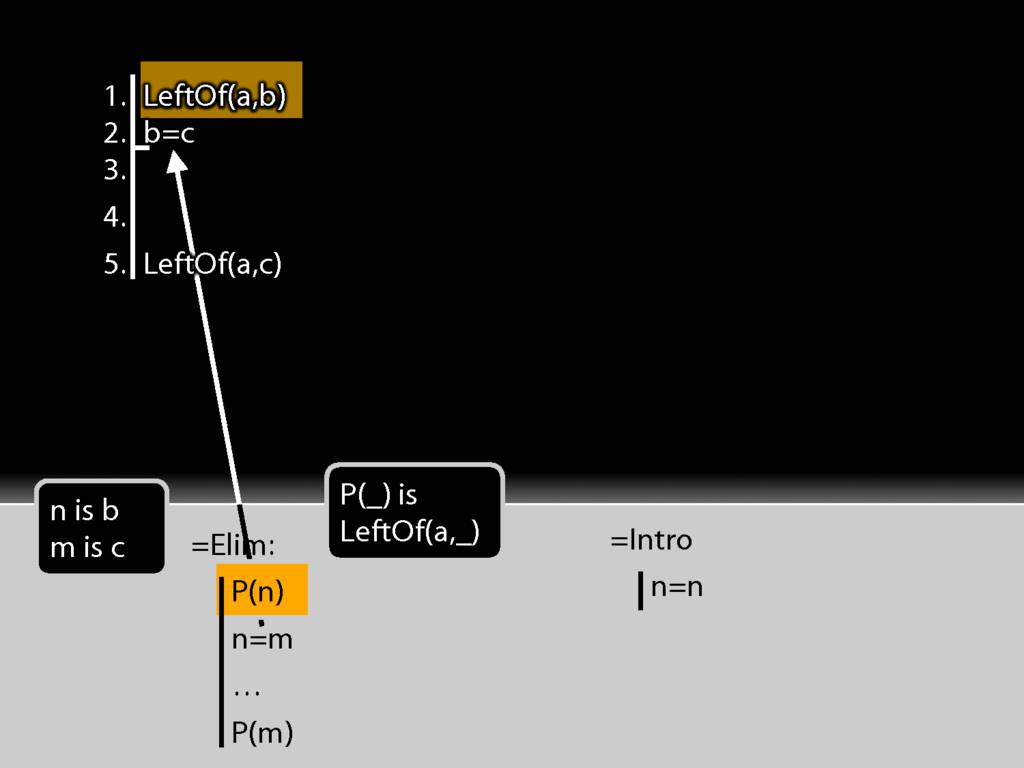
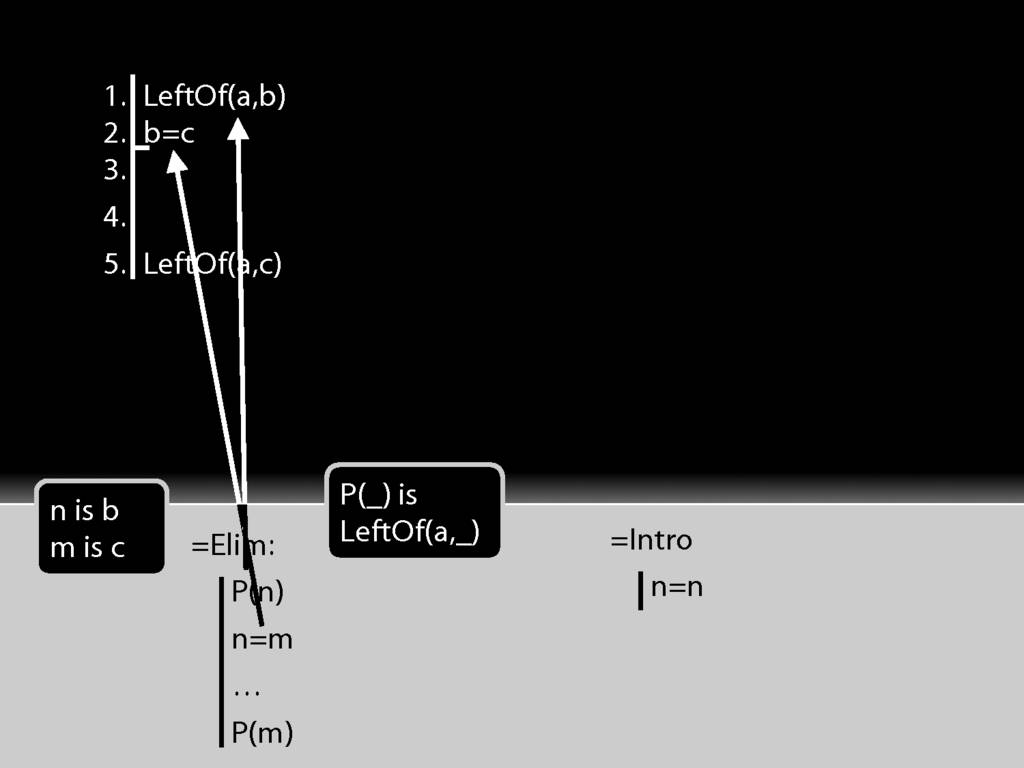
So actually I have both of the things I need to apply =Elim.
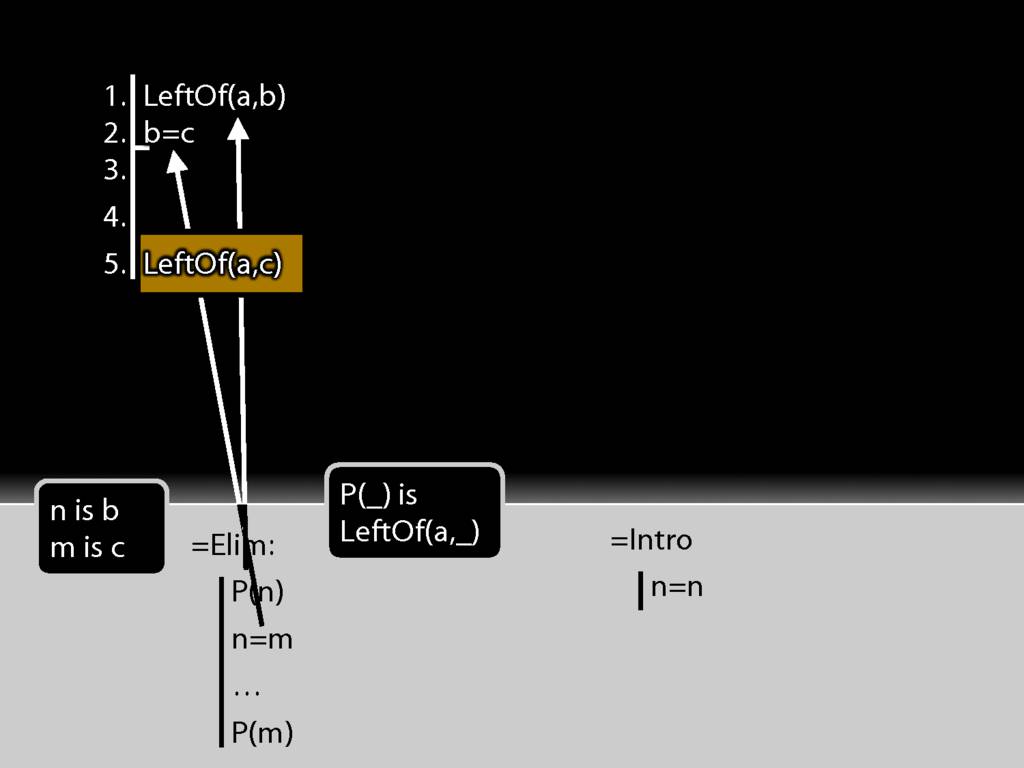
But now look at the conclusion of this argument.

The conclusion is just what =Elim allows me to conclude.
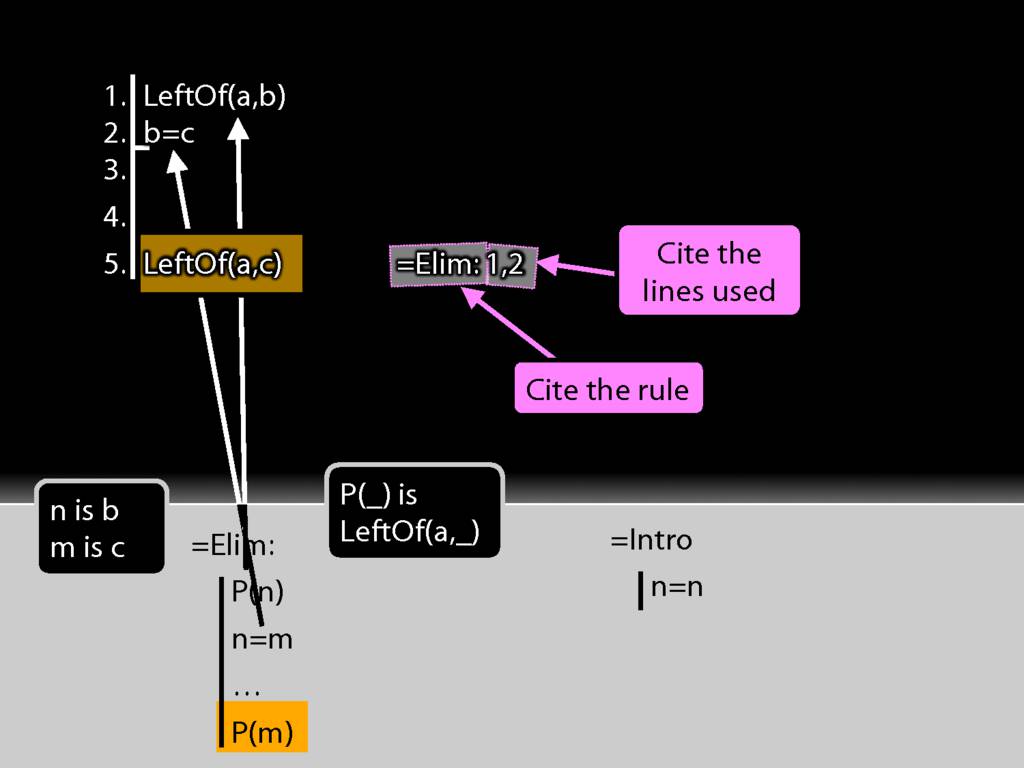
Have I finished the proof? Not yet. I need to justify the step, which involves two things: I need to cite the rule and to cite the lines I've used in applying it.

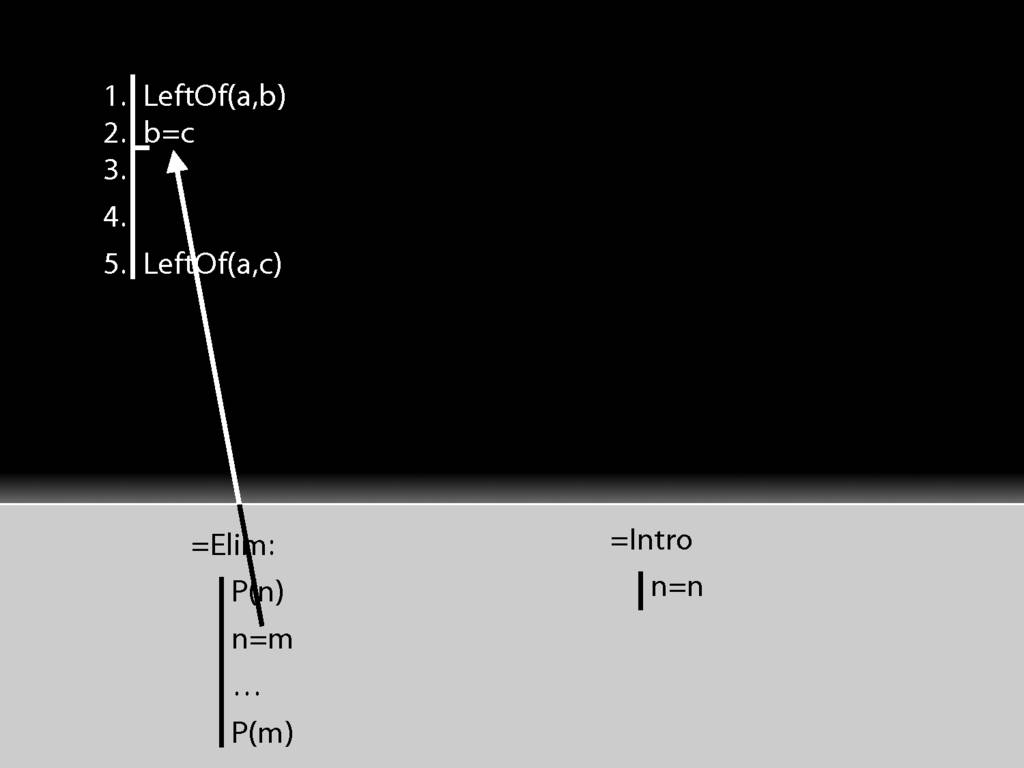
Let's look at the same thing a different way.
The first premise is a statement about b (it says a is left of it) whereas the conclusion is the same statement about c (it says that a is left of it).

I take the b from the first premise and put it into the identity statement.
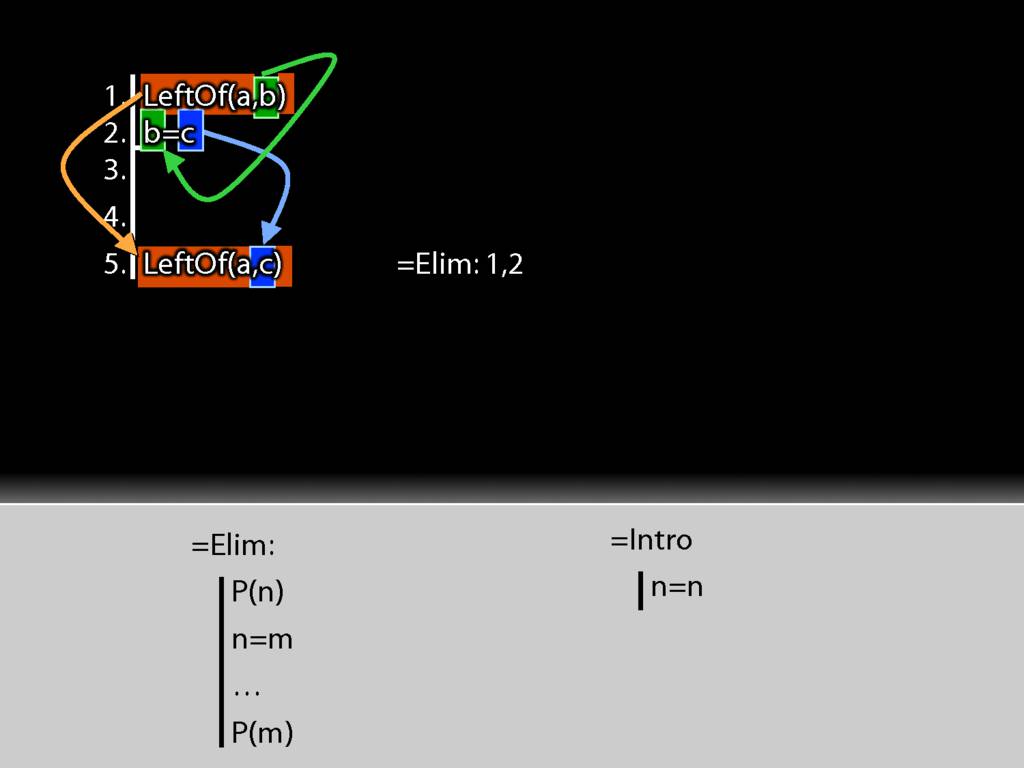
I move accross the identity statement from left to right and find c. And this c I put into the conclusion just where b was earlier.
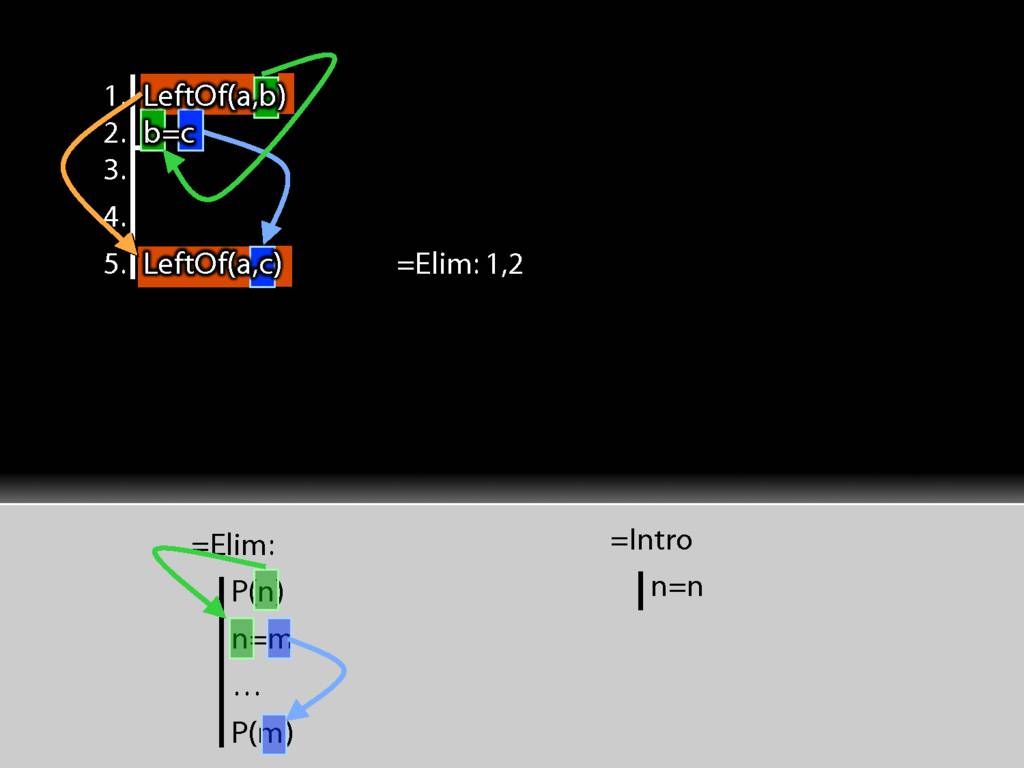
And this is just the pattern I need to make to use =Elim.

One last thing ...
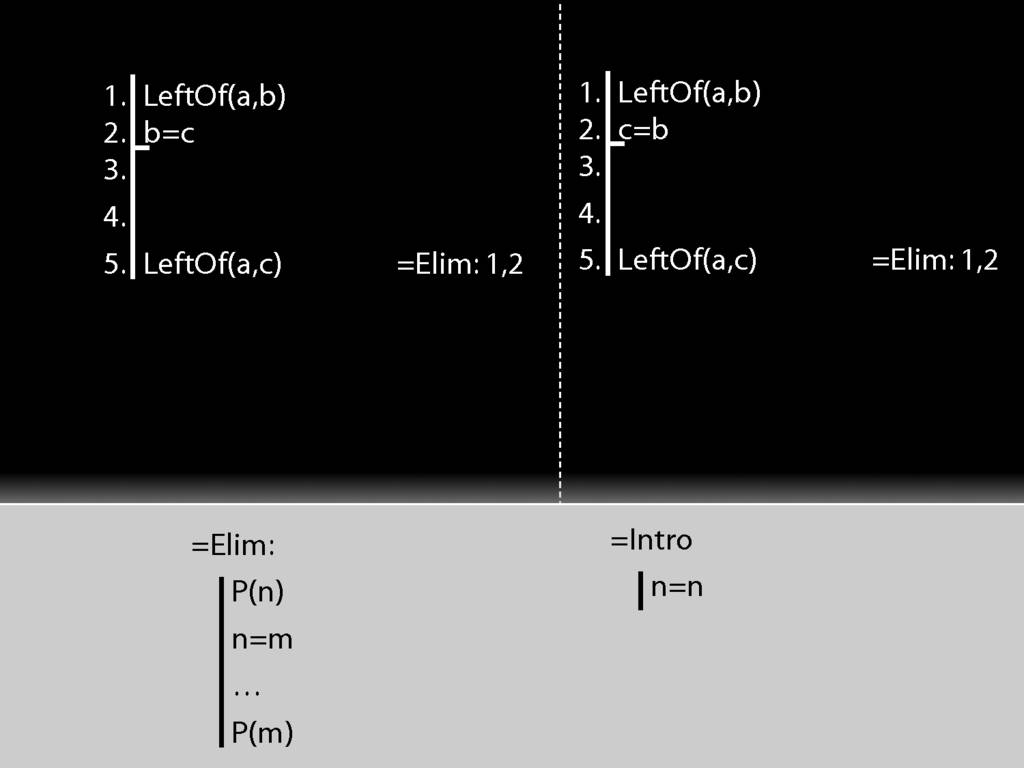
Look at this thing on your right. It looks much like a proof. But actually it's no more a proof than a toddler's scribble. Why not? (I'll return to this question later.)

DeMorgan: ¬(A ∧ B) ⫤⊨ ¬A ∨ ¬B
\section{DeMorgan: ¬(A ∧ B) ⫤⊨ ¬A ∨ ¬B}
\emph{Reading:} §3.6, §4.2
\section{DeMorgan: ¬(A ∧ B) ⫤⊨ ¬A ∨ ¬B}
3.19
4.15--18
7.1--7.2, *7.3--7.6
3.19
4.31

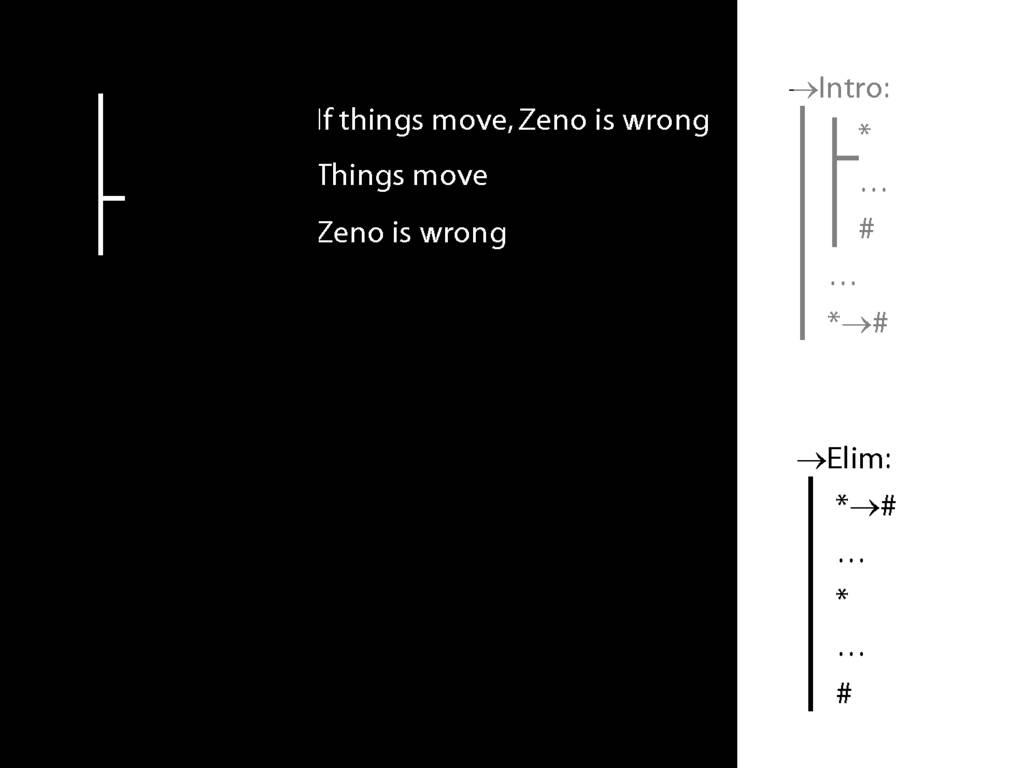
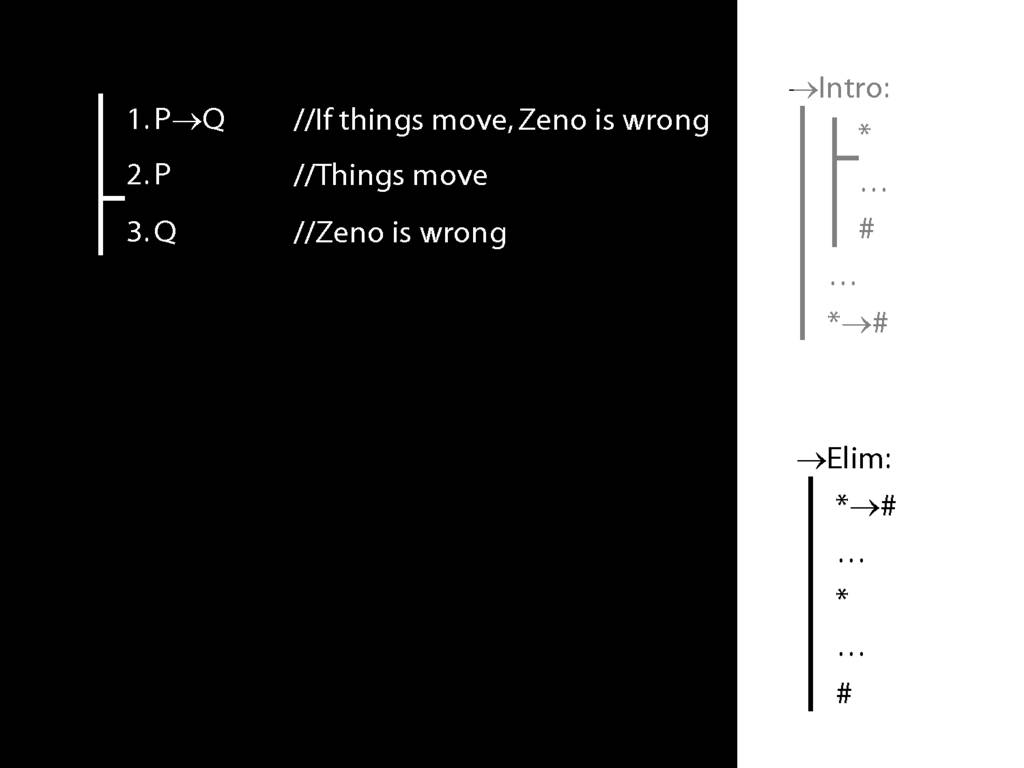
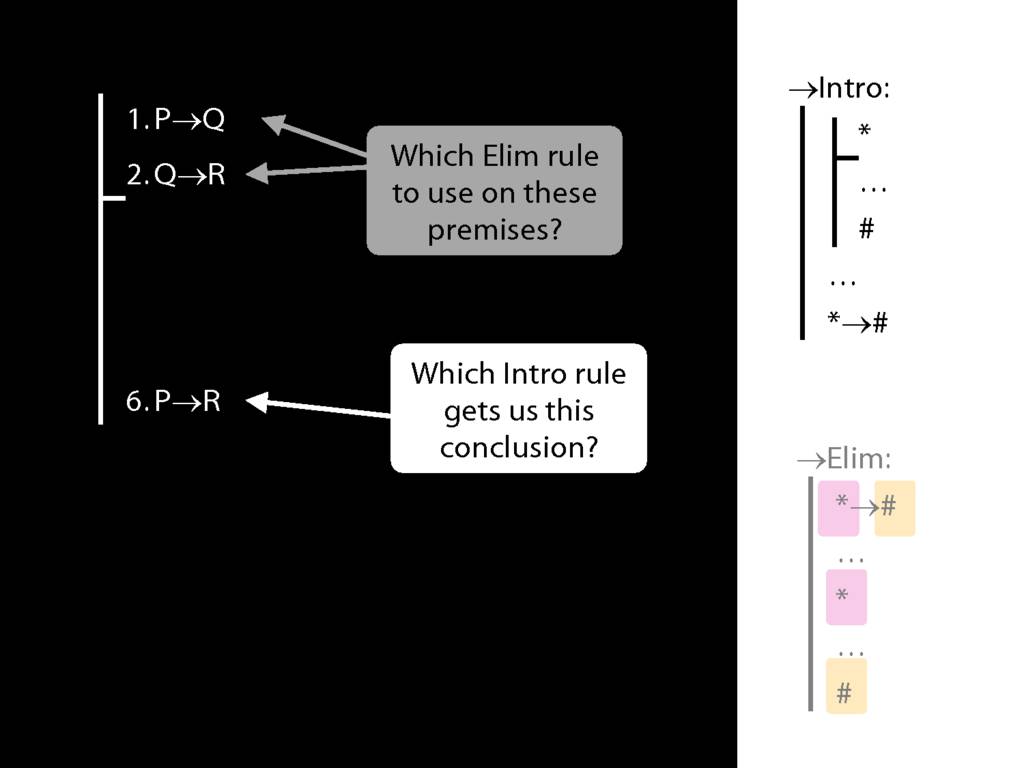
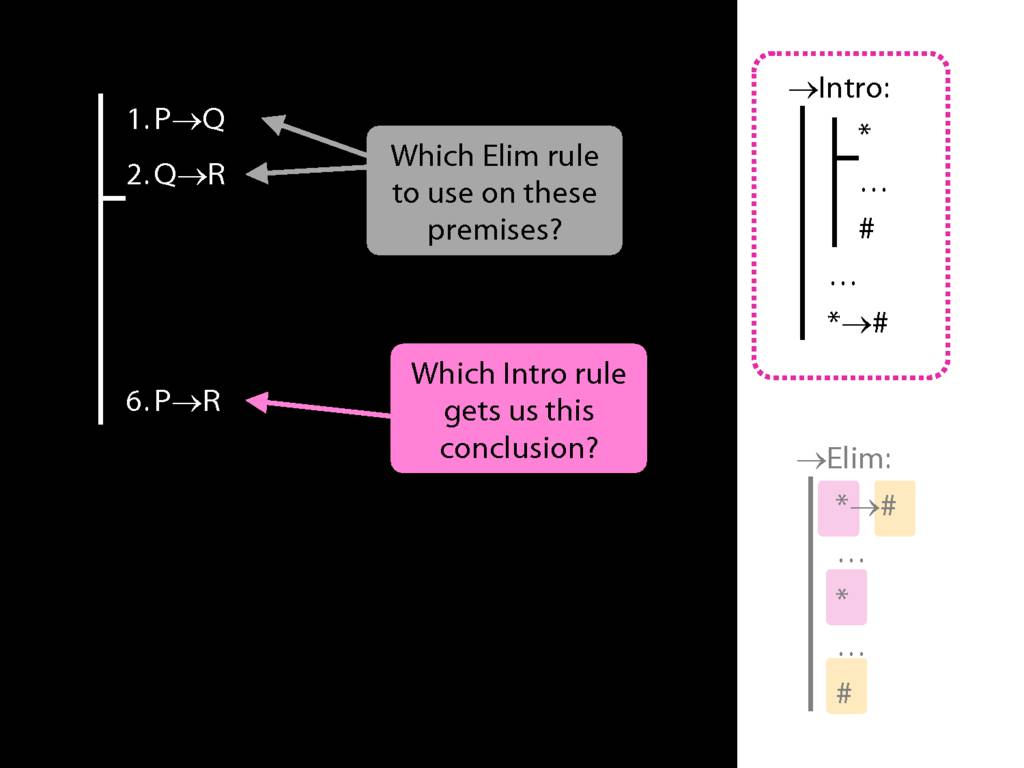
→Intro, →Elim
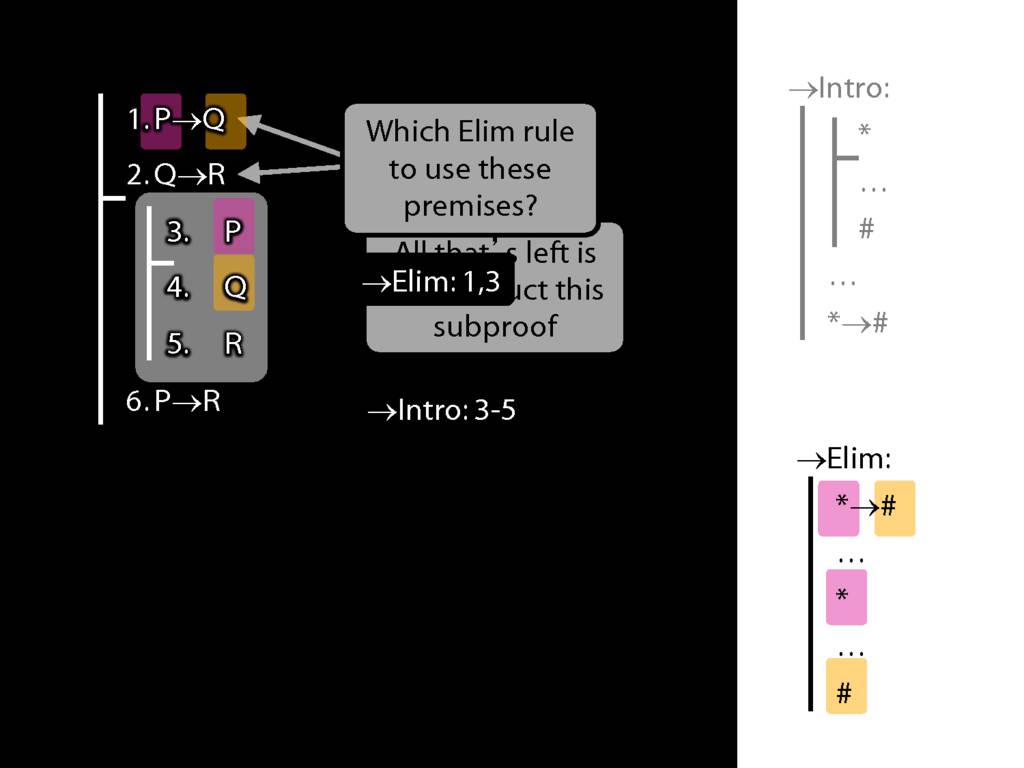
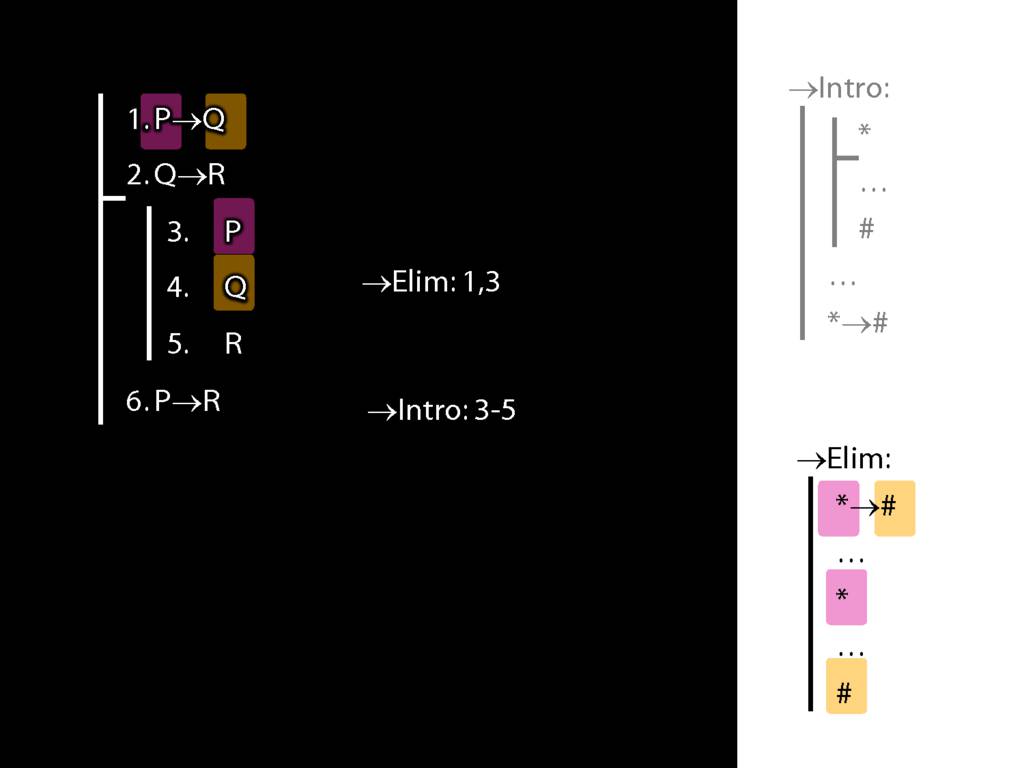
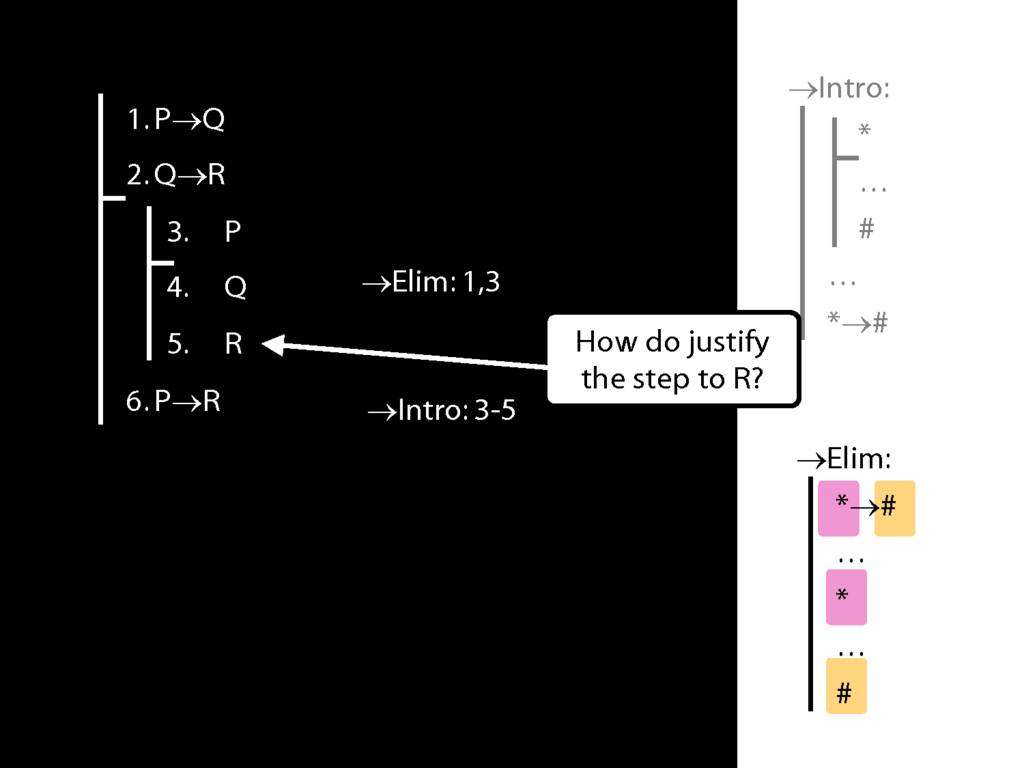
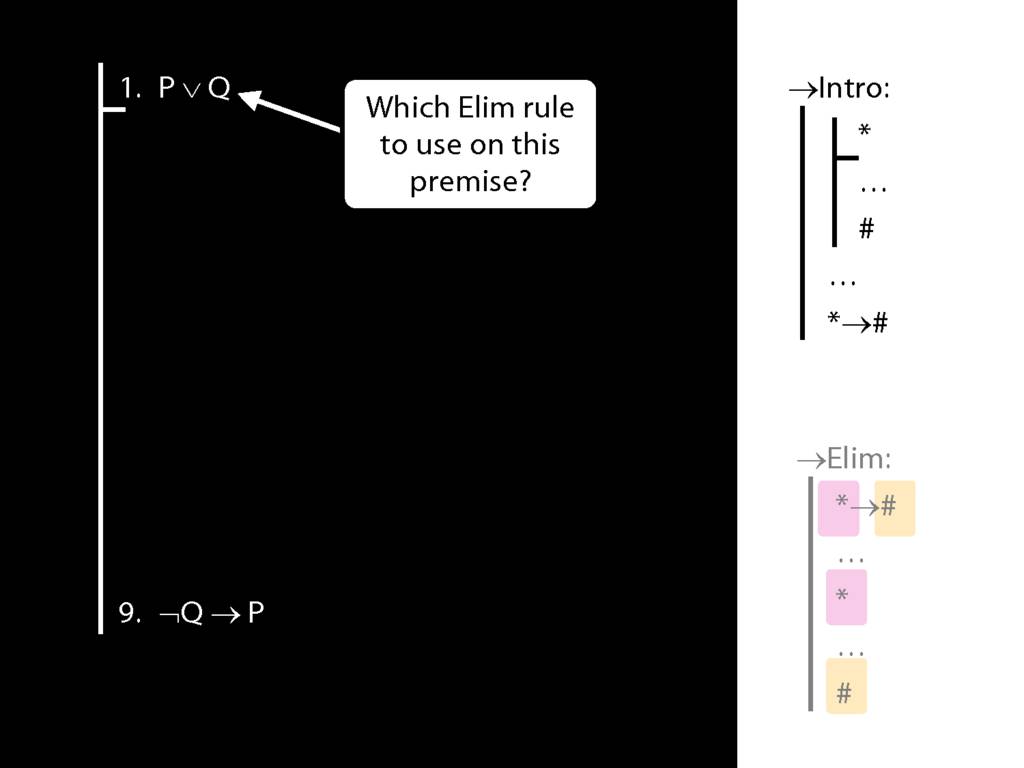
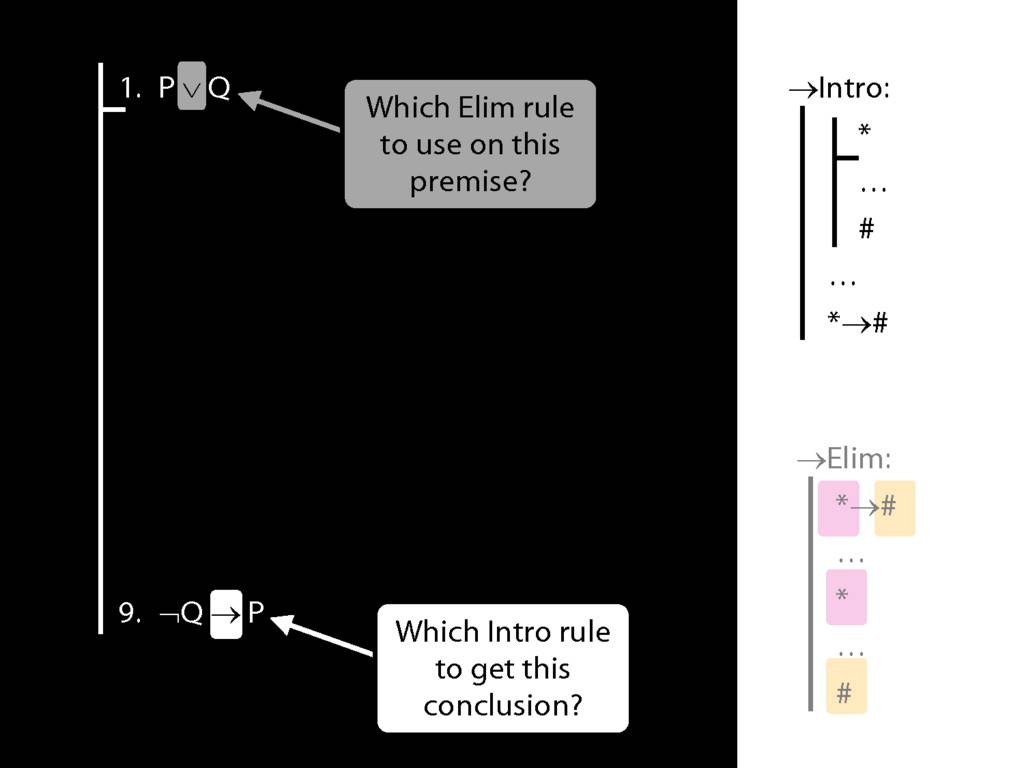
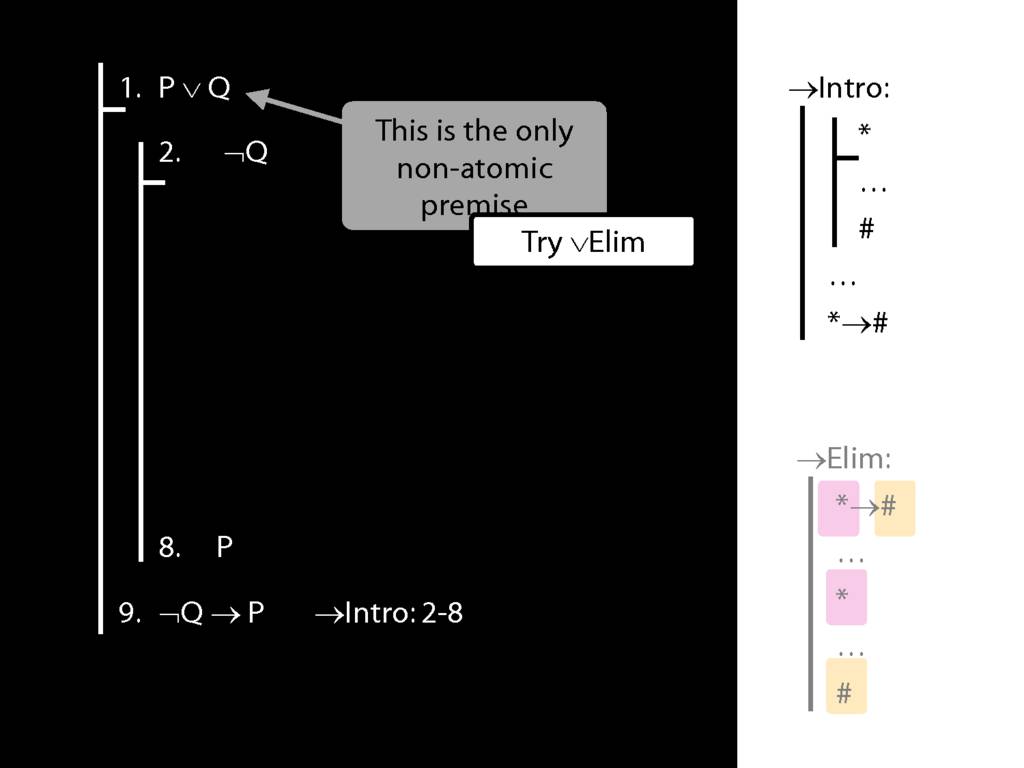
\section{→Intro, →Elim}
\emph{Reading:} §8.1, §8.2
\section{→Intro, →Elim}

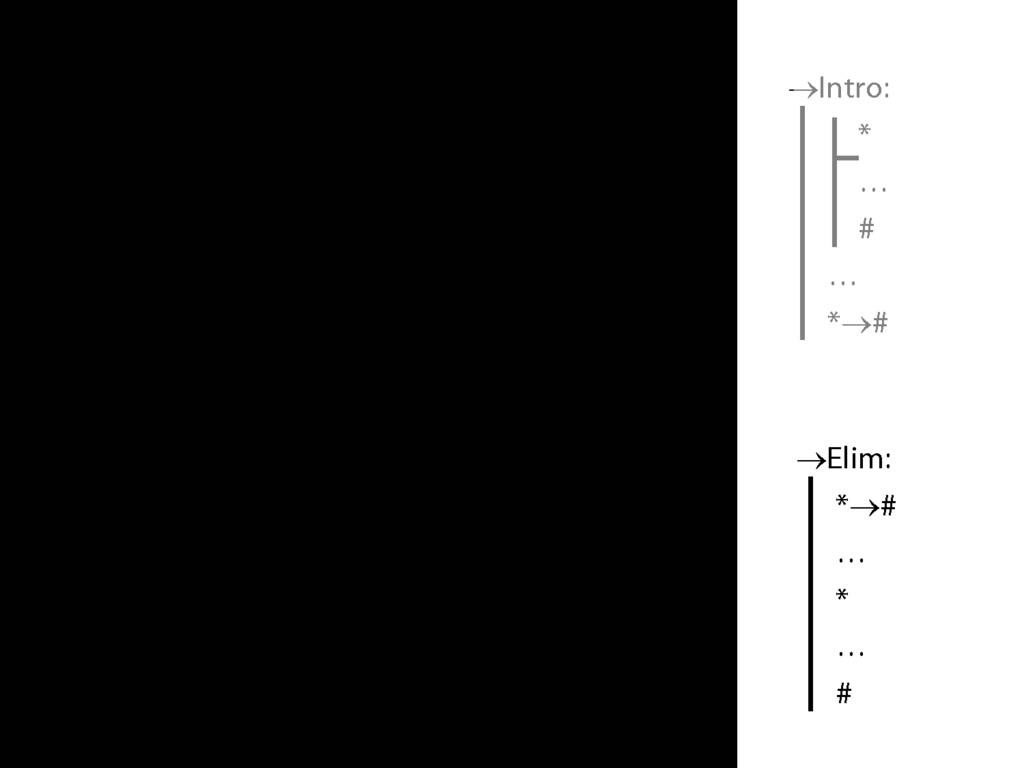
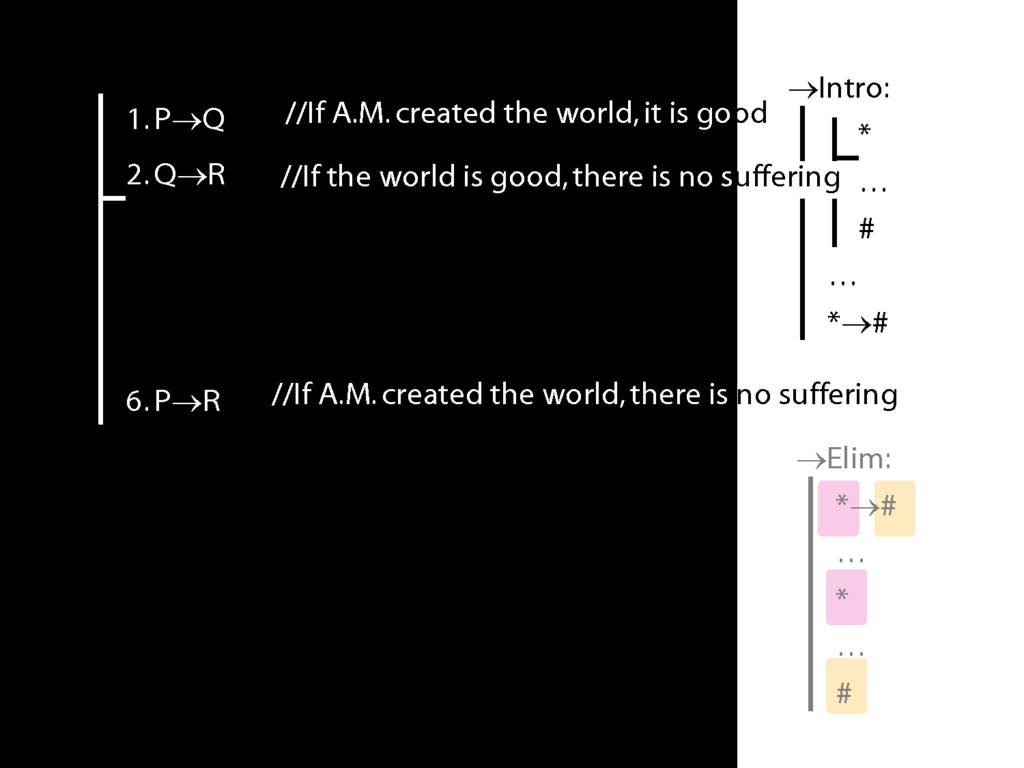

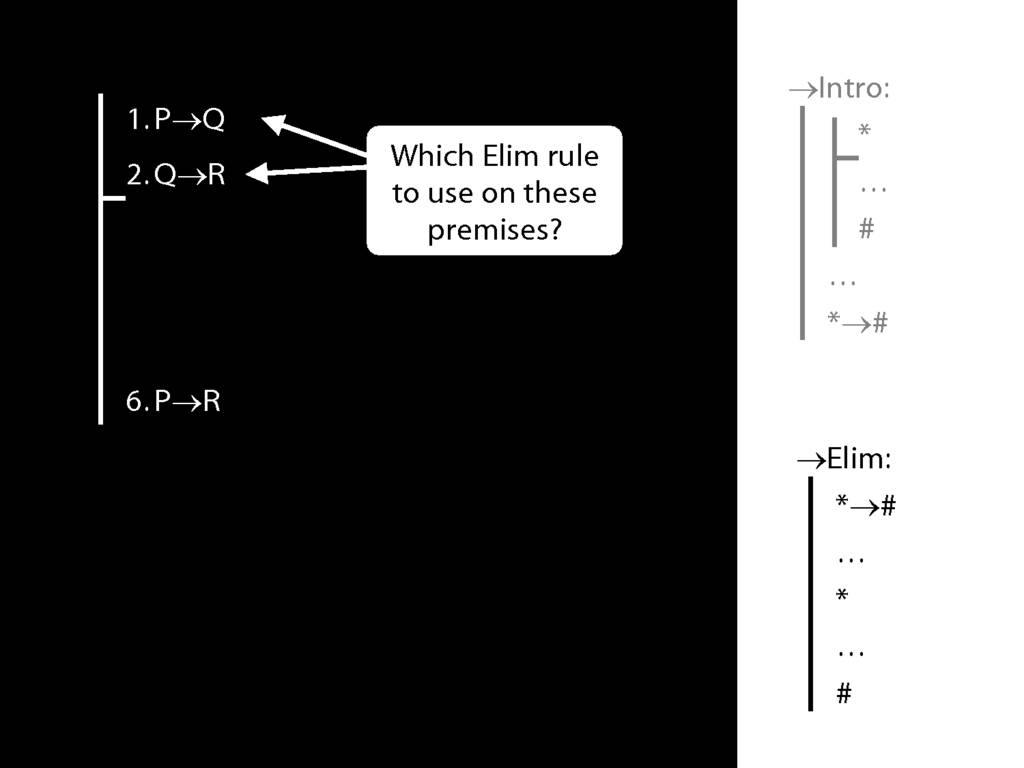
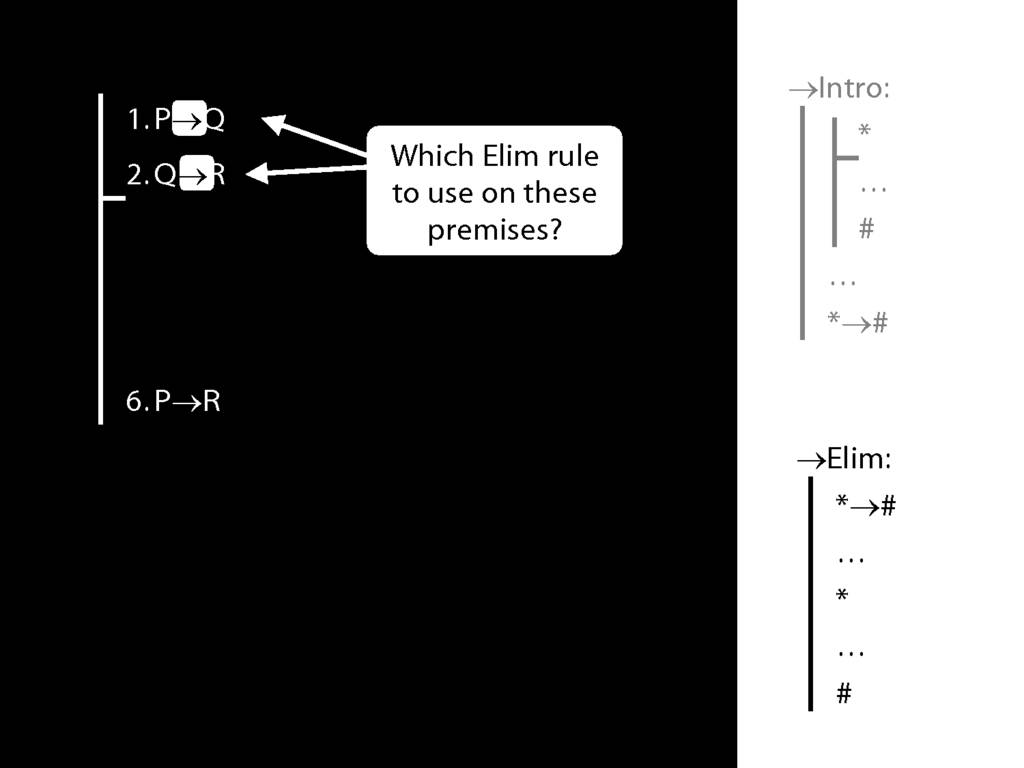
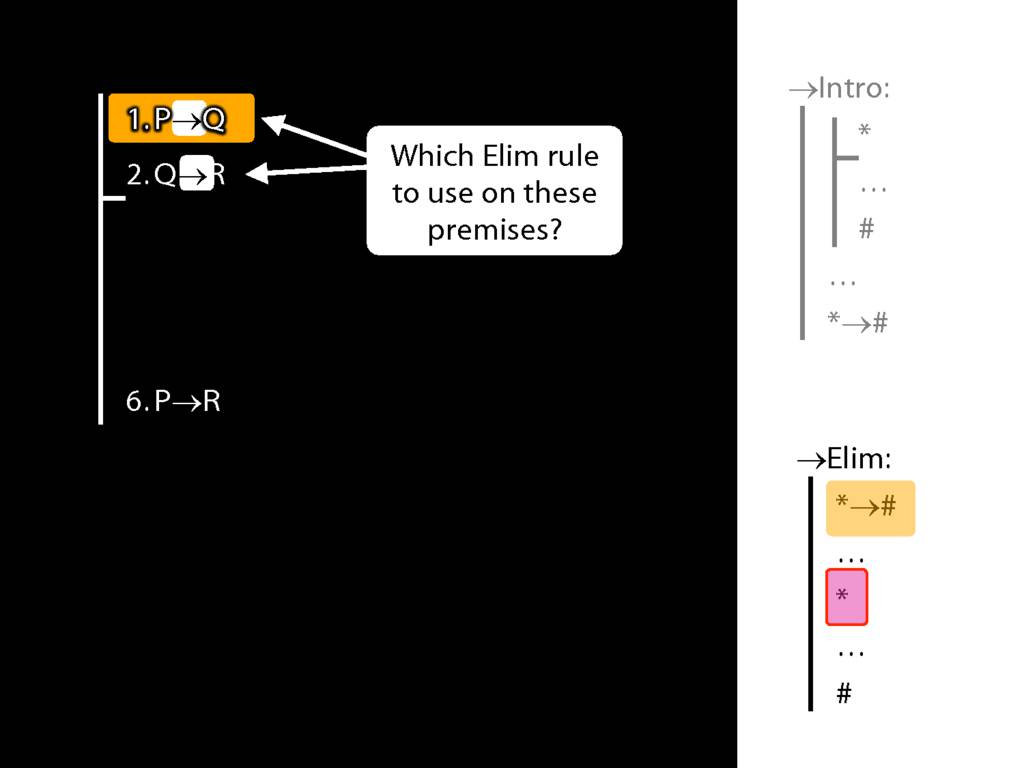


8.20--8.25
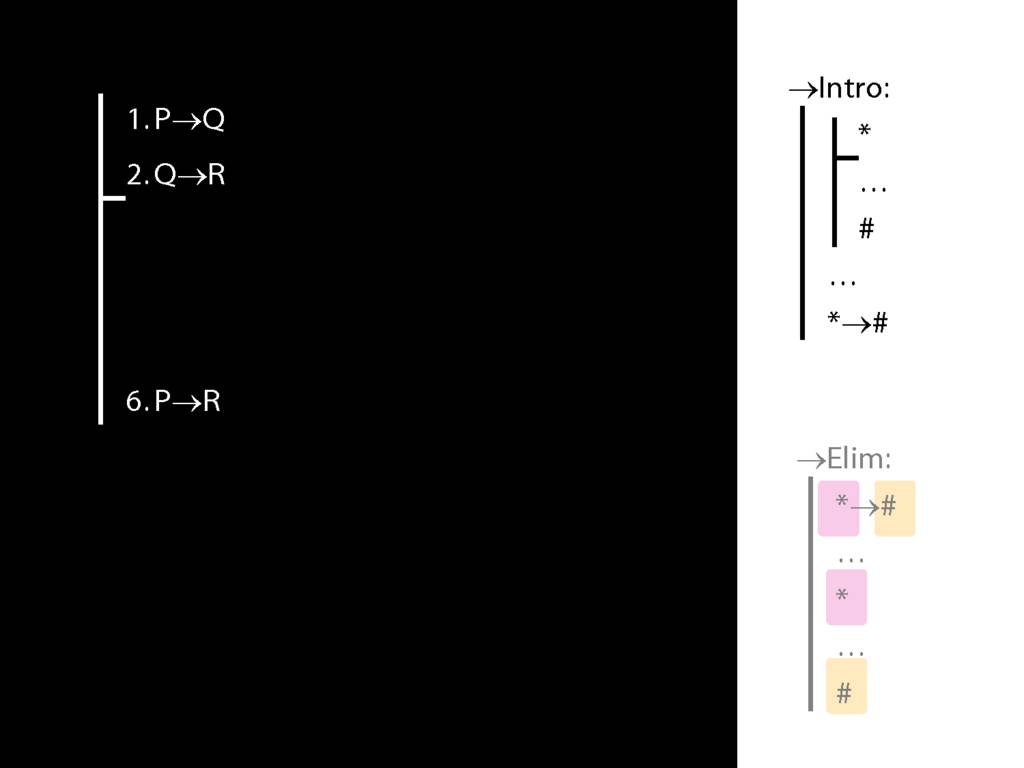
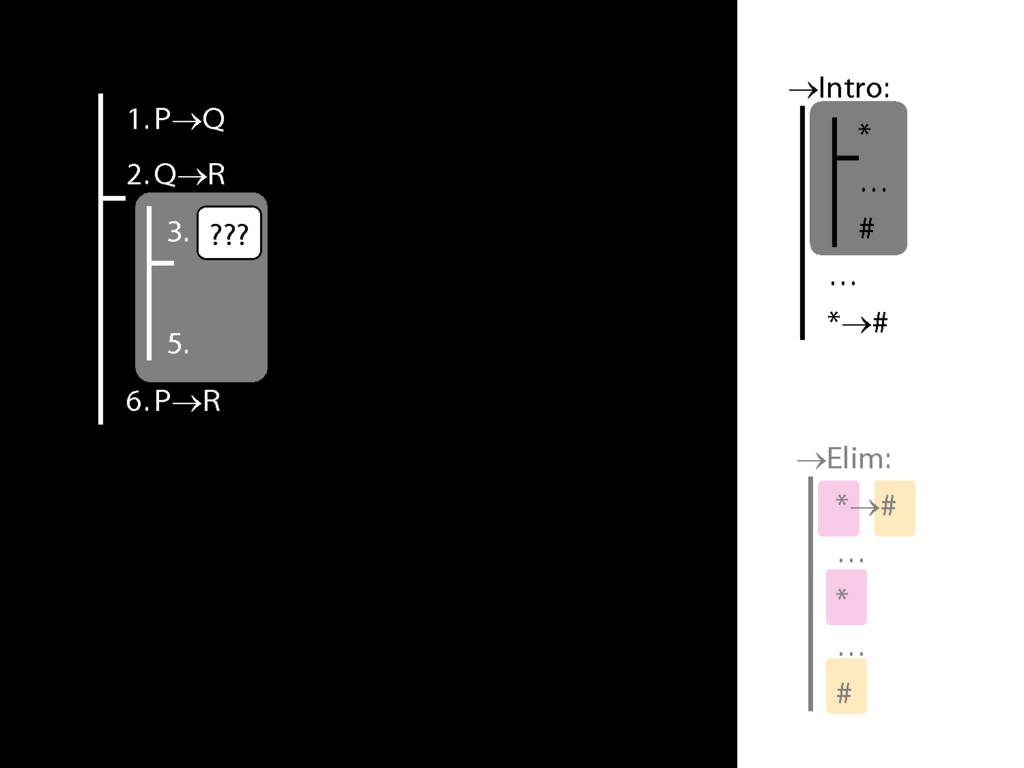
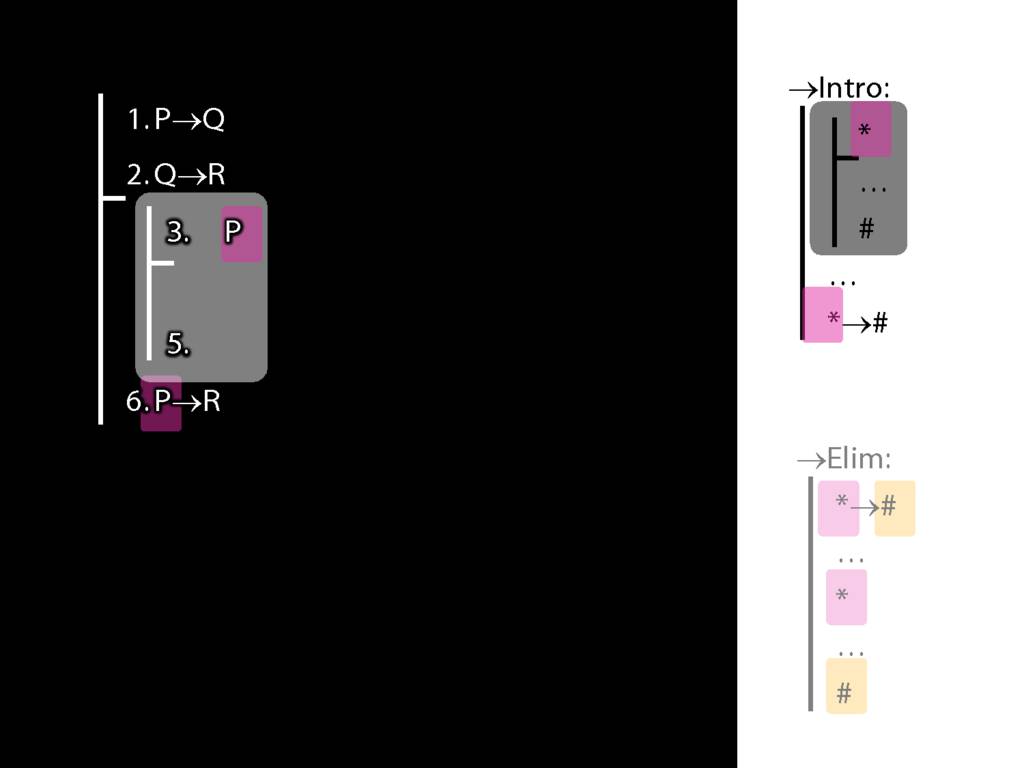
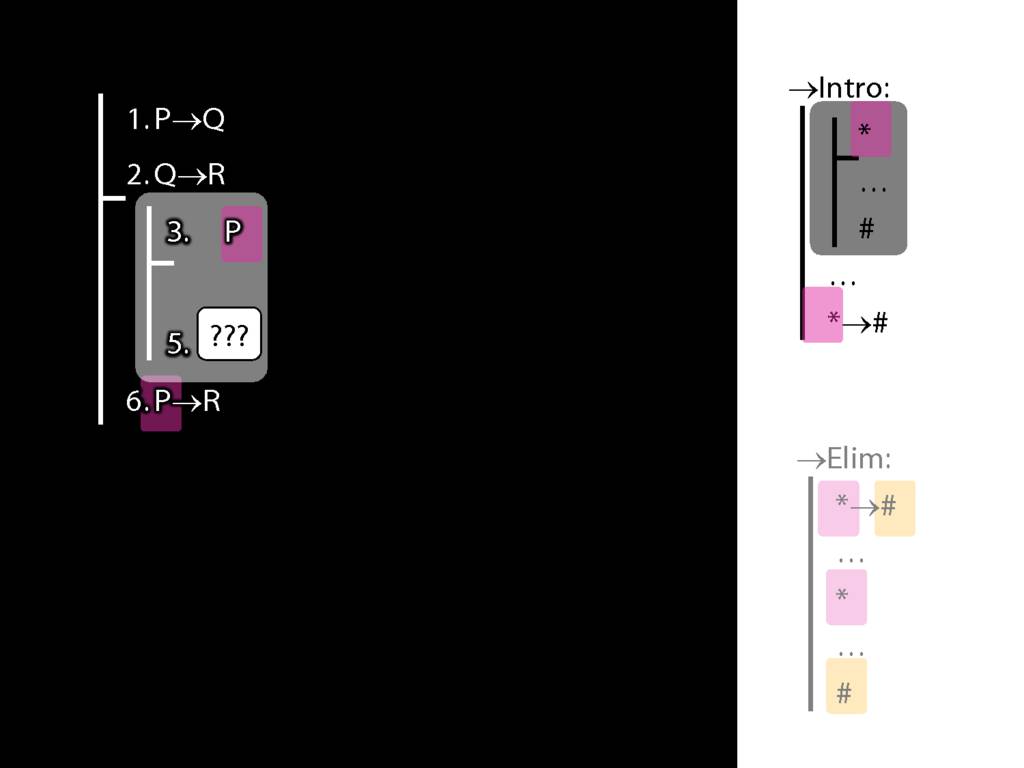
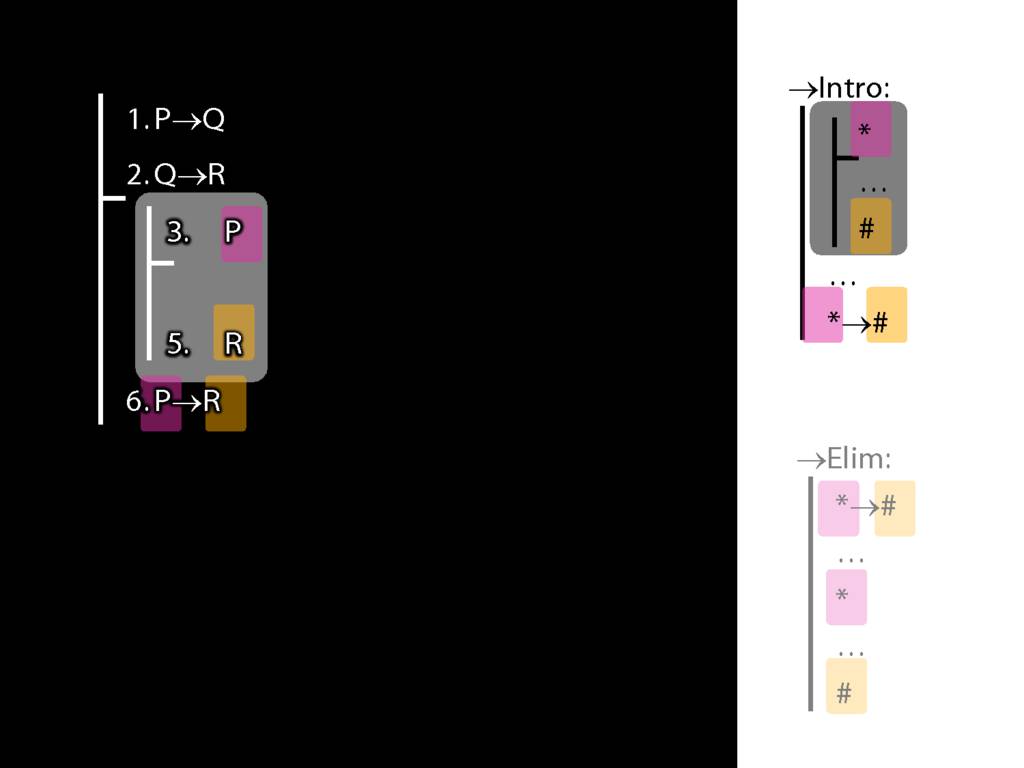
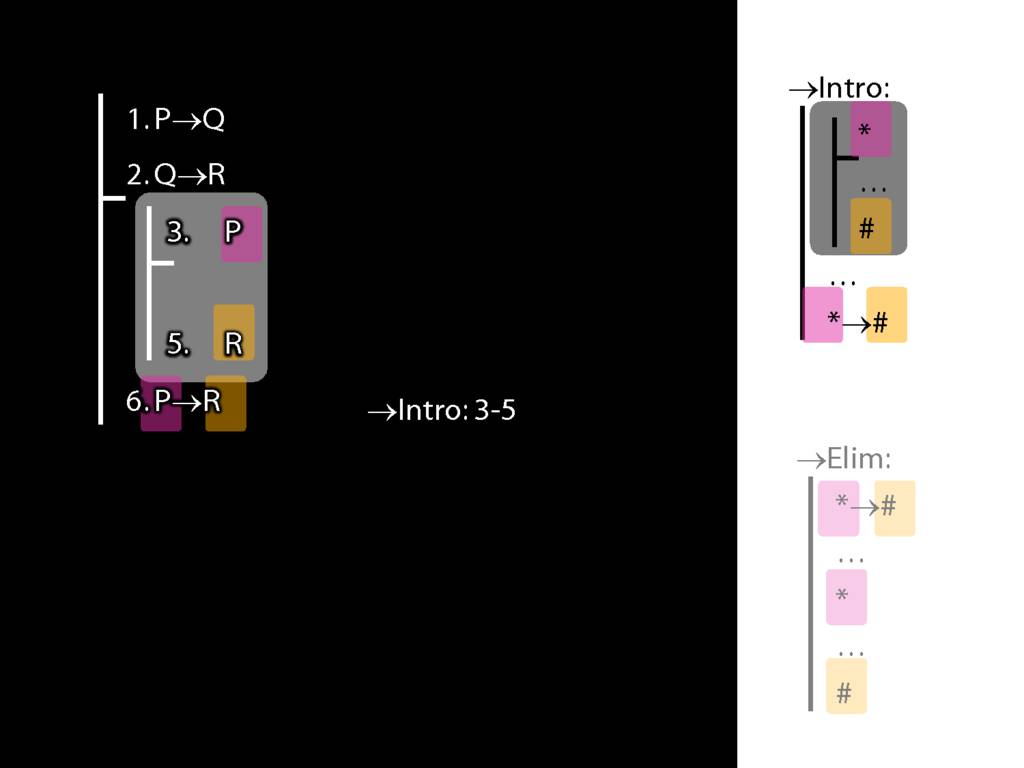
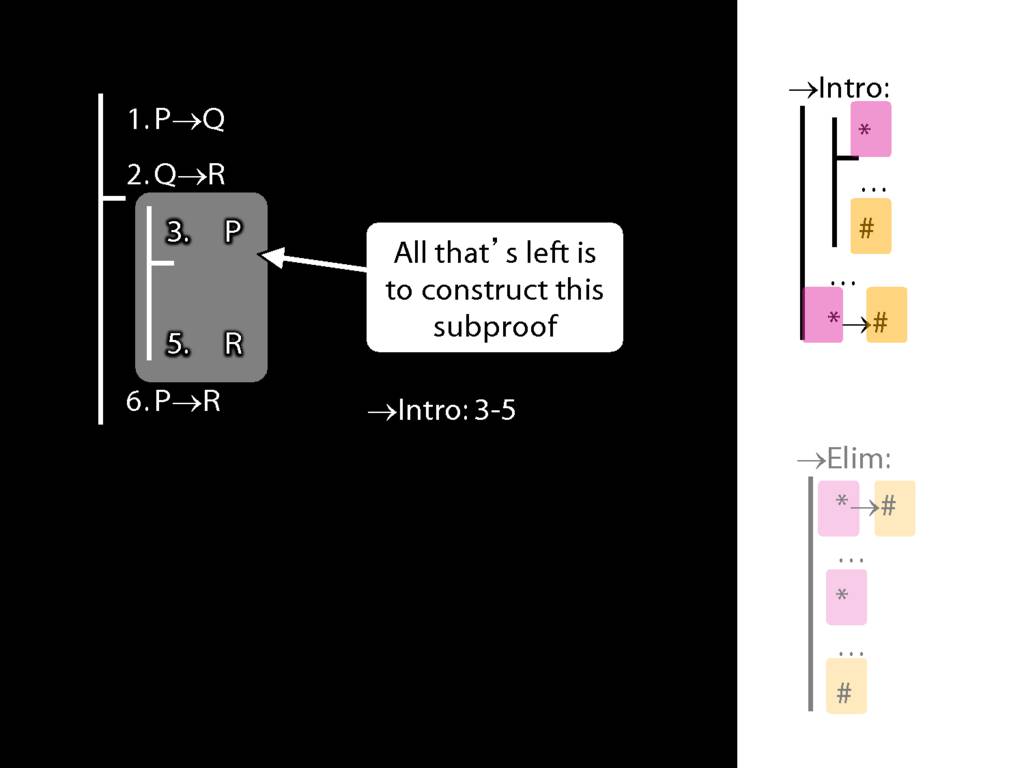
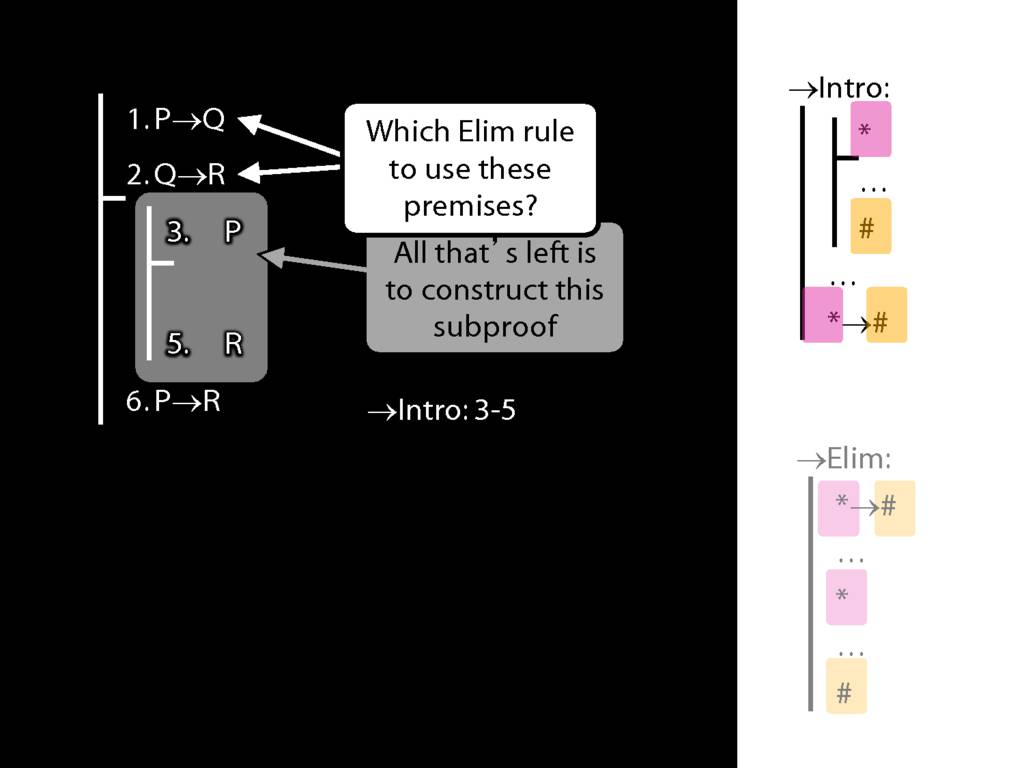
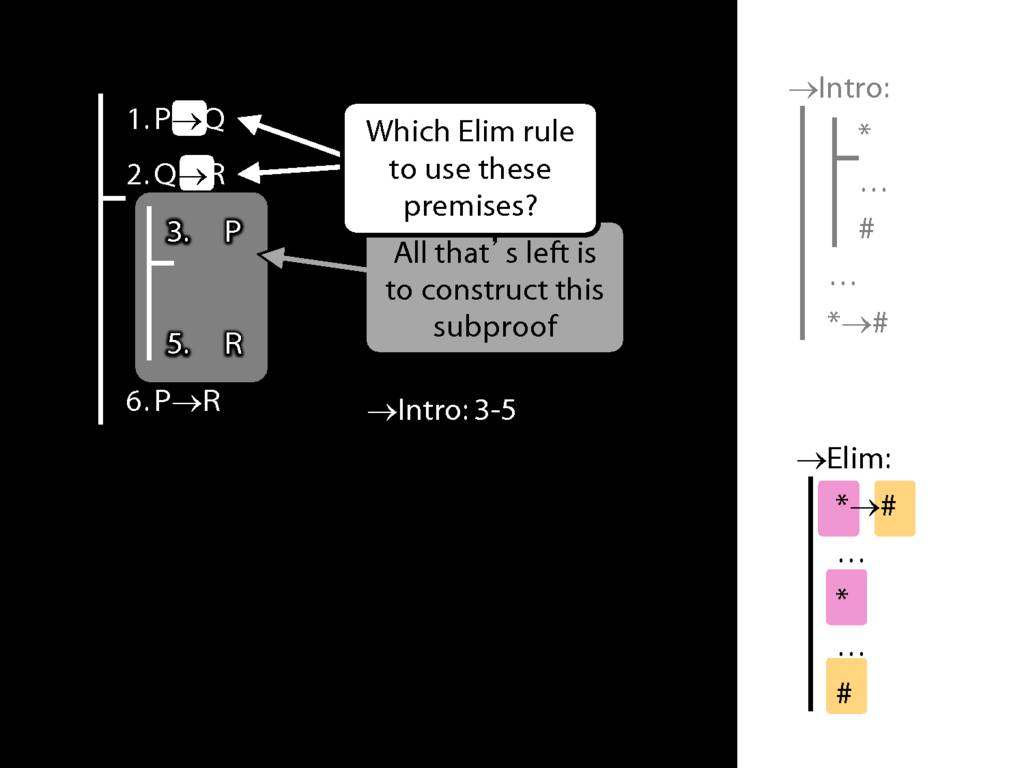
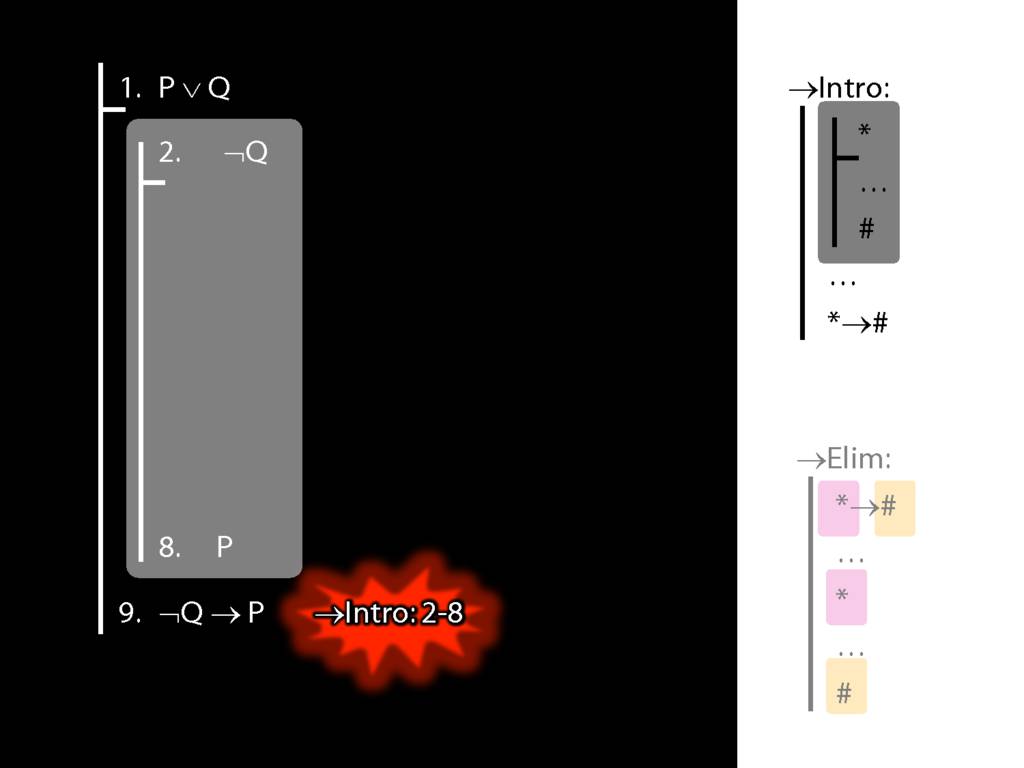
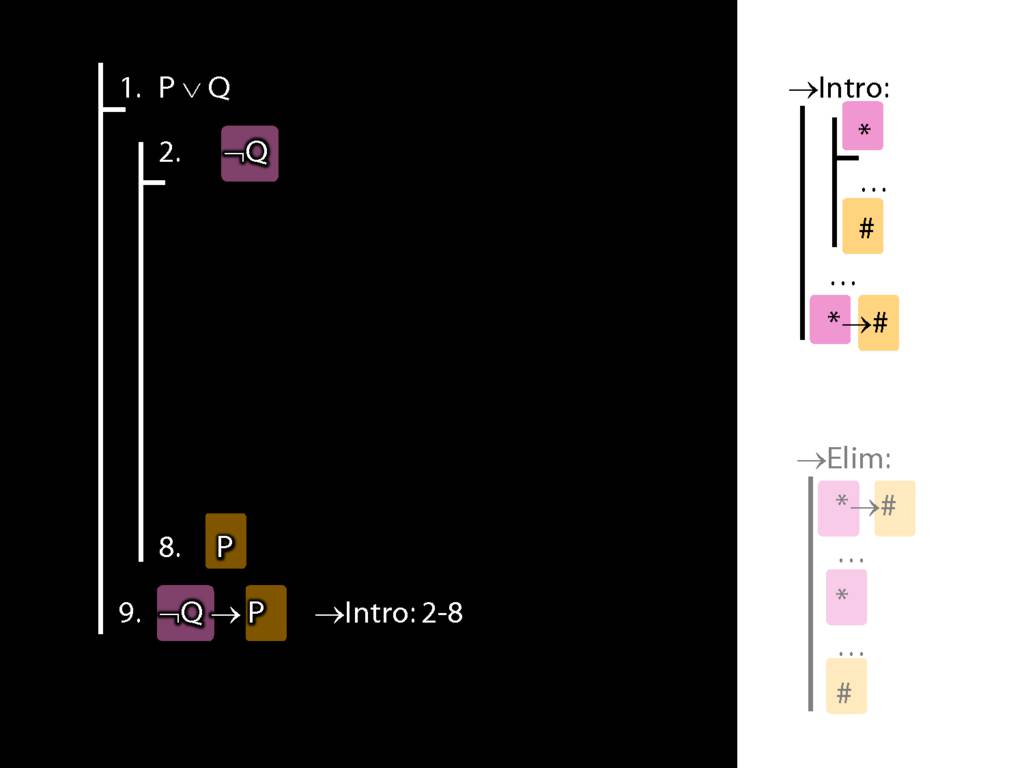
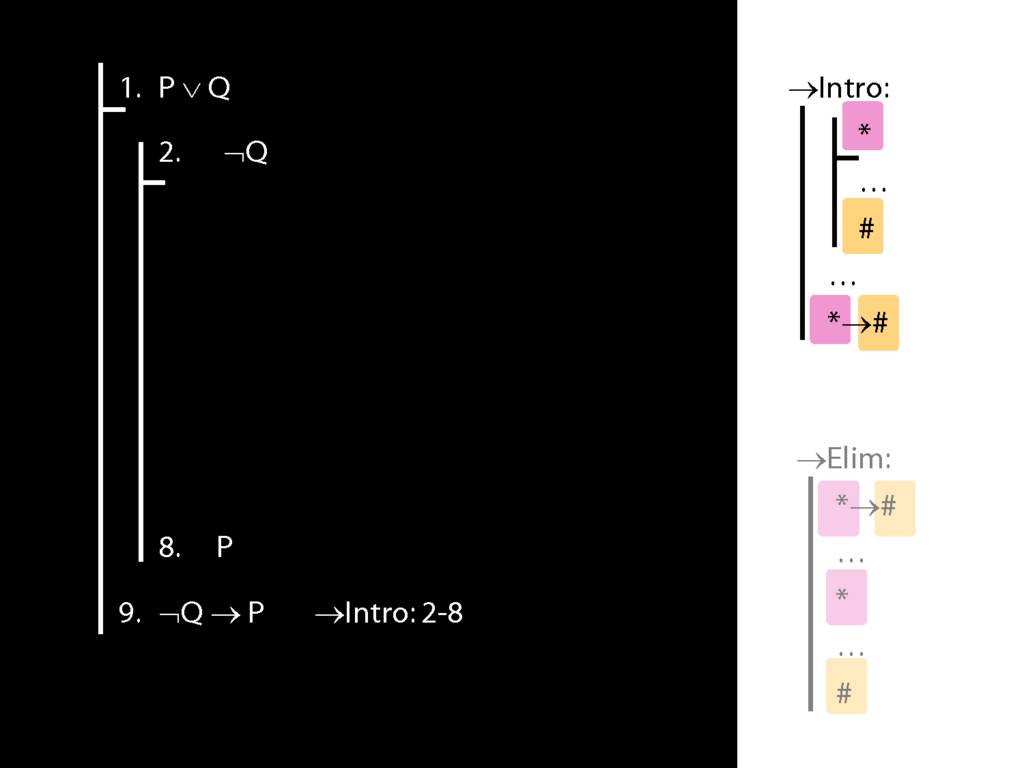
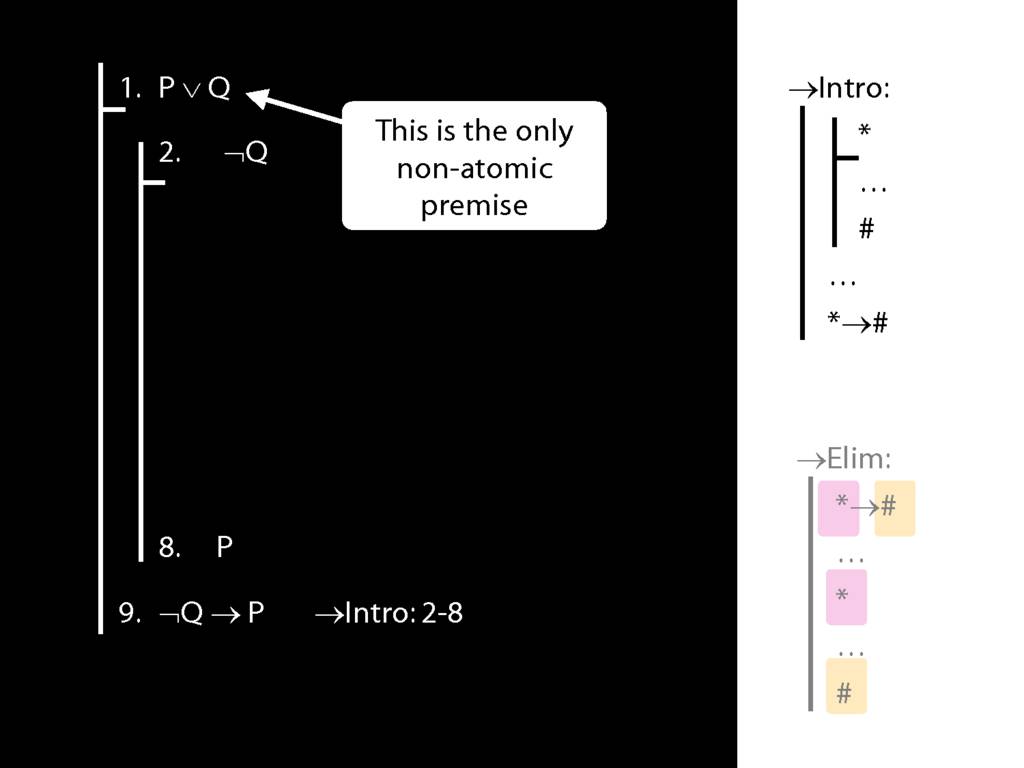
\section{→Intro: An Example}
\section{→Intro: An Example}


Subproofs with zoxiy
\section{Subproofs with zoxiy}
\emph{Reading:} §8.1, §8.2
\section{Subproofs with zoxiy}
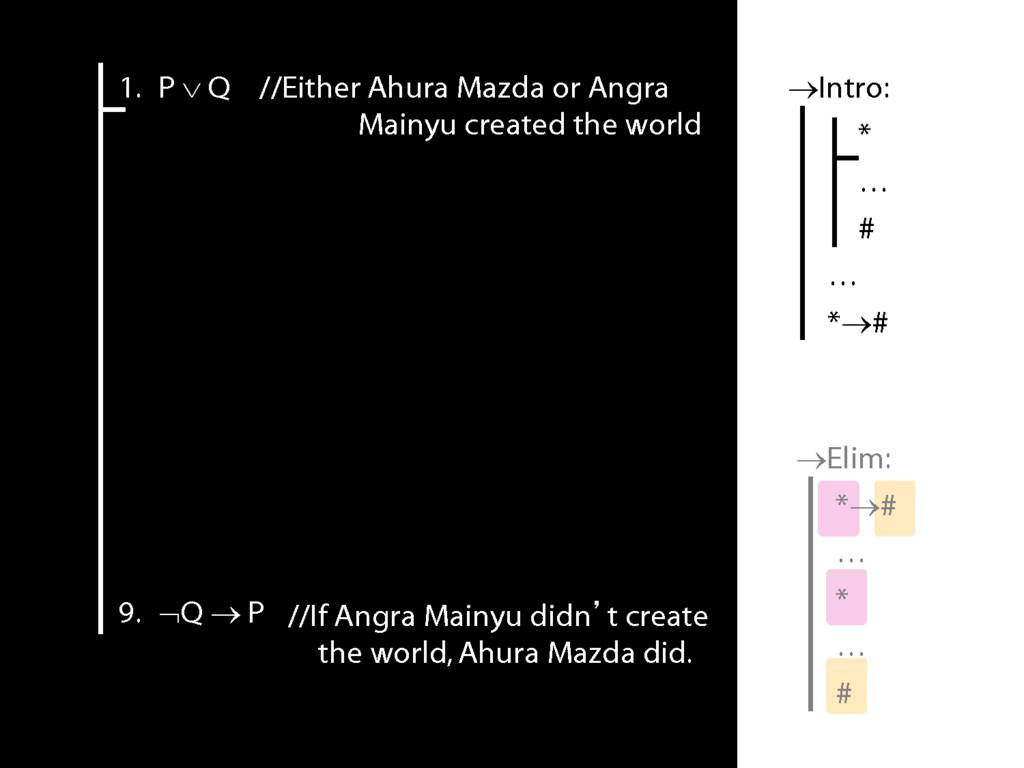
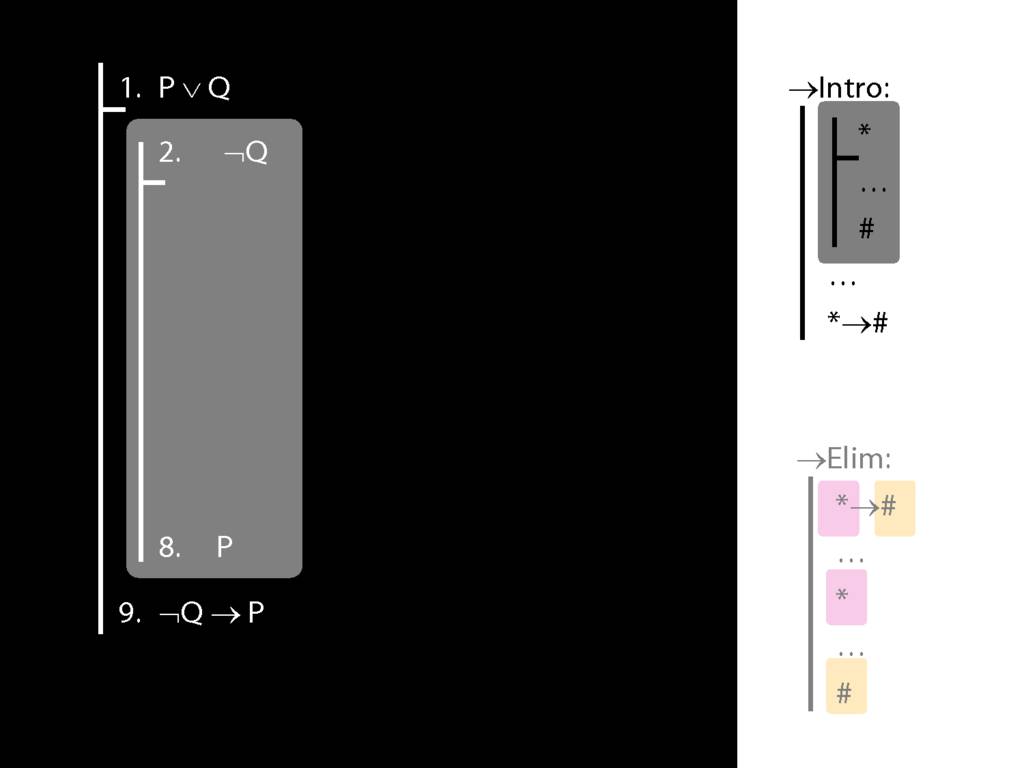
Here we’re asked to write a proof that will
require a subproof. (If you’ve been following the
lectures, you’ve already seen this proof.)
We’re going to create a subproof in order to use the rule arrow intro.
If you don’t already know the rule, please take a look at the rule now
so you can follow what we’re doing.
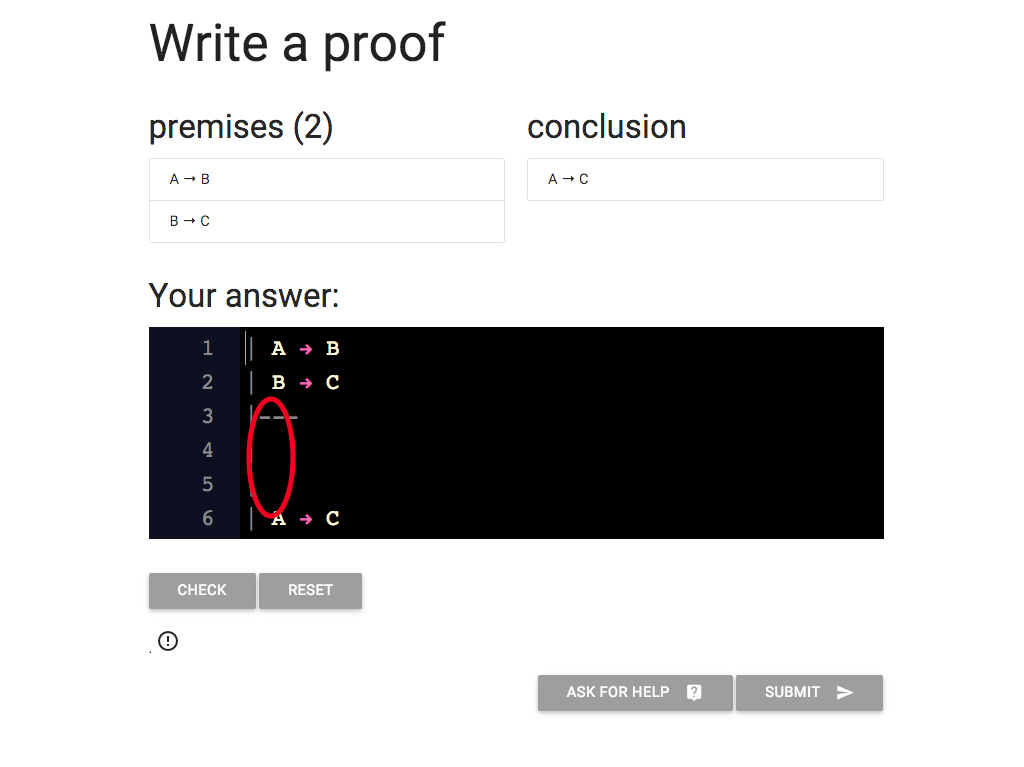
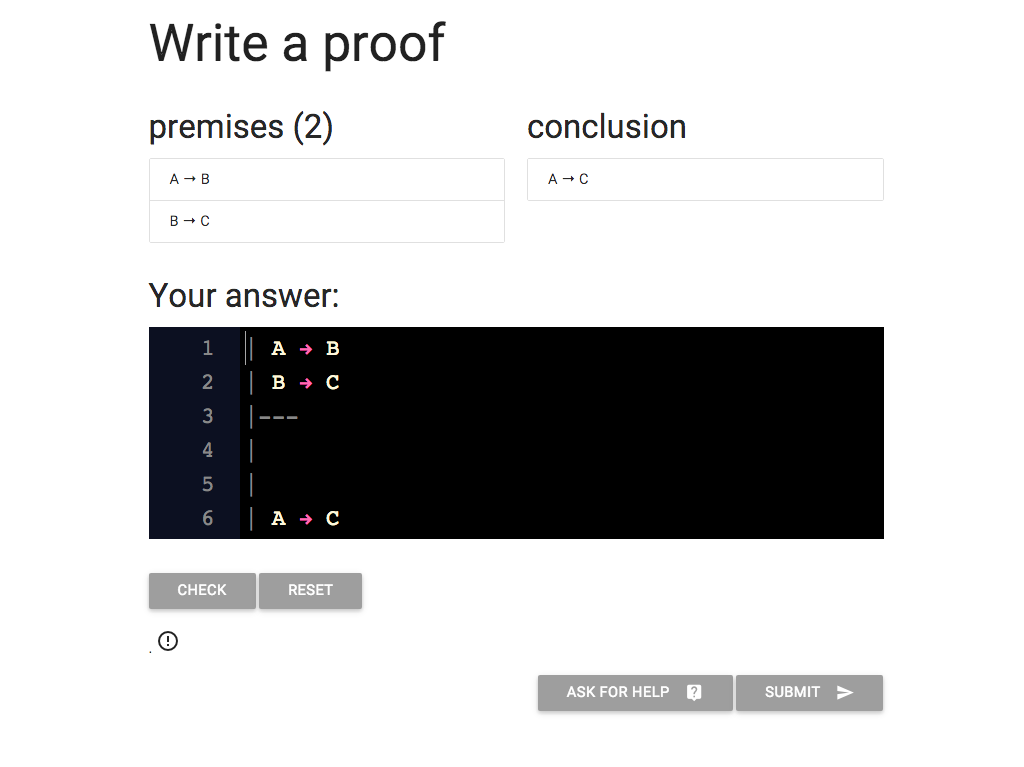
The first thing we need is a bit more space
for our subproof.
Remember that the proof is just a bit of text, and the black box here
is just a text editor.
So to make new lines I just use the enter key.

Here I’ve added new lines to the proof.
Each line starts with a vertical bar, ‘|’.
(If you can’t find the vertical bar on your keyboard you
might have to copy and paste it.)

OK, let’s make a subproof.
On each line, I need to add a new vertical bar like this one.
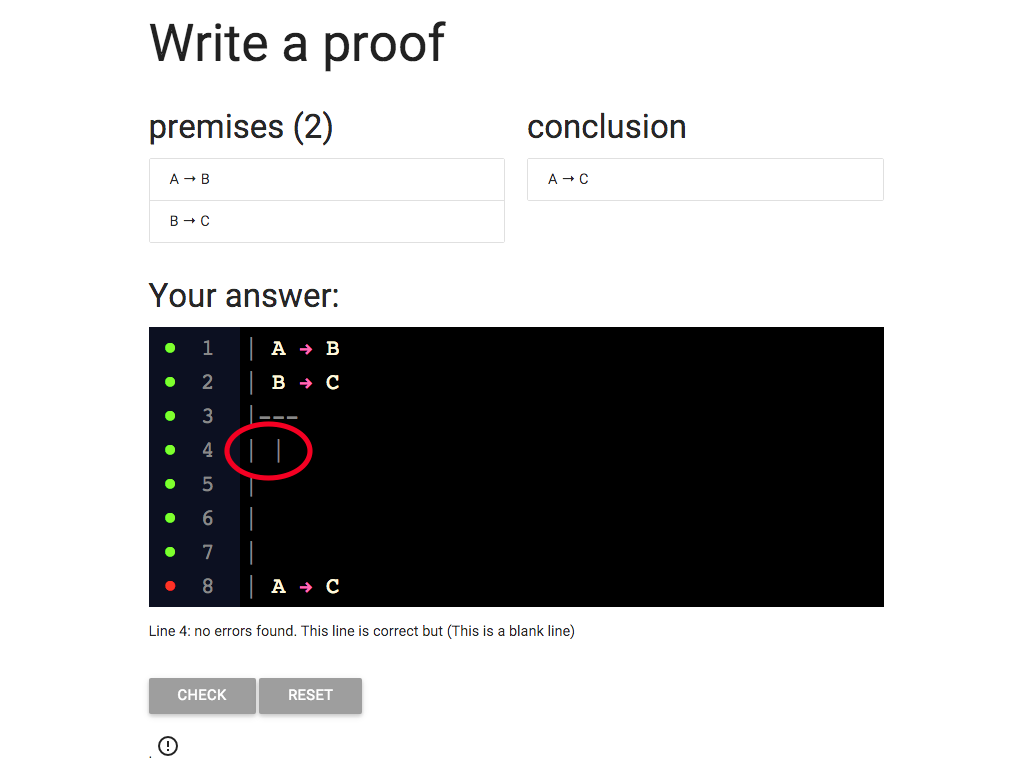
So now, as you can see, there are two vertical bars at the start of line 4.


I keep going with adding the extra vertical lines,
and I add the horizontal line as three dashes, ‘-’.
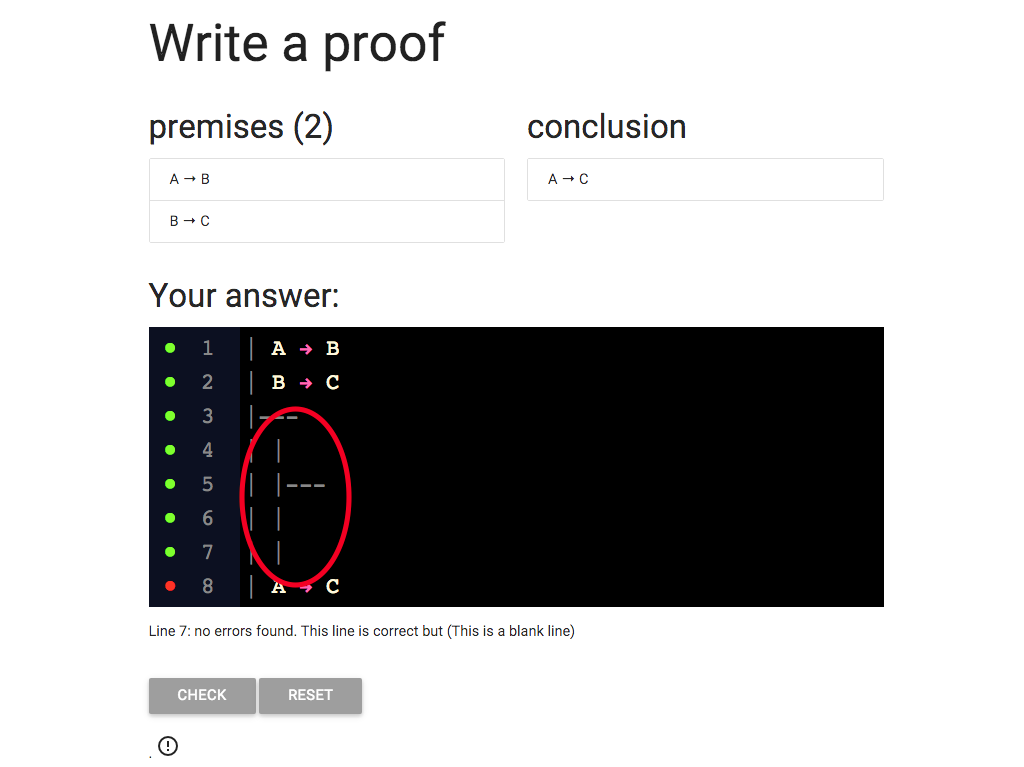
So this is a subproof. It’s just lie the outer proof:
each line that is part of it starts with a vertical bar,
and the premise is seperated from the rest with a horizontal
line comprising three dashses.

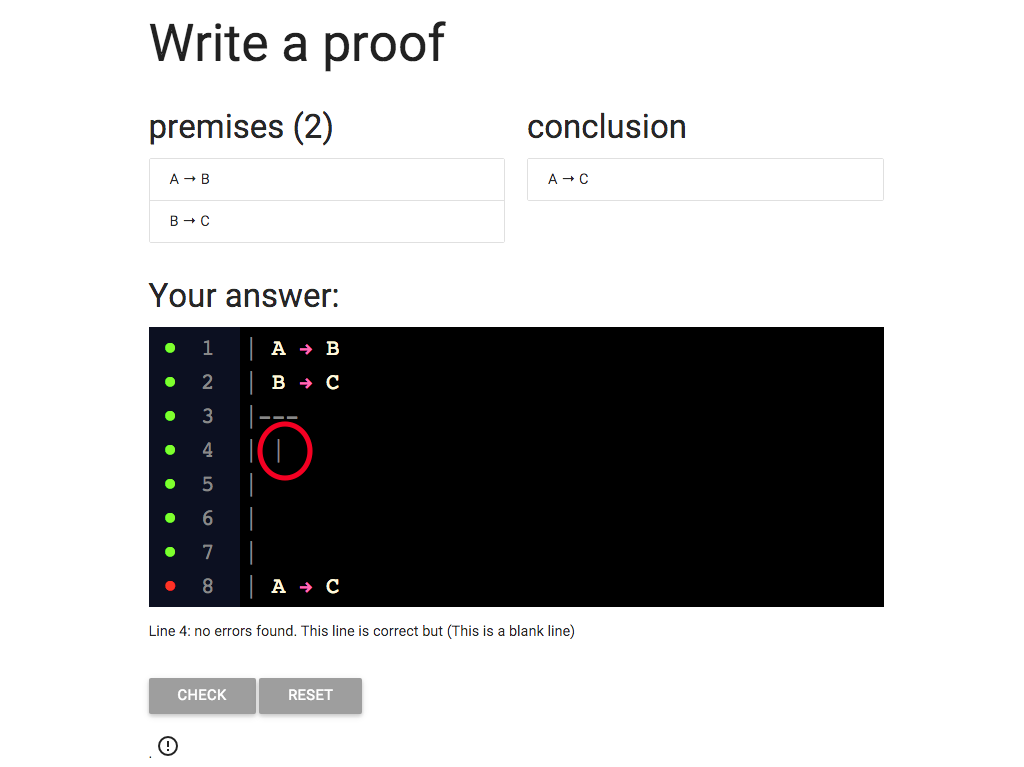
What next?
When I’m doing a proof I like to put the premise
and conclusion of the subproof in first.
After all, we already know what these are from the rule
of proof we are using, whereas we will have
to think about what goes in the middle.

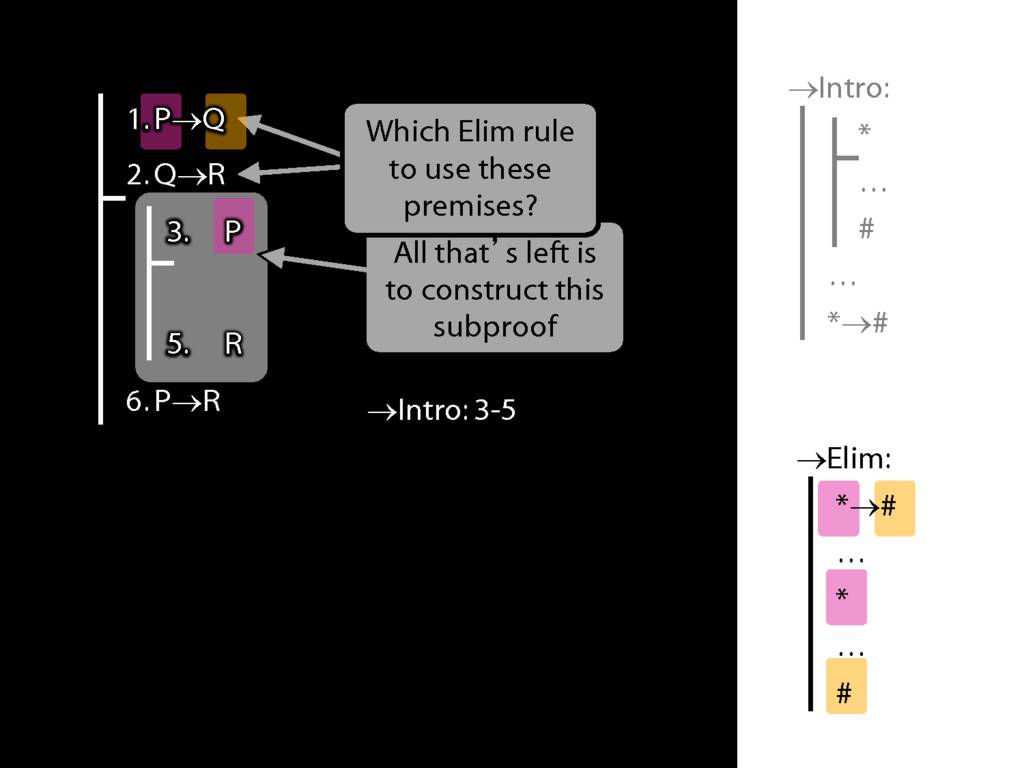
The premise of the subproof is A.

But why is it A?
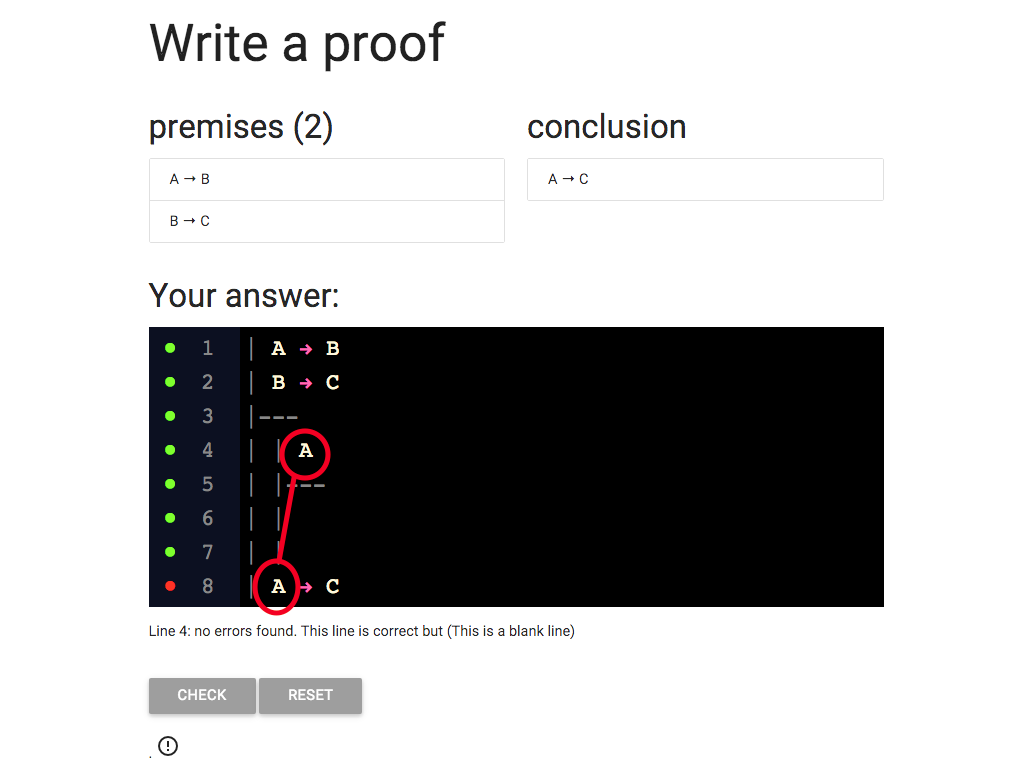
Well A is the thing on the left of the condition.
It’s the *antecedent* of the conditional.
And if you look at the rule for arrow intro, it tells you
that the subproof has to start with the antecdent of the
conditional you want to introduce.

Now for the conclusion of the subproof.
Here I’ve written C.
But why have I written C?
Because C is the thing on the right of the conditional
we are trying to introduce.
It is the *antecdent* of 'A → C '
And the rule for arrow intro tells us that we need a subproof
whose conclusion is the antecdent of the conditional we are
trying to introduce.

So there’s no choice about what to put for the premise and
conclusion of the subproof, we just have to do what the rule tells
us to do.
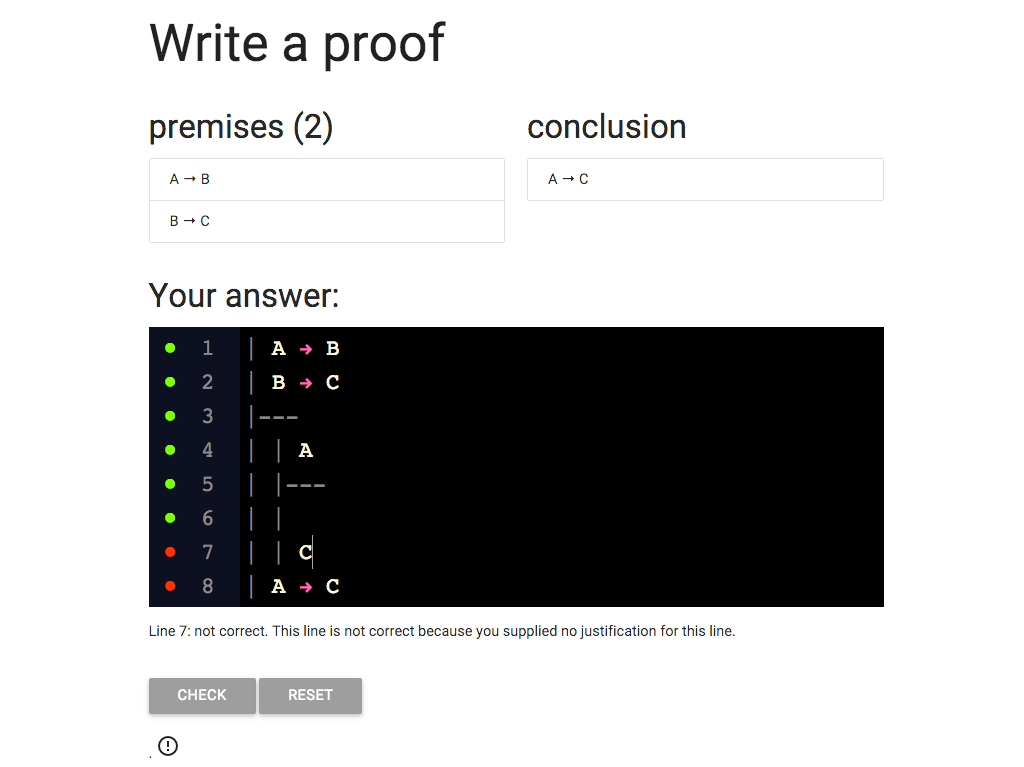
We’re not done with the rule arrow intro yet.
To use the rule it’s not enough to have a subproof: we also neeed
to provide the justification.
What goes here?
As always the rule tells us exactly what to write.
So I’ve filled in the justification.
But wait a minute: the red dot means the line is not correct.
Why is it wrong?

Oops, I wrote arrow elim when I should have written arrow intro.
You might think this doesn’t really matter; I got the ‘arrow’ part write,
I just confused intro and elim, which I do all the time (sorry).
But if you’re a machine, or a logican, it matters.
The software doesn’t do marks for effort, it just cares where what
you’ve written is a proof or not. And if you’ve got a red dot,
you havent’t written a proof.
So I’ve changed elim to intro.
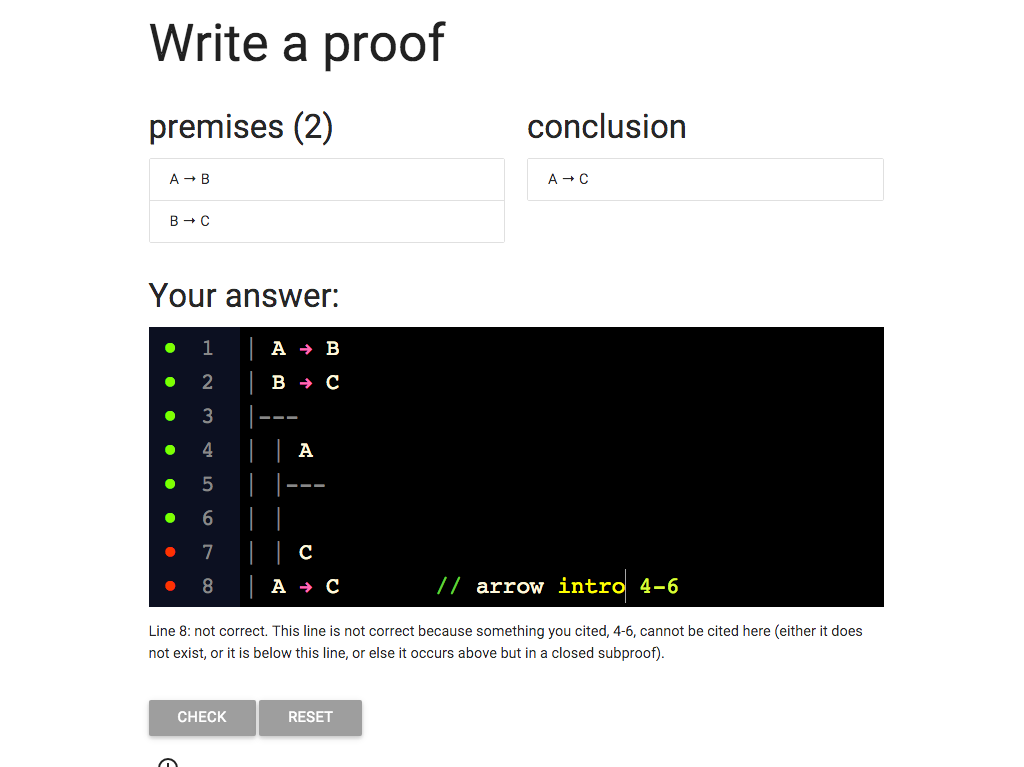
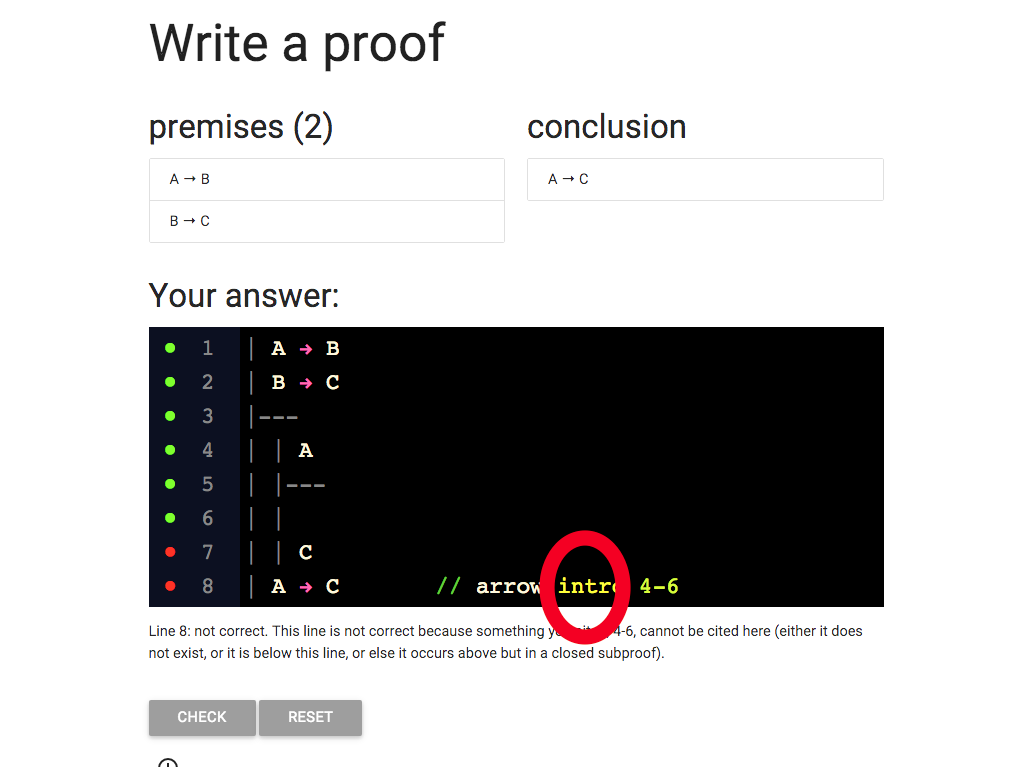
Now I’m citing the right rule ...
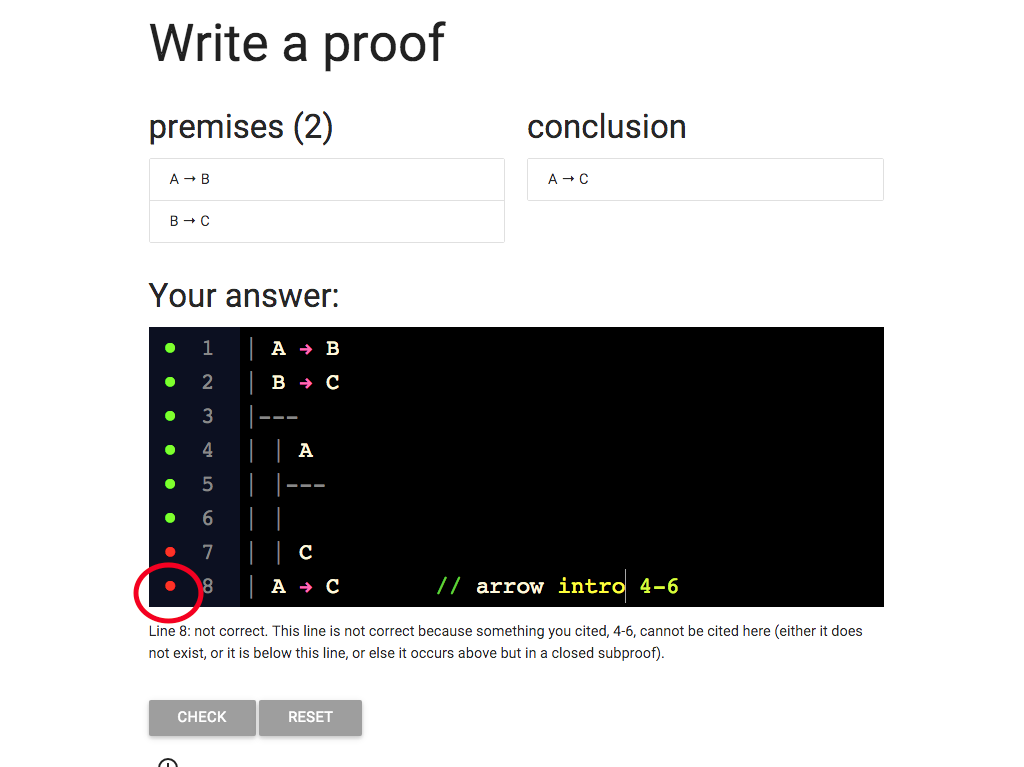
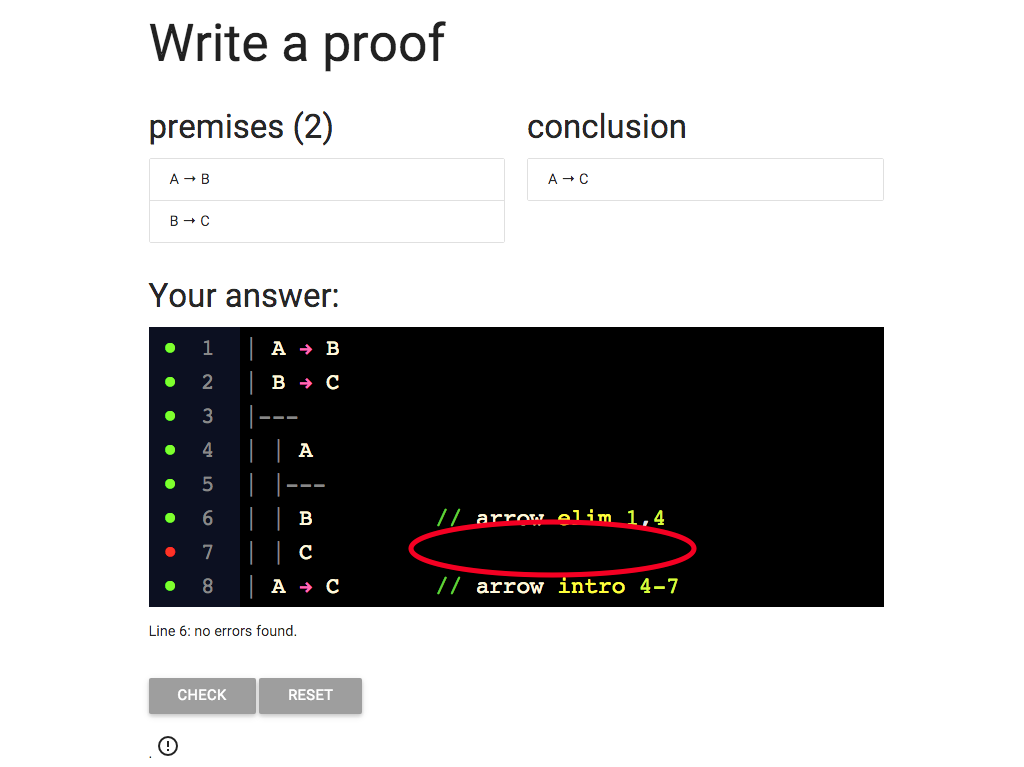
... but I still have that red dot.
What is wrong?
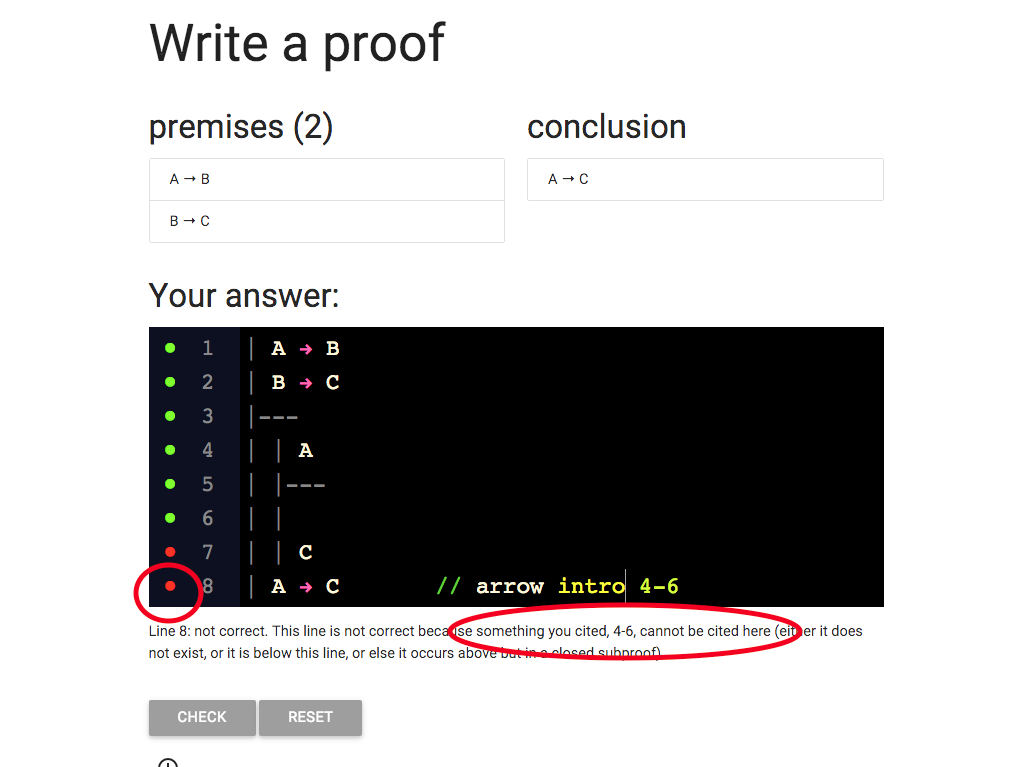
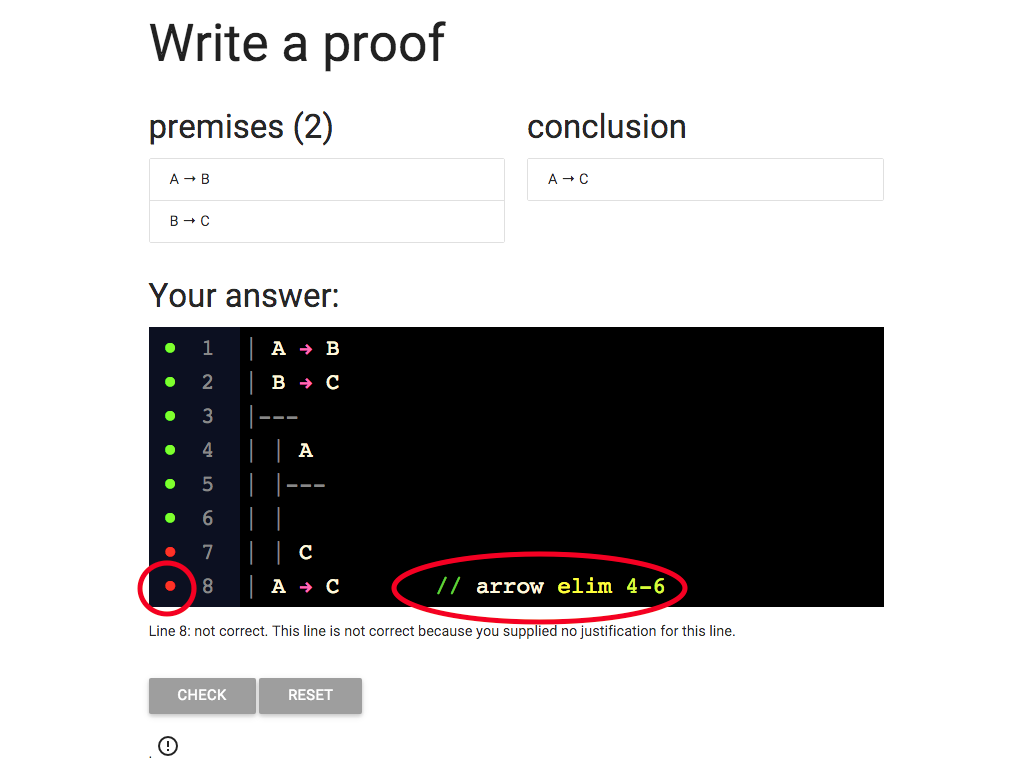
Take a look at the error message.
It tells me that lines 4-6 can’t be cited here.
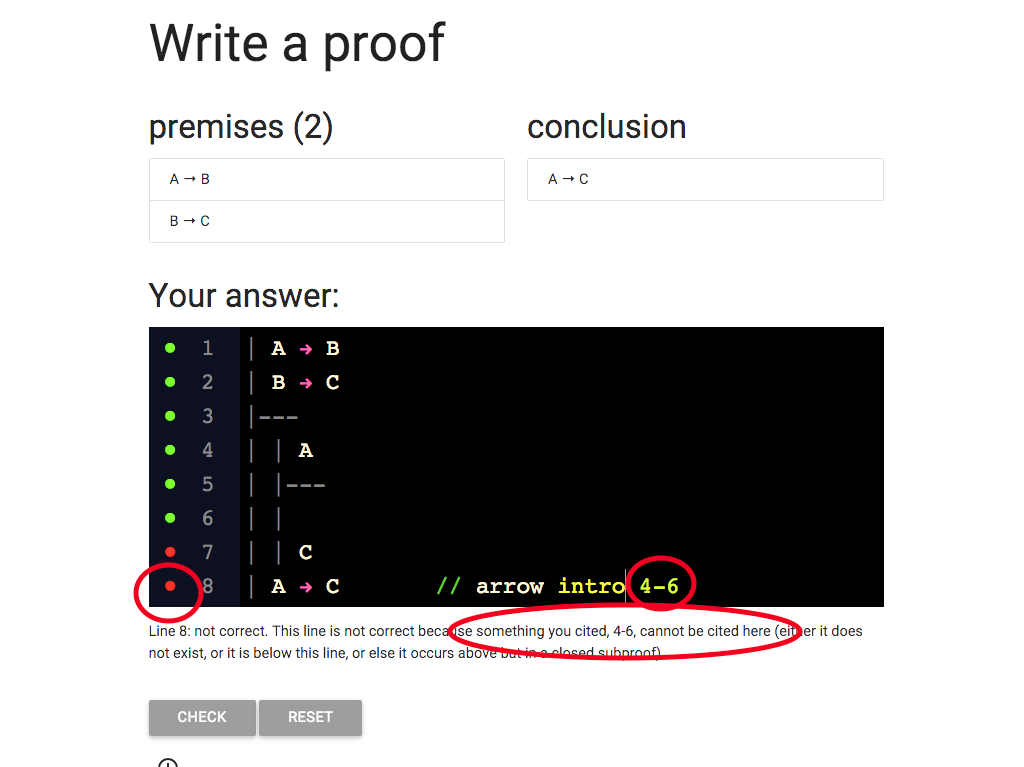
And I am citing lines 4-6, so the message is relevant.
But why can’t I cite them?
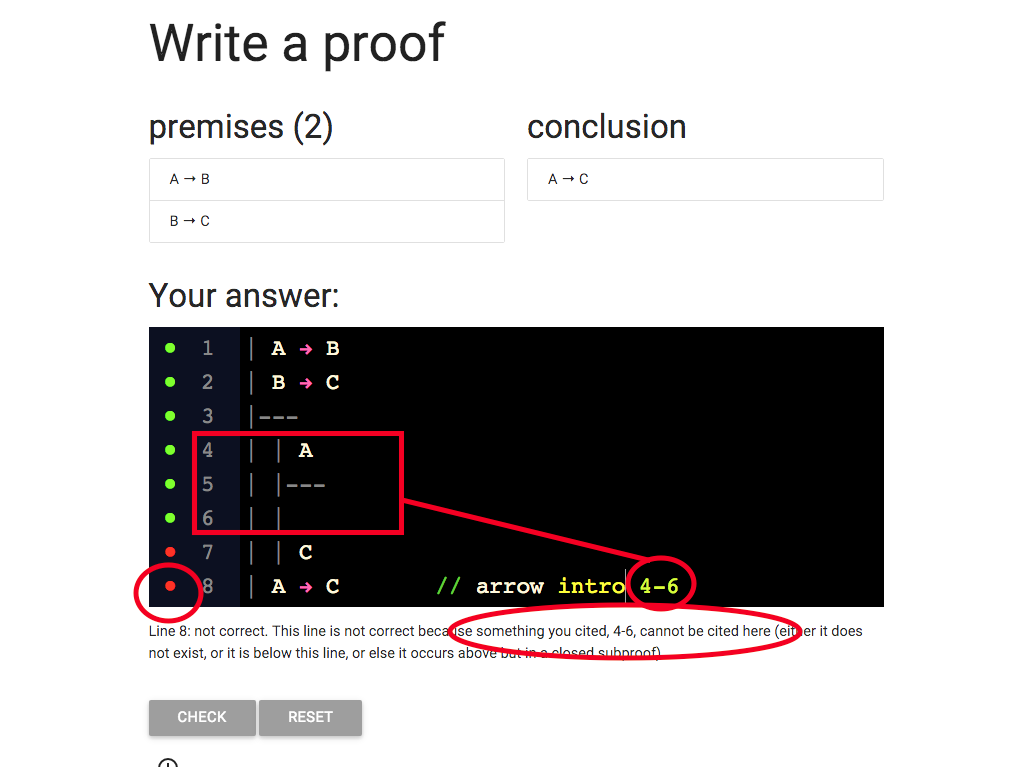
Wait a minute, lines 4-6 are only part of the subproof.
This is a mistake.
I wanted to cite the whole subproof.
And in fact the rules of proof only allow me to cite whole
subproofs.
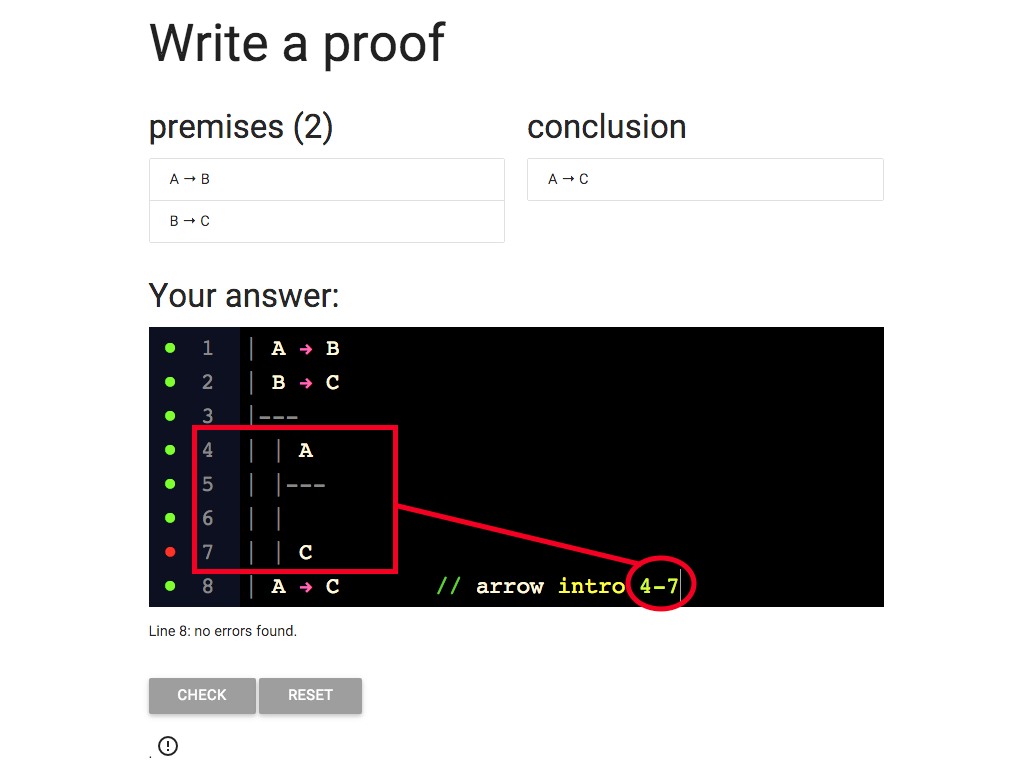
Let’s update so that the justification cites the whole subproof.
That is, it cites lines 4-7
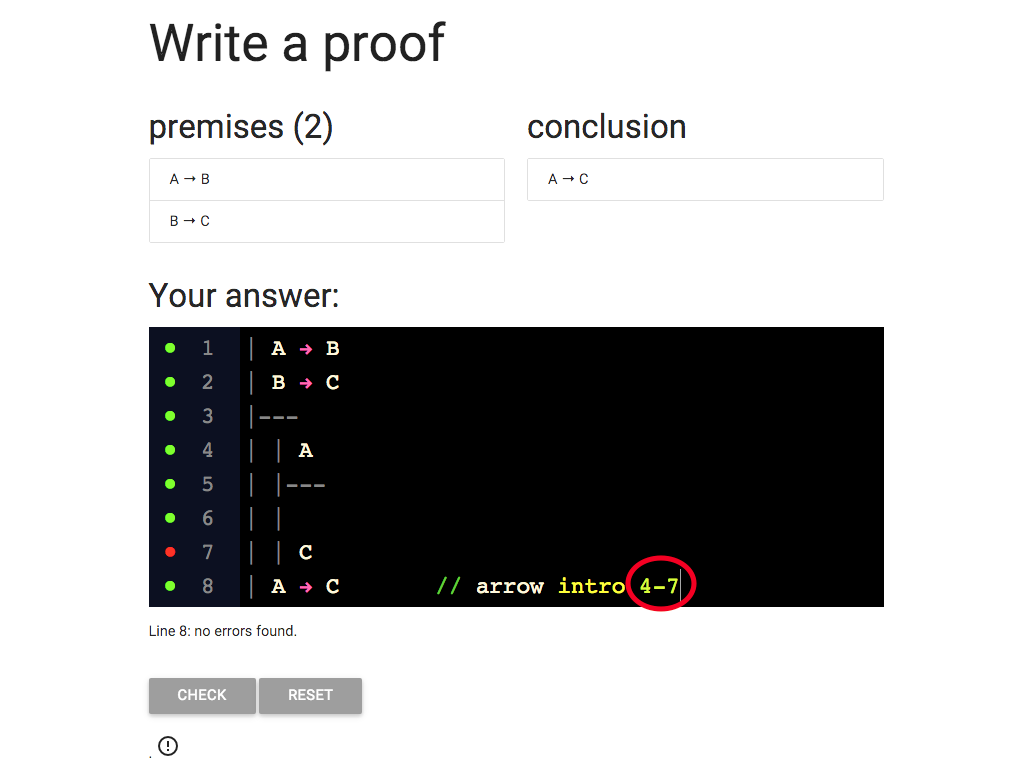
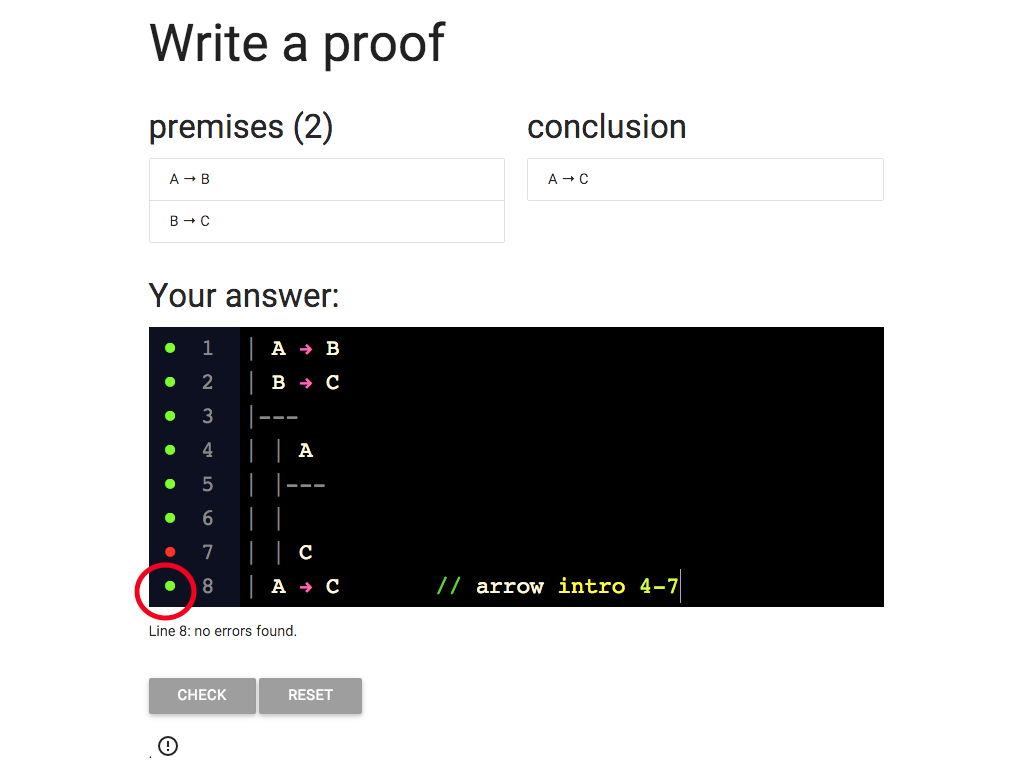
Now I’ve got the grren dot, at last.

Am I done?

Not quite, I still need to complete the subproof.

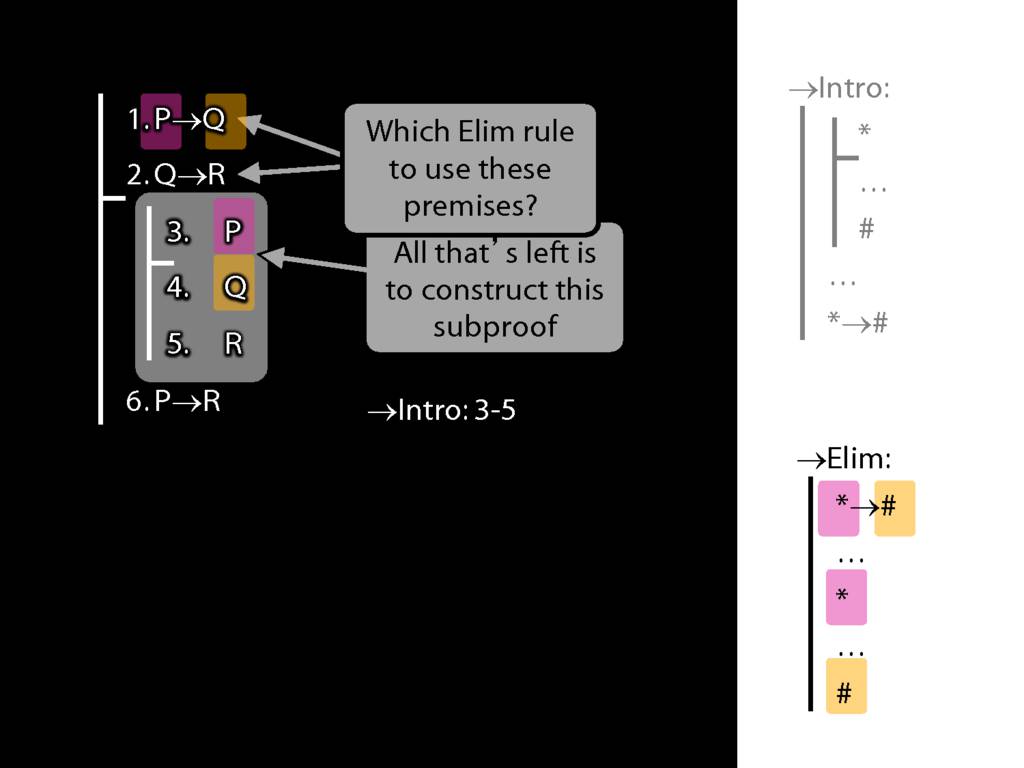
I know that I can get B from
A at line 4 and the conditional ‘A → B’ at line 1.
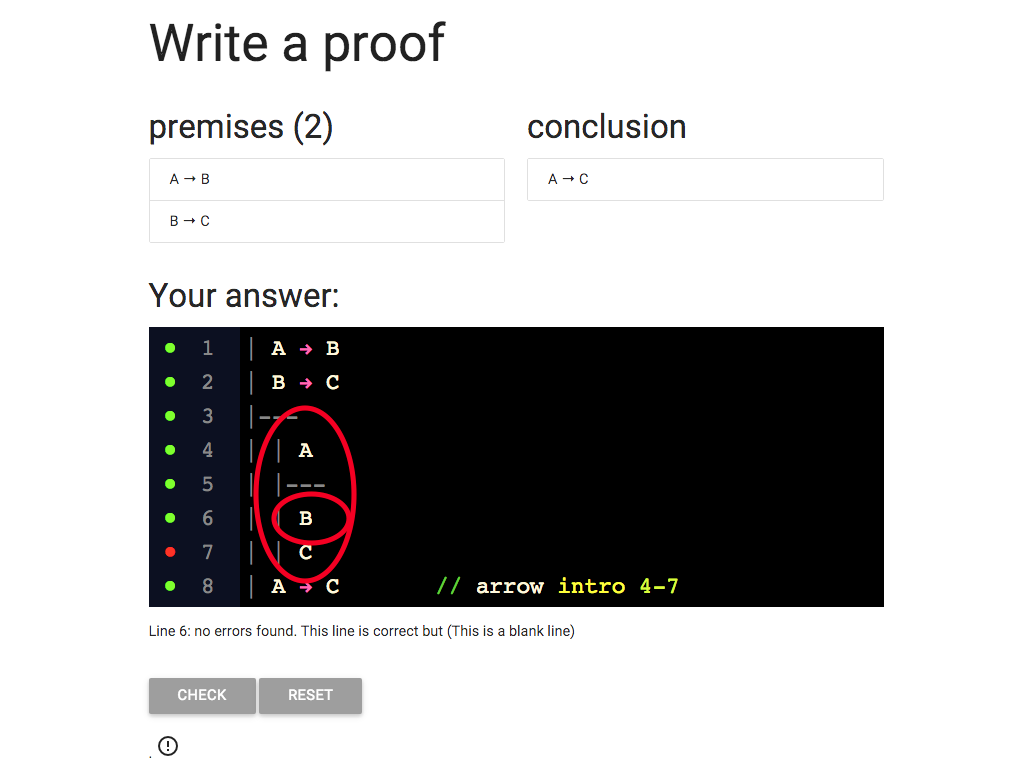
So I’ve added B at line 6.


Now I need to give some justification for this line.
What will the justification be?
I’m eliminating the arrow from a conditional sentence, A → B, from line 1, and I have the
antecedent of the conditional at line 4.
So what should I write for the justification?

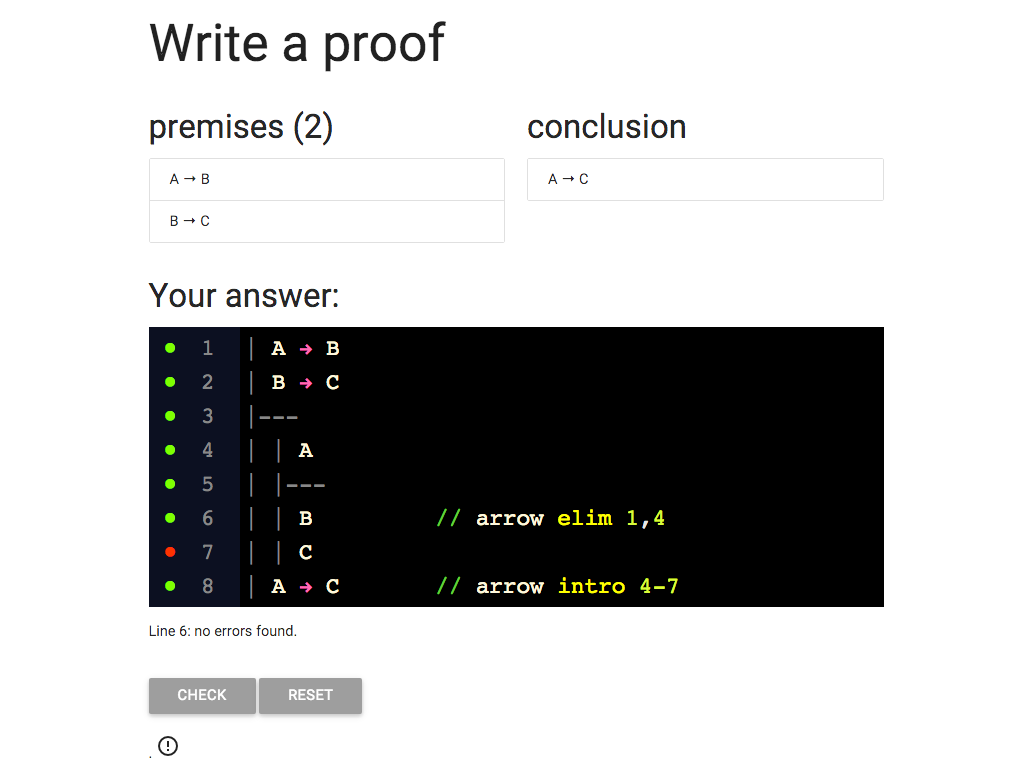
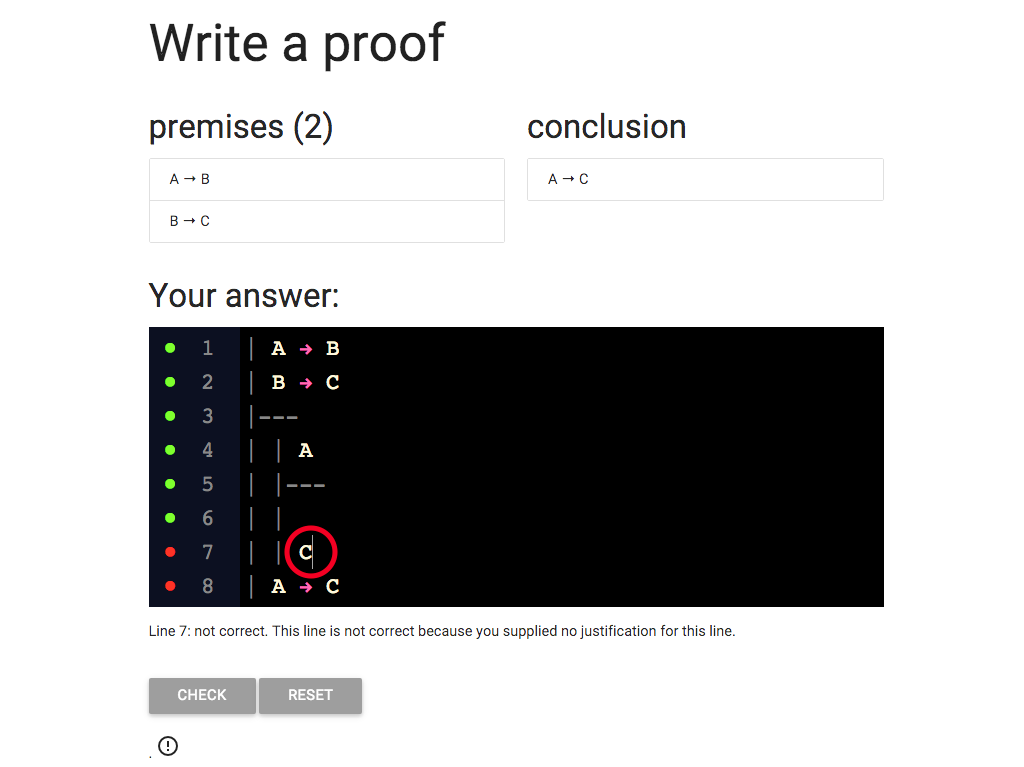
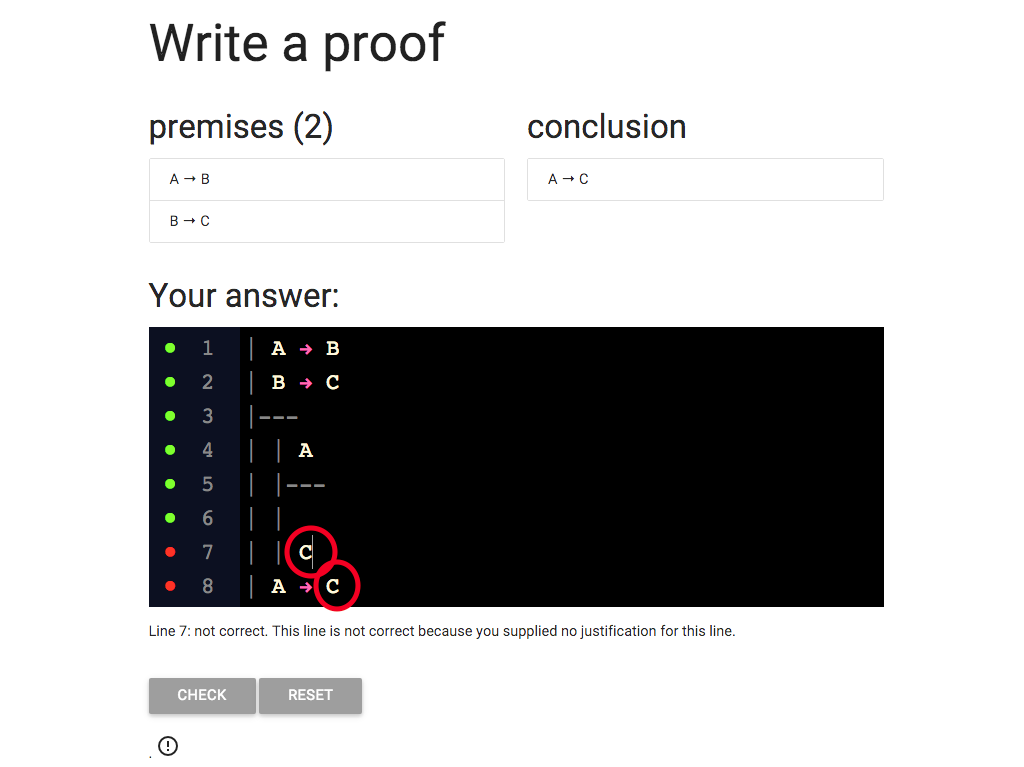
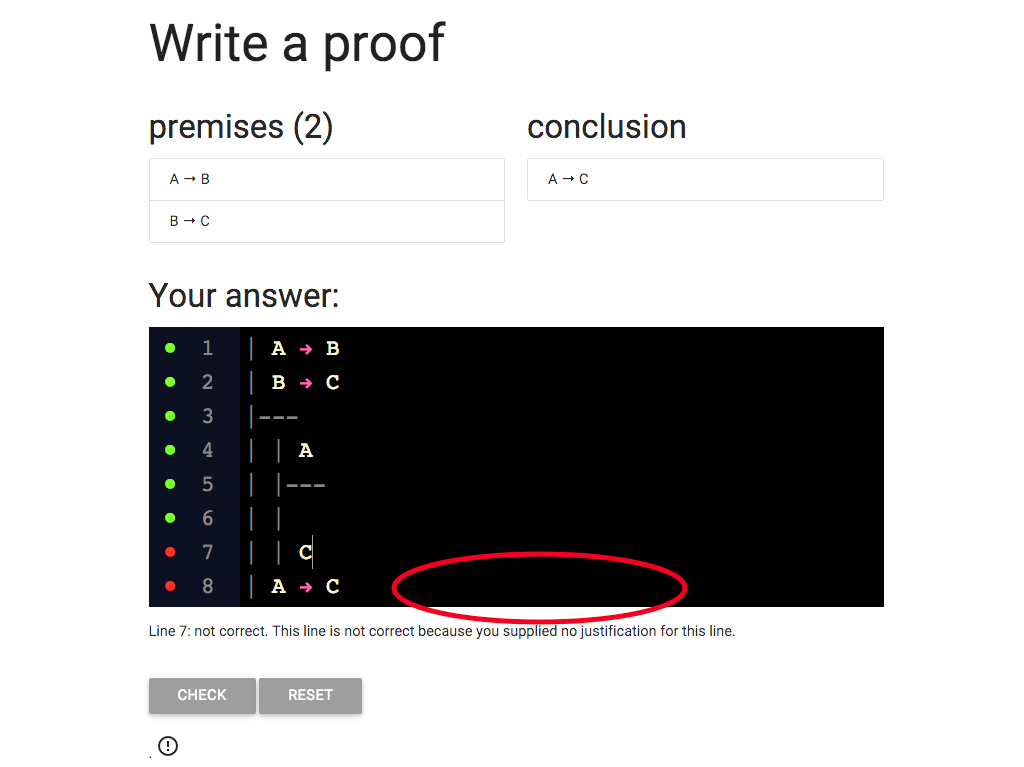
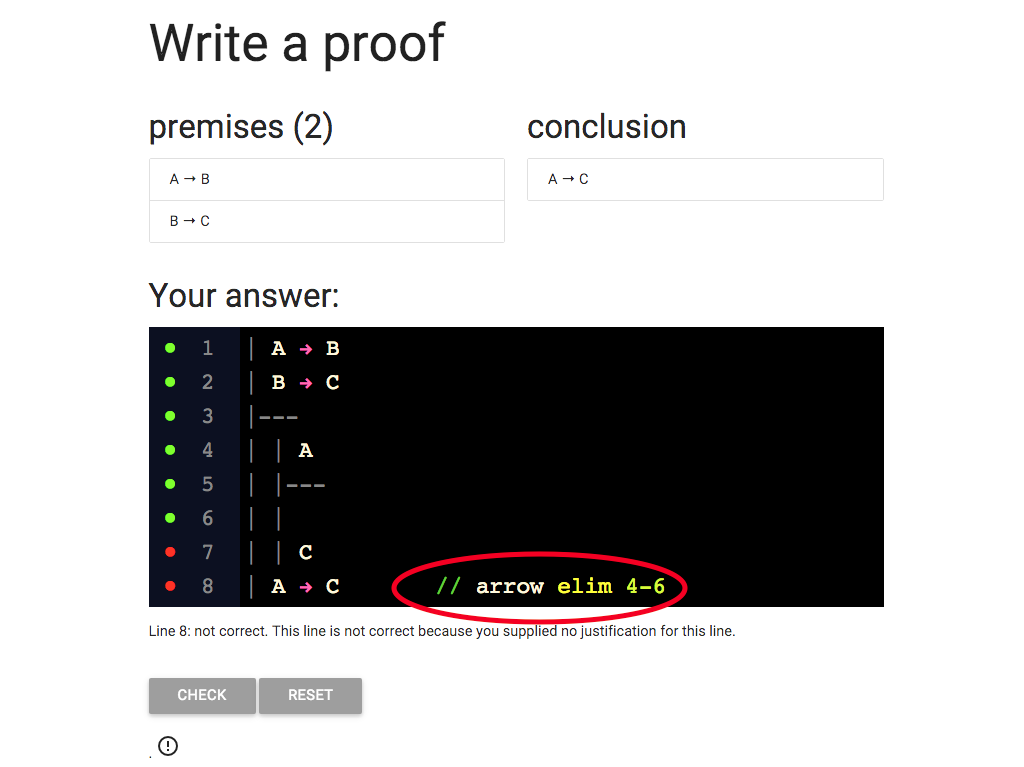
The last thing I need is the justification for the C at line 7.
Where does this come from?

I’m eliminating the arrow from B → C (line 2) and I can do this because
I also have the antecedent, B, at line 6.
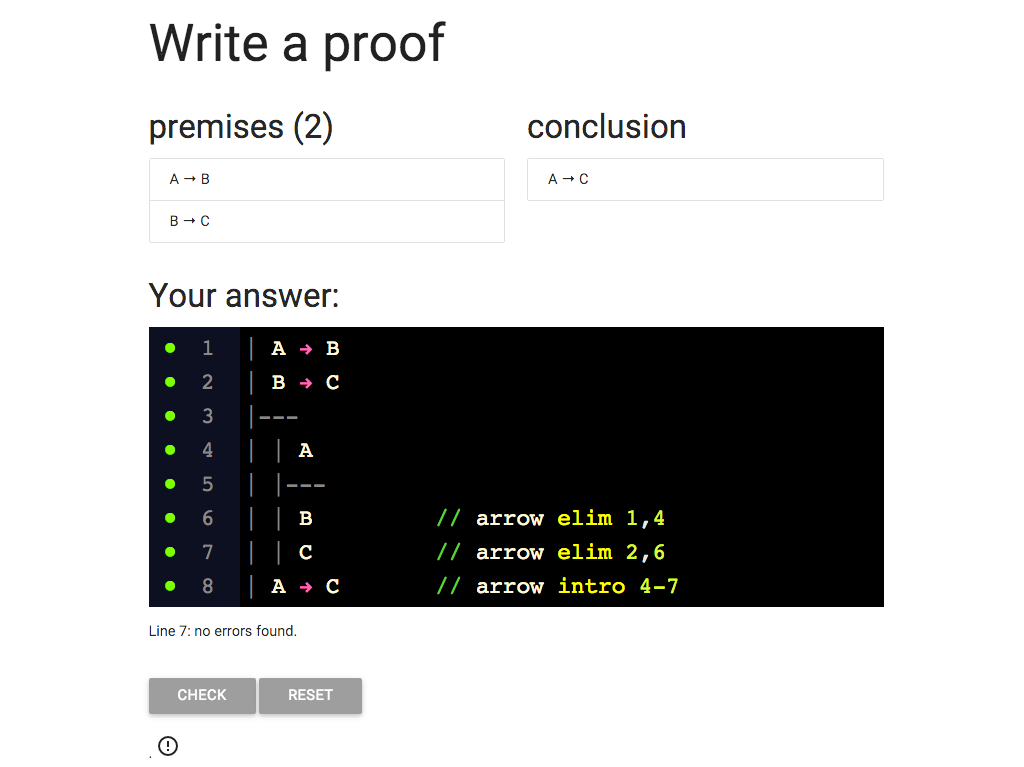
The proof looks ok, lots of green dots, but sometimes the dots don’t
get updated (they’re a bit lazy to avoid making your browser slow down).
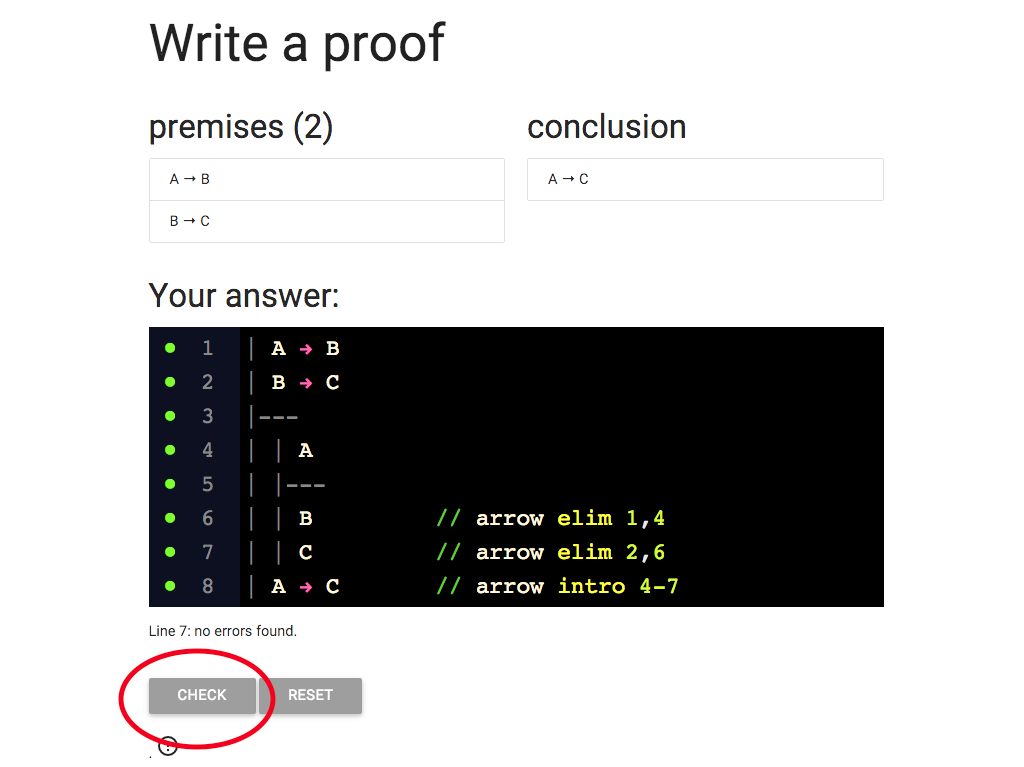
So to be sure I can hit the ‘CHECK’ button.

Great, we did it!

∨Intro and ∨Elim
\section{∨Intro and ∨Elim}
\emph{Reading:} §6.2
\section{∨Intro and ∨Elim}

\section{∨Elim: An Example}
\emph{Reading:} §5.2, §6.2
\section{∨Elim: An Example}
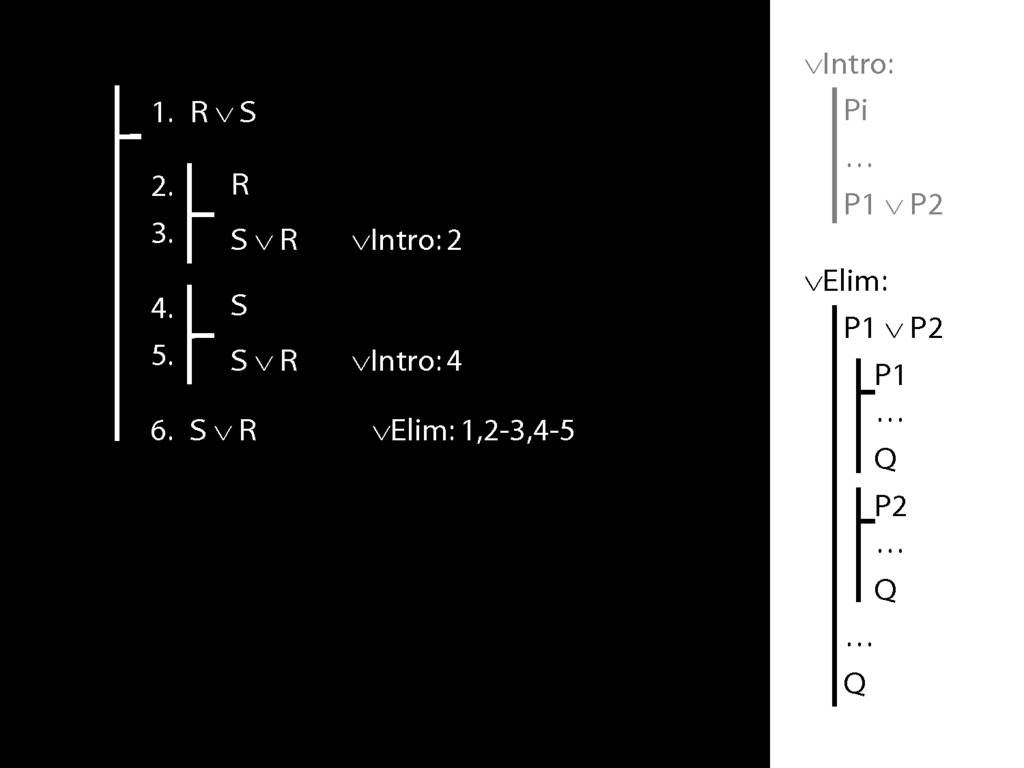
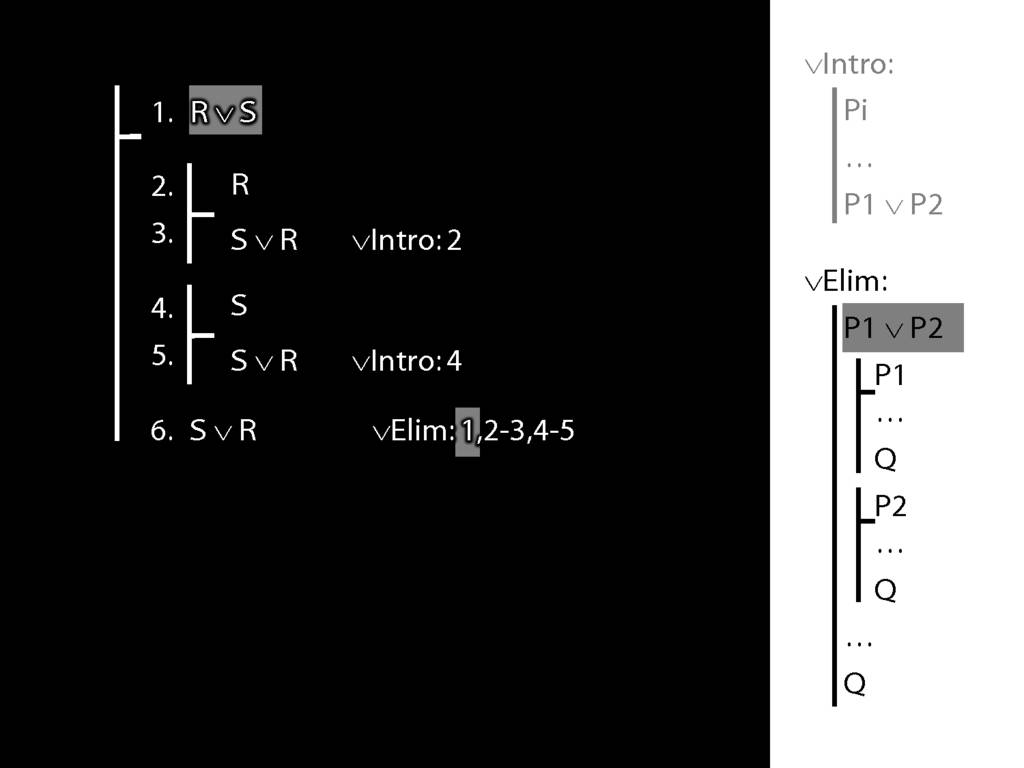
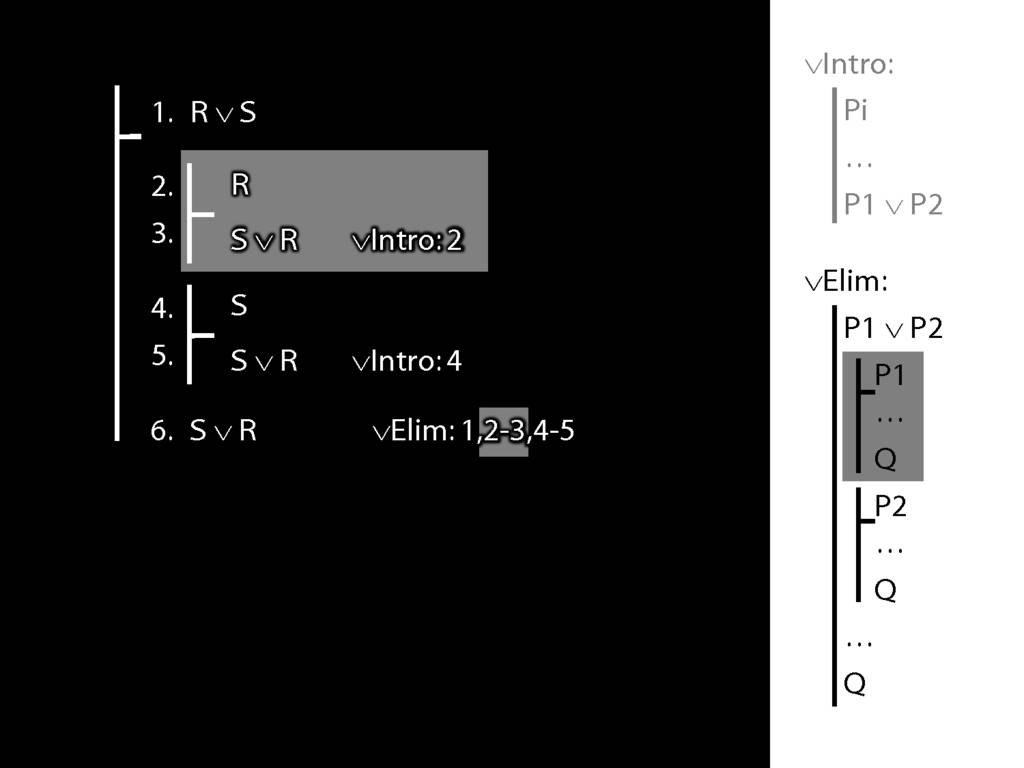
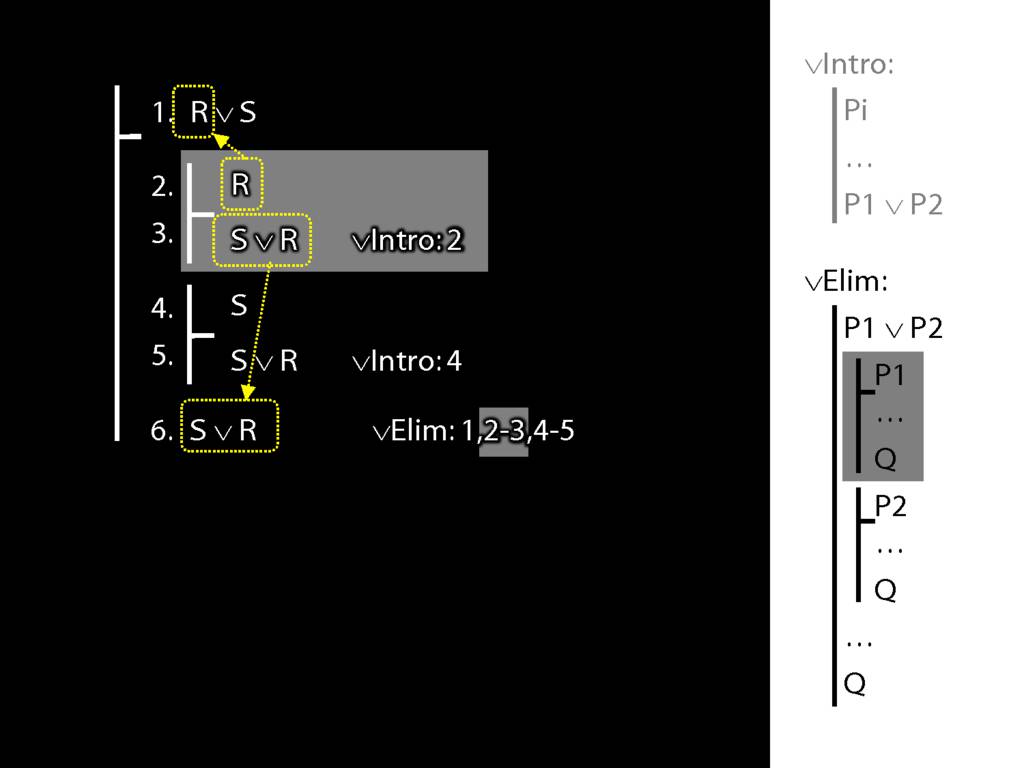
To prove a conclusion from a disjunction, prove it from each disjunct.

5.1--5.6
6.2--6.6

¬, ⊥
\section{¬, ⊥}
\emph{Reading:} §6.3
\section{¬, ⊥}

Here are the negation sign and my favourite truth-functional connective, the contradiction sign.
For each of these signs, we want two things: it's truth table and the rules of proof that allow us to exploit it in Fitch proofs.
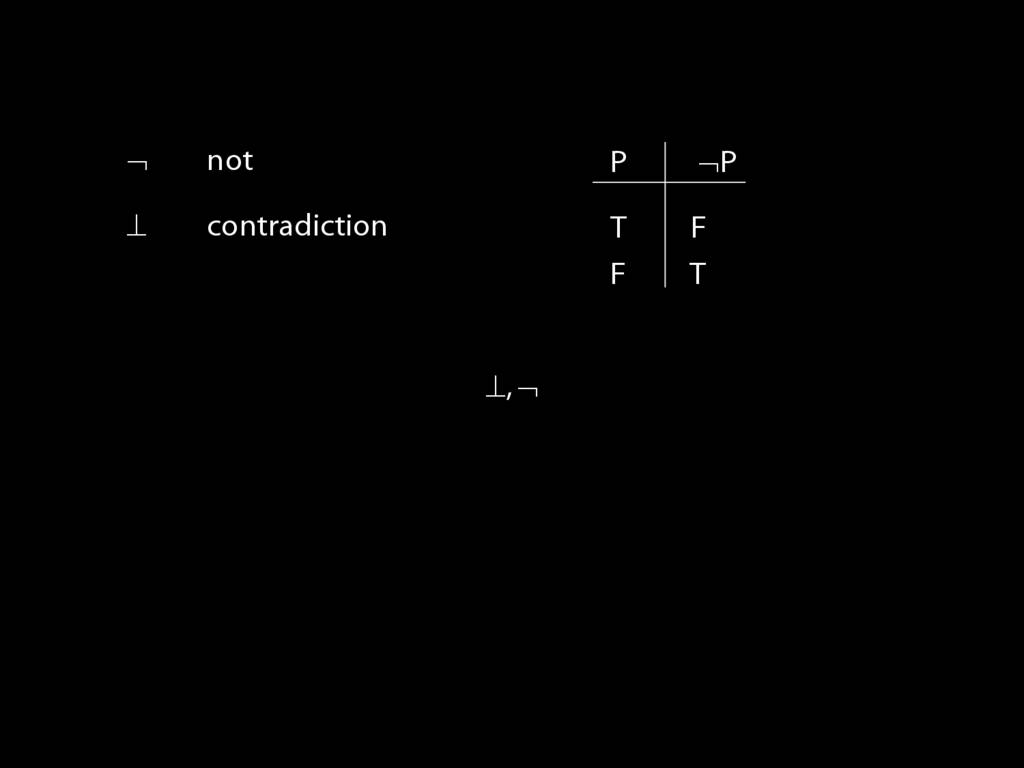
Here's the truth table for negation: it takes true to false and false to true.
This is a sulky attitude to have, but not quite as sulky as the contradiction sign ...
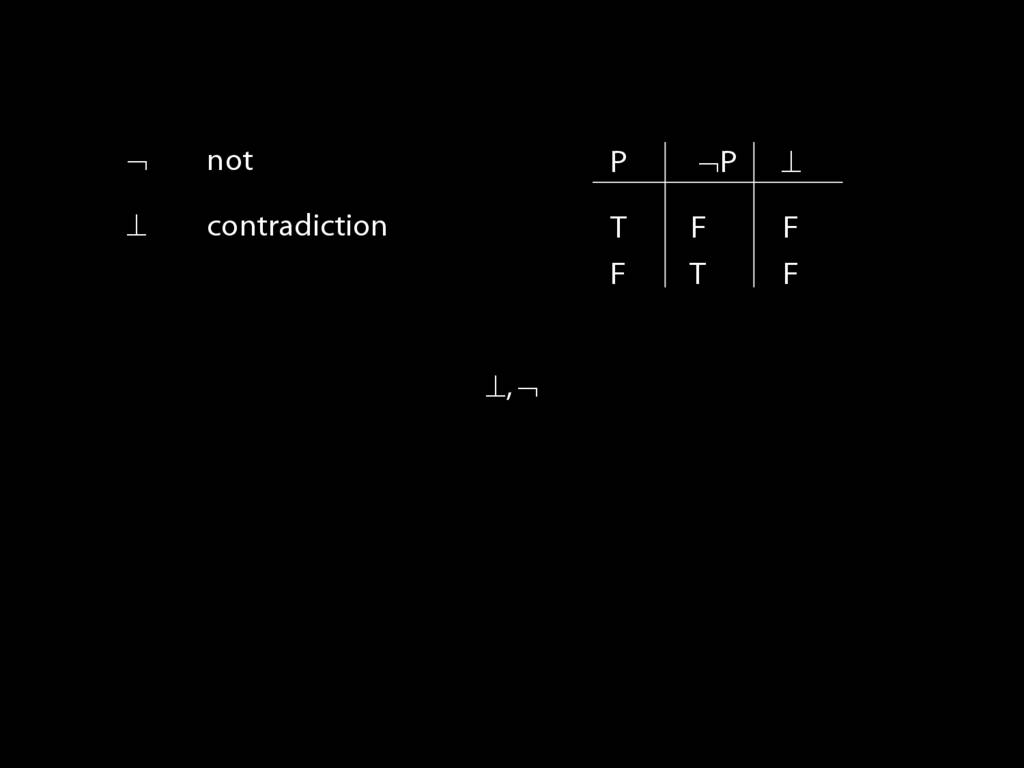
... which just takes everything to false.
(How great is that?)
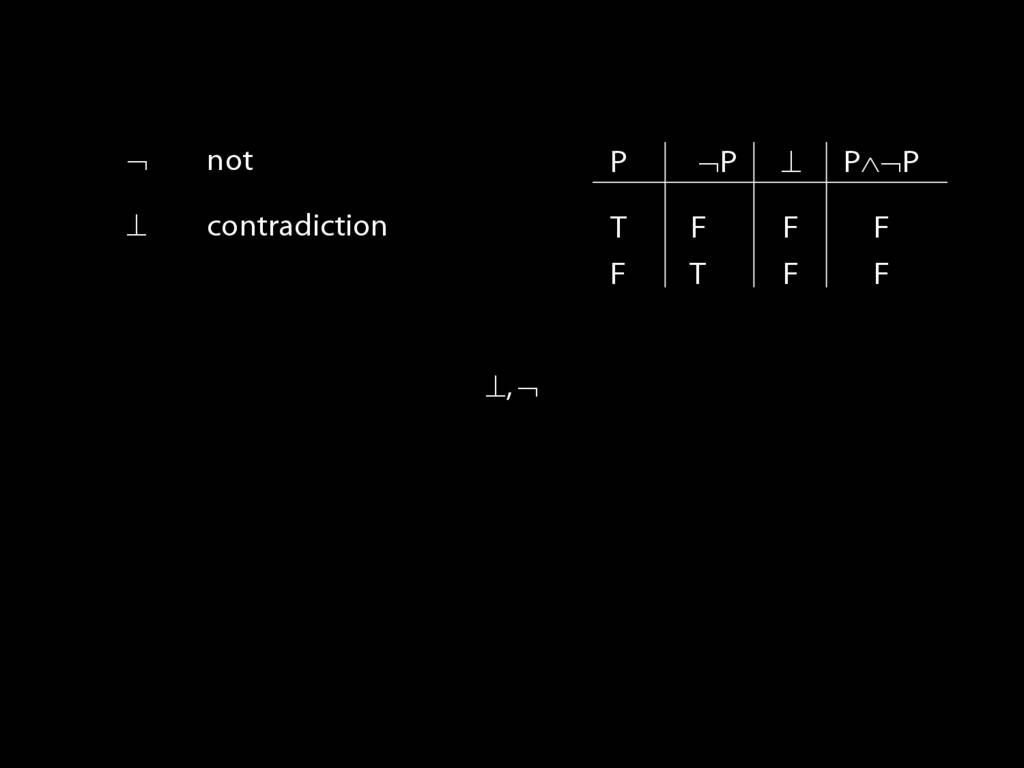
Strictly speaking we don't need the contradiction sign because it has the same truth table as P and not P.
(Well, strictly speaking, we only need one connective, but that is another story.)

Let's do contradiction first.
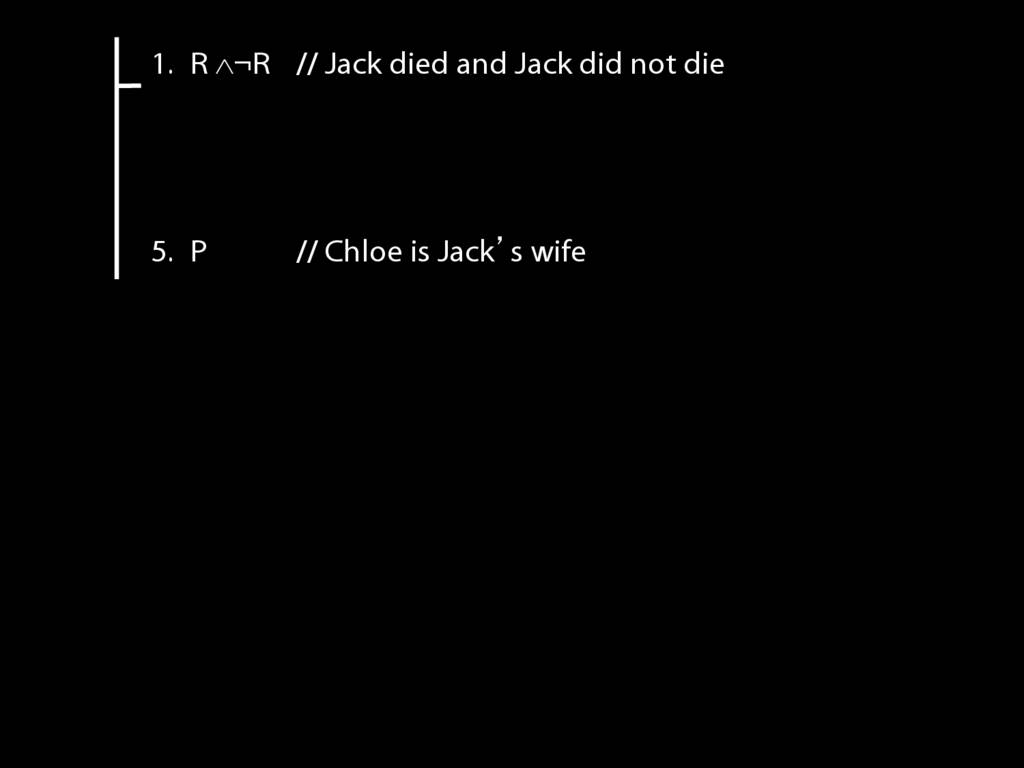
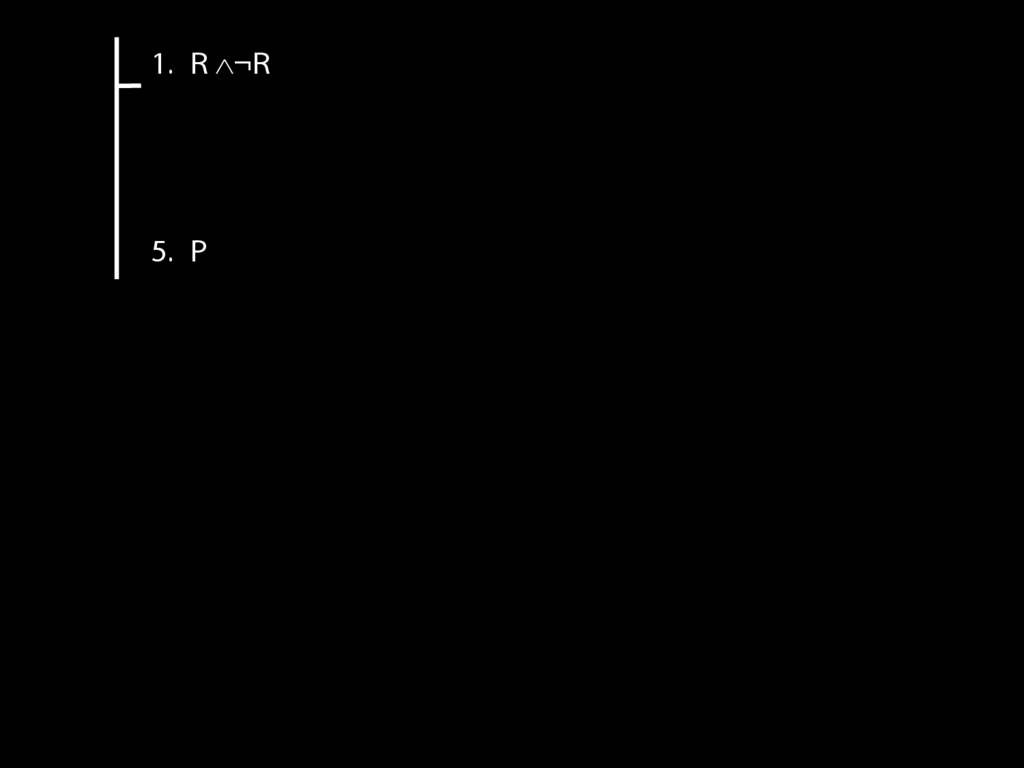
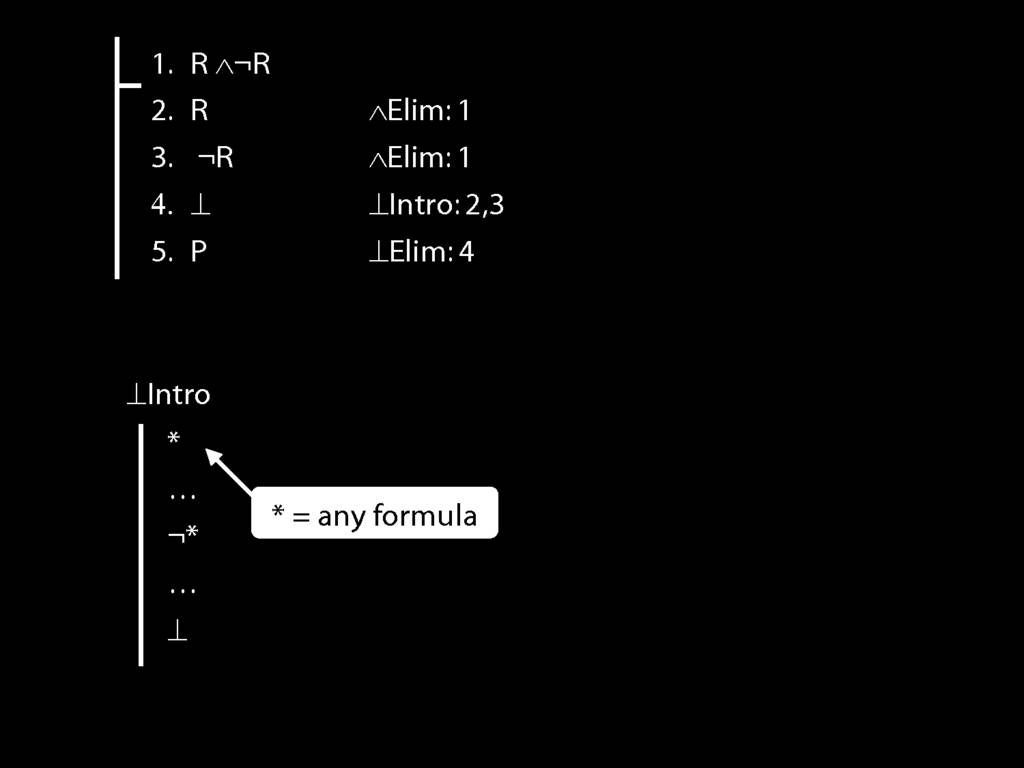
Here is an argument exemplifying the use of the contradiction rules.
We're going to prove it using Fitch, but first, is it valid?

Recall the definition of logical validity.
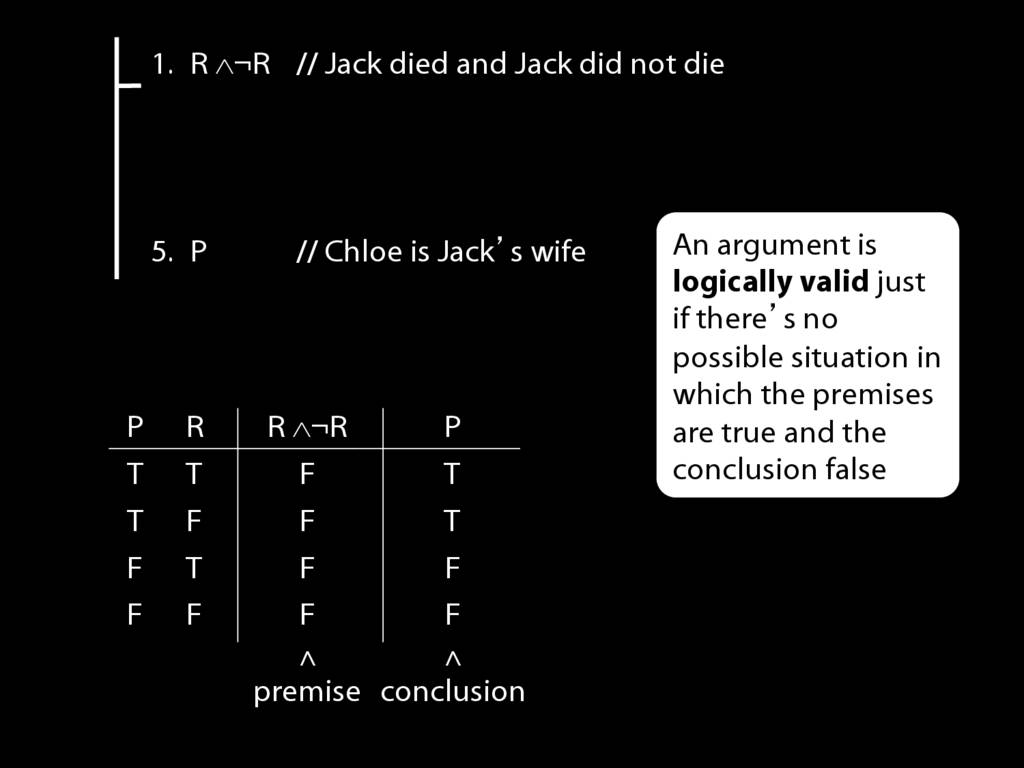
Now looks at the truth-tables for premise and conclusion.

You can see that there's no possible situation in which the premise is true.
So, surely, there can't be a possible situation in which the premise is true AND the conclusion is false.
So the argument is logically valid.
Now let's prove it.
What shall we do first? The premise is a conjunction, so we can apply conjunction elimination.

This gets us R ...
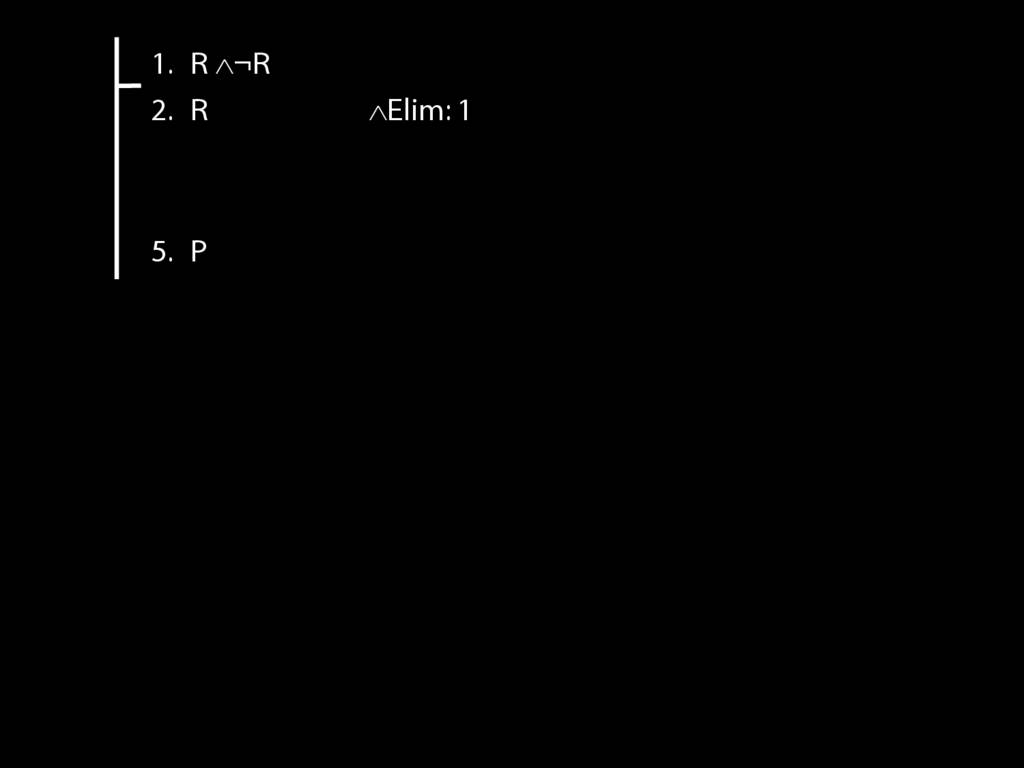
... and we musn't forget to cite the rule and the line number.
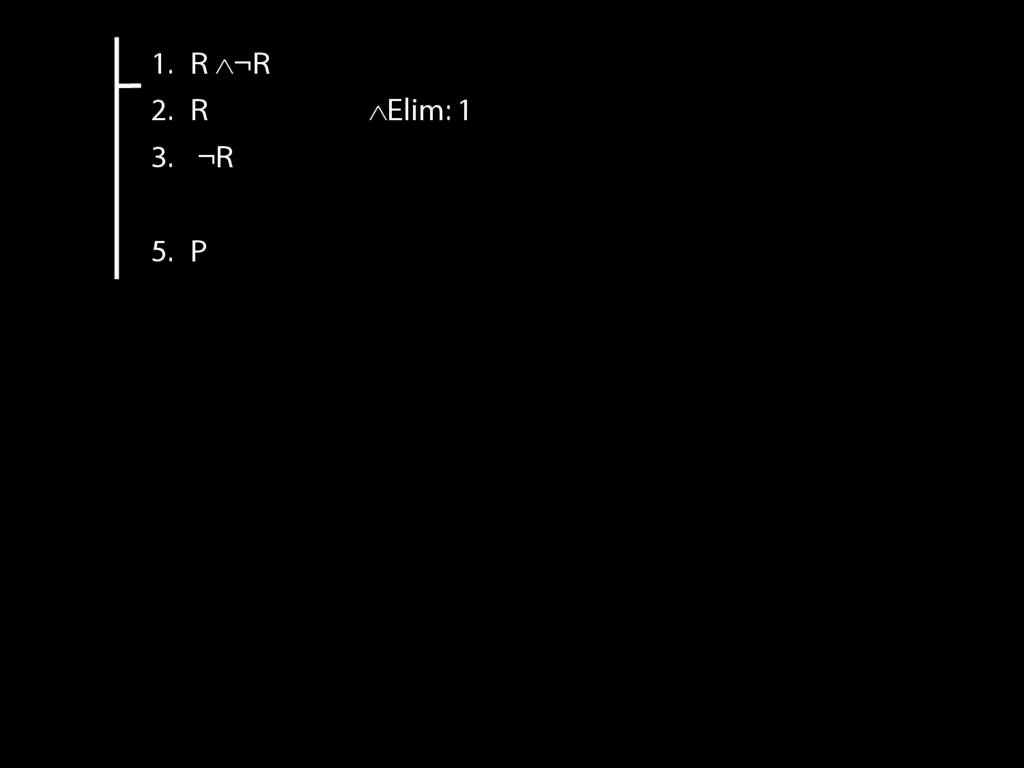
We can also extact not R from the premise ....
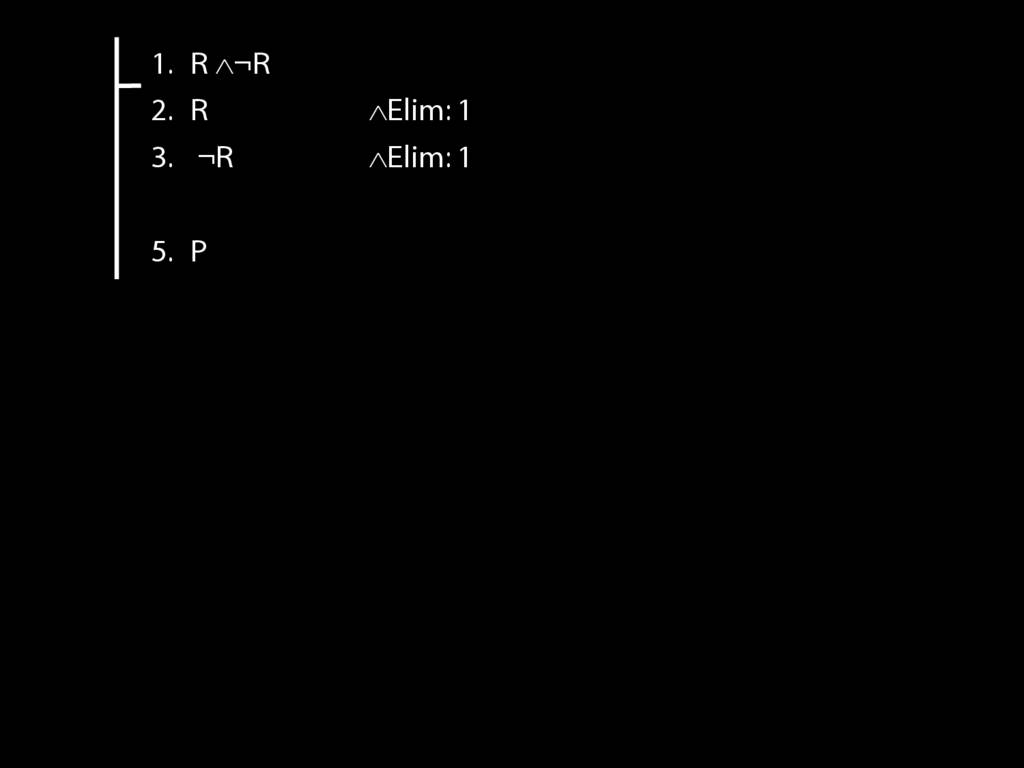
... using the same rule, conjunction elim.
But now what happens?
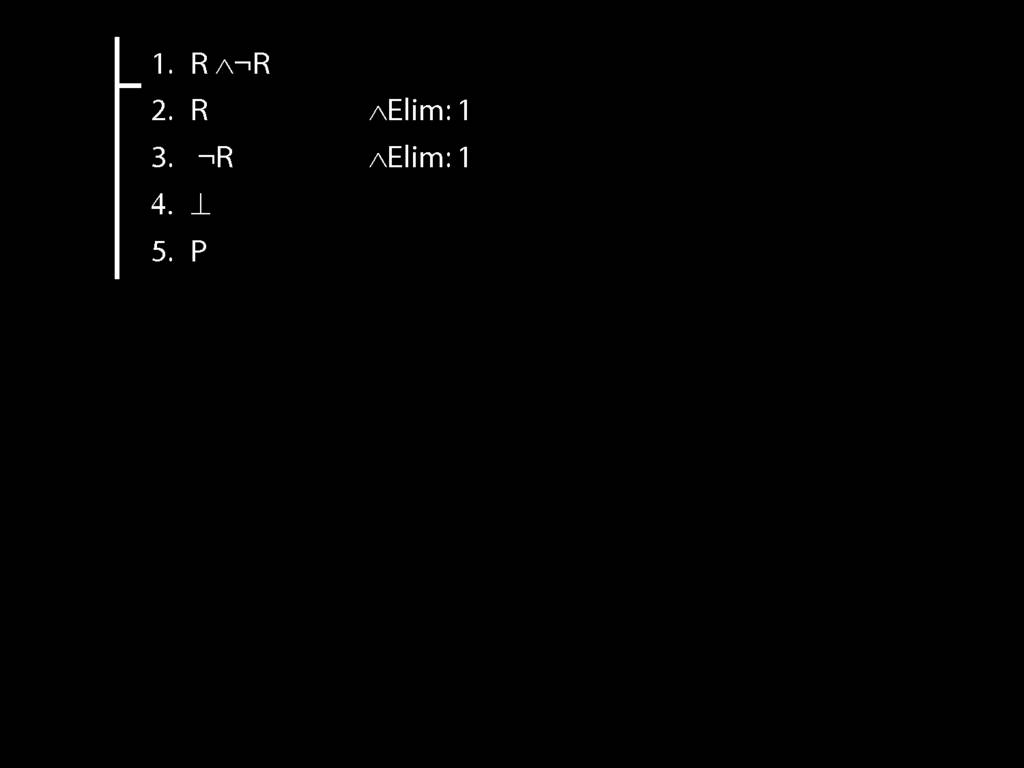
We can introduce a contradiction. Why? What allow us to do this?
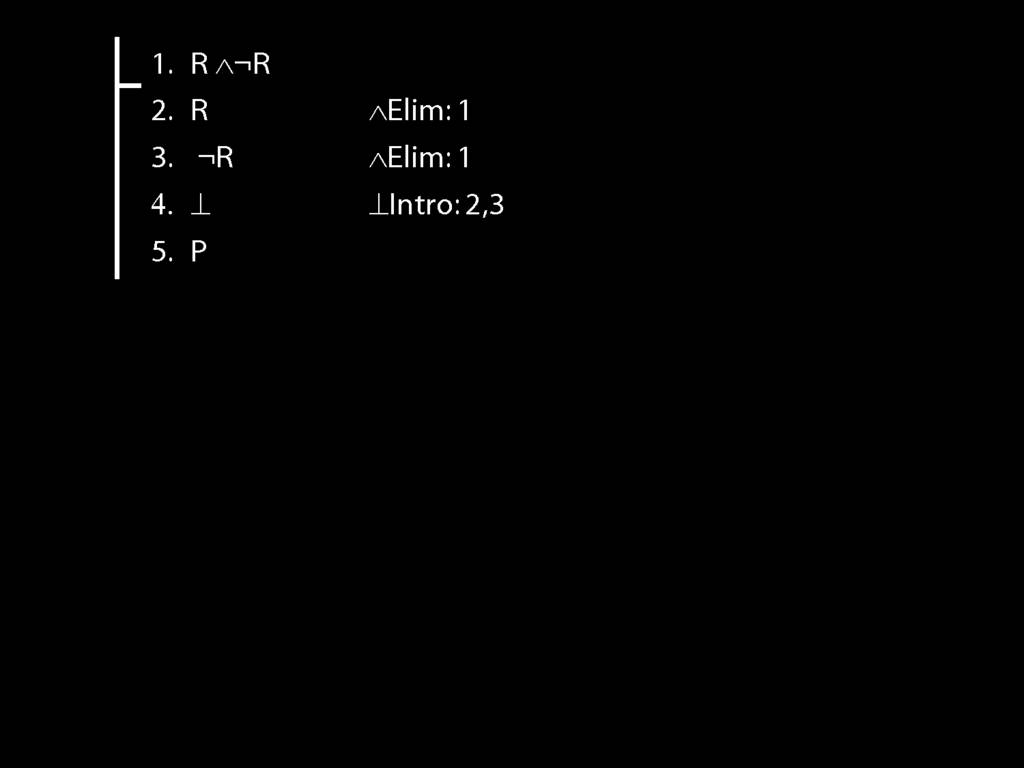
Look at the justification given. This tells us that the rule is contradiction intro ...
... and it tells us that the lines are 2 ...
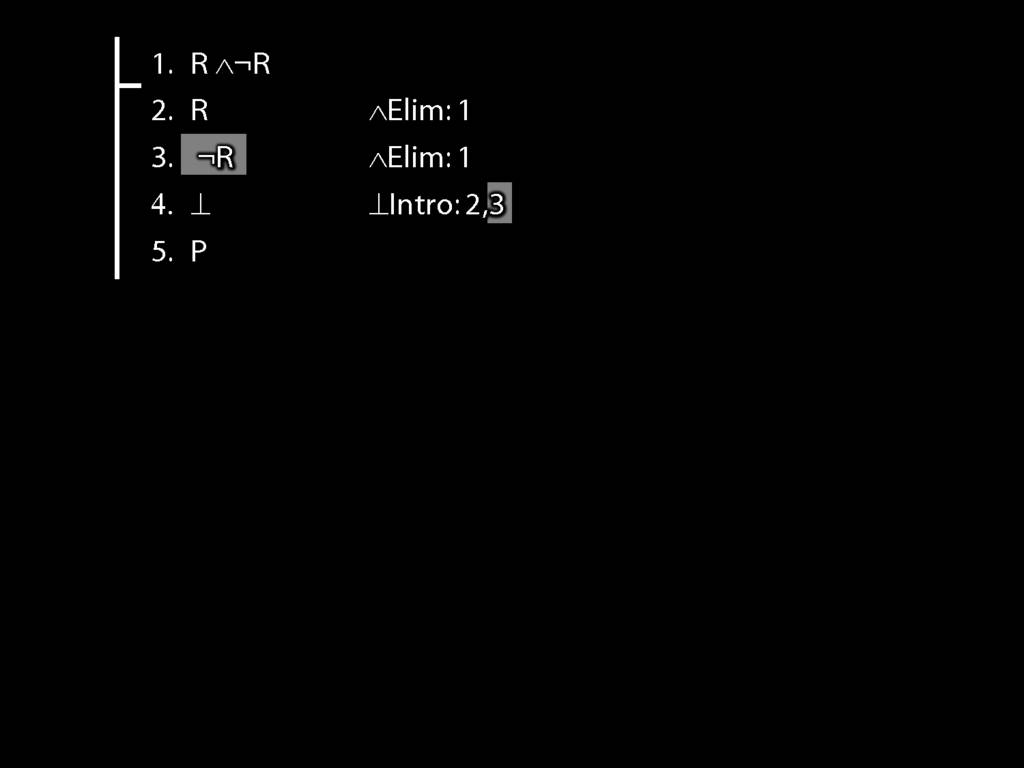
... and 3.
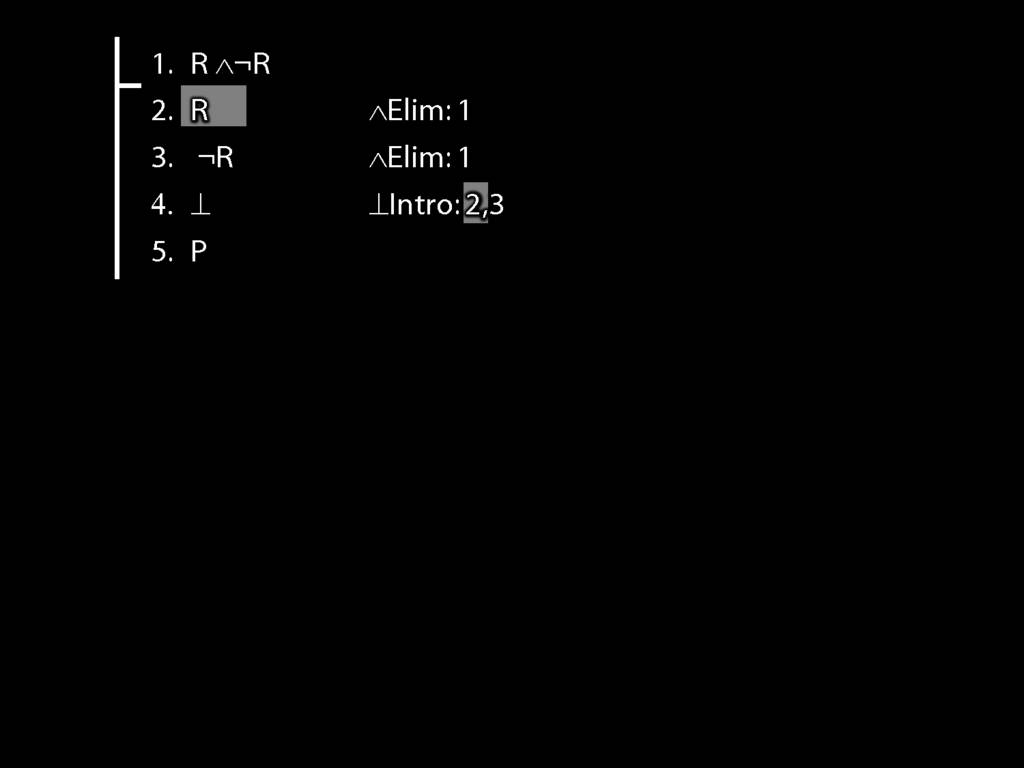
Now how do we get to the conclusion?

Conjunction elimination is made for this purpose.
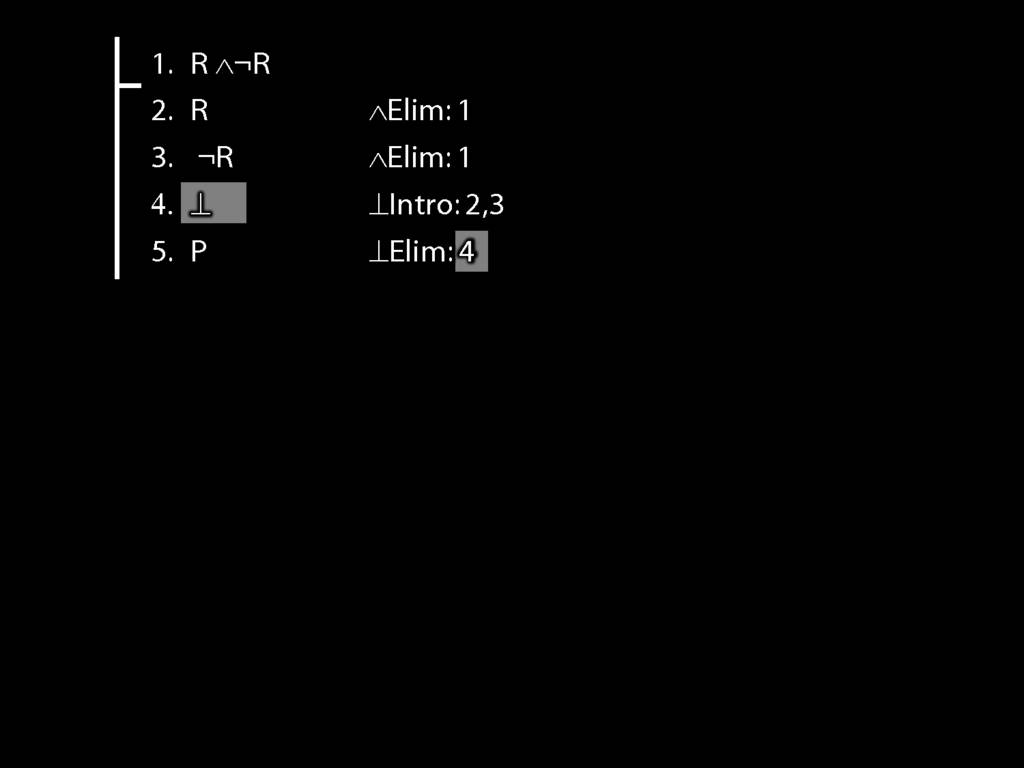
To eliminate the conjuction, we need to cite the line in which it occurs.
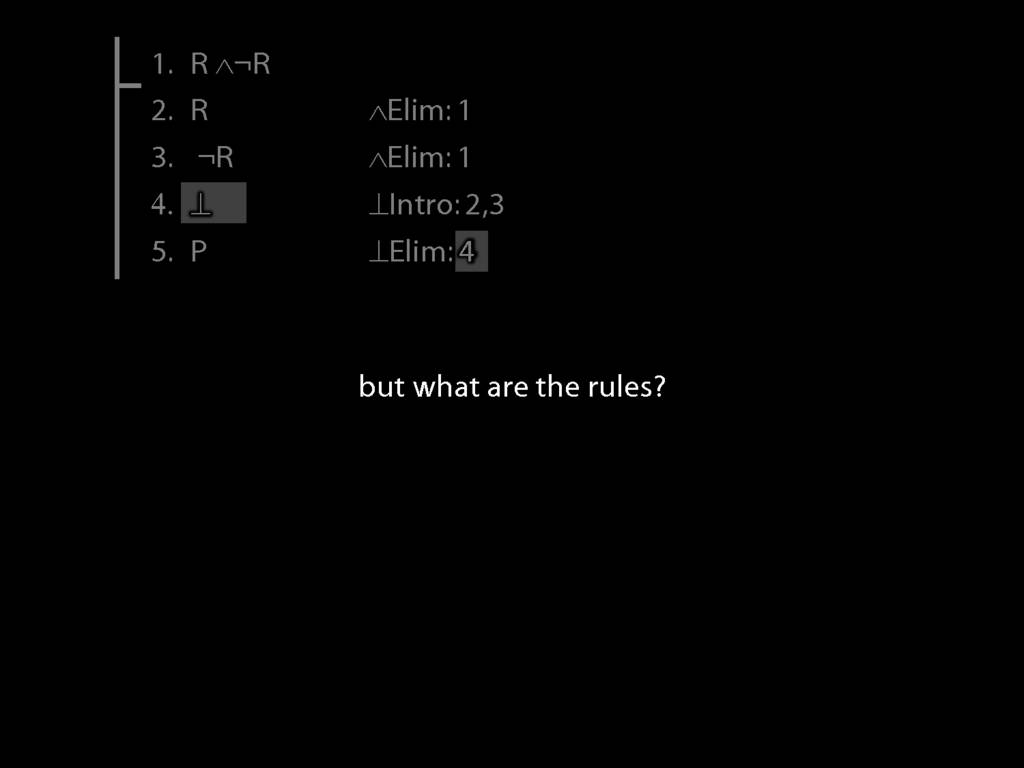
That's good, we've seen the rules contradiction intro and contradiction elim in action. But so far I've not told you what the rules are.

Here's where we used contradiction intro.
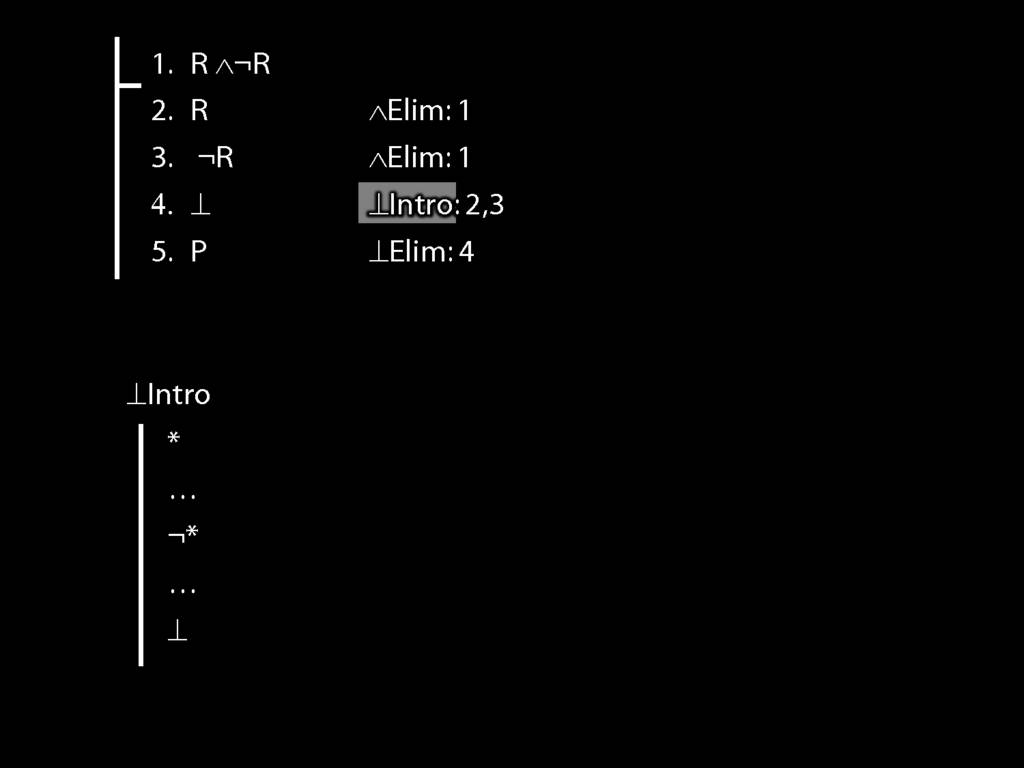
The rule says this ...
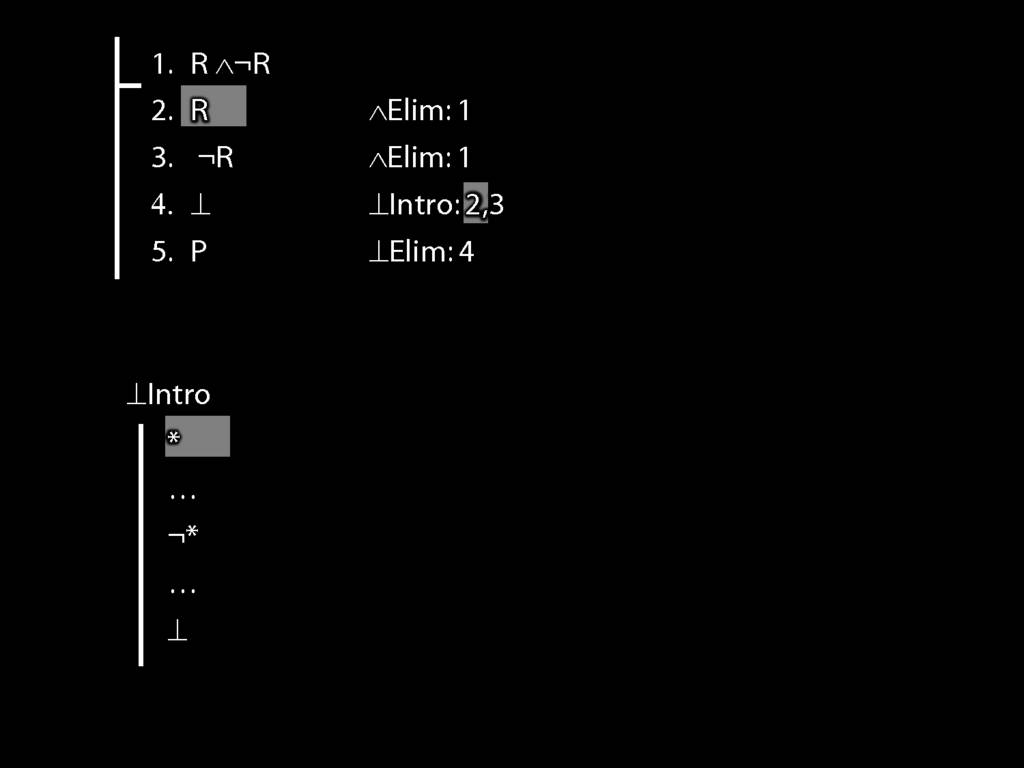
... that if you have a sentence ...
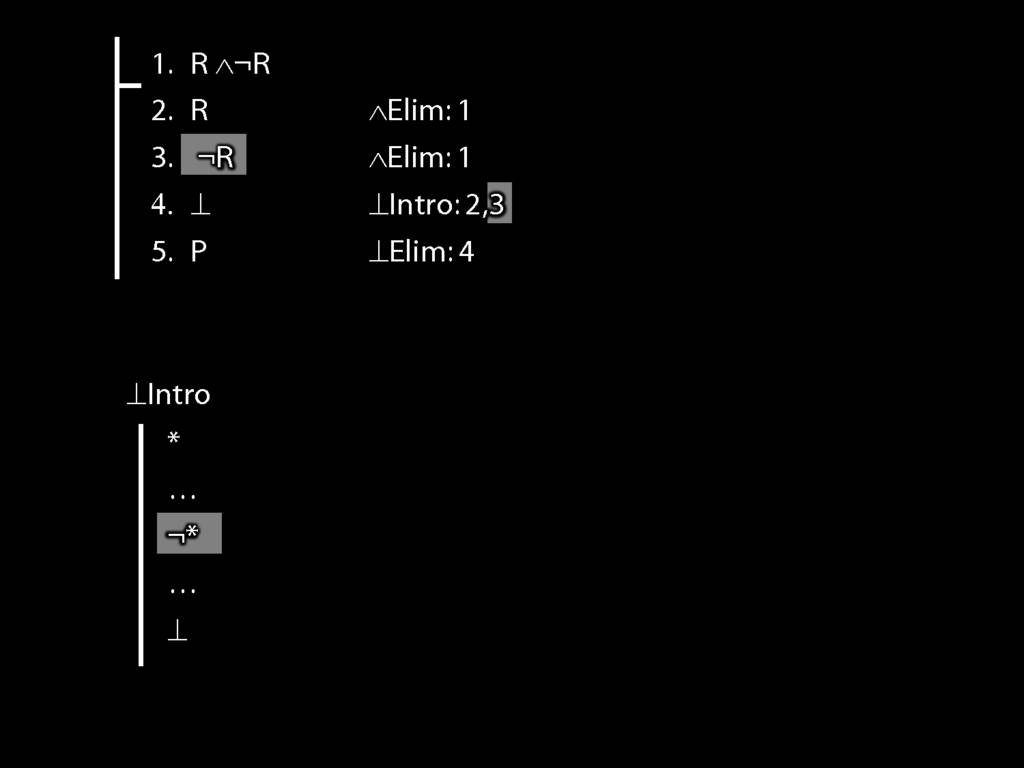
... and also the negation of that same sentence, then ...
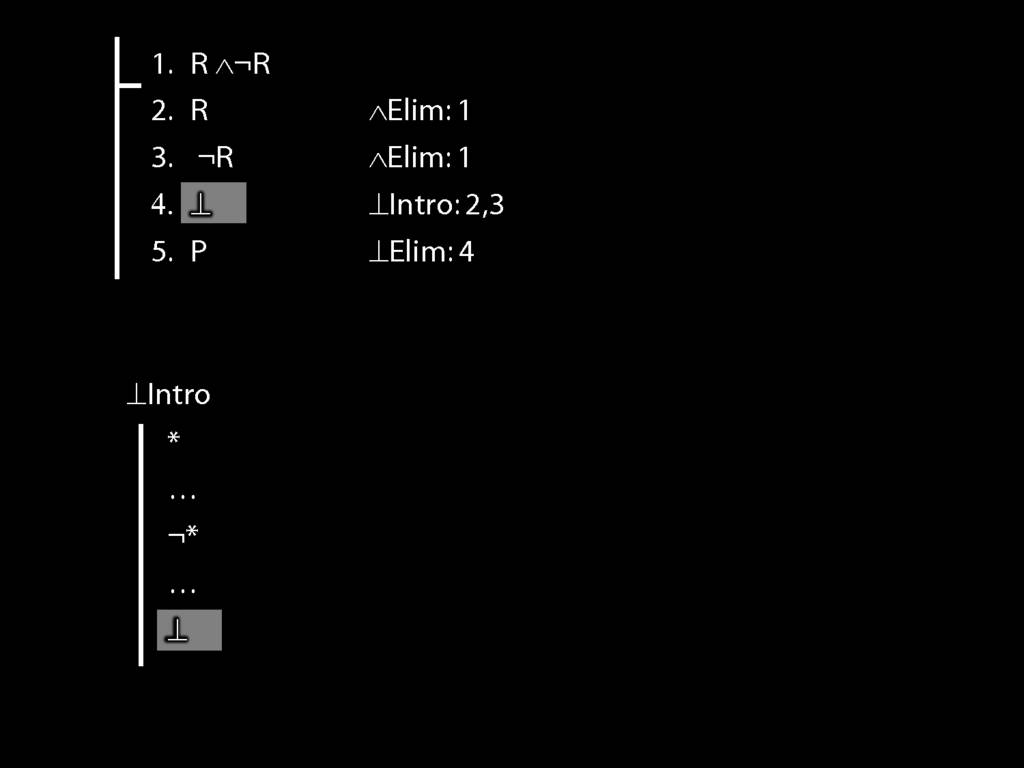
... you can add the contradiction sign in a new line of your proof.
(This works for any sentence, not just sentence letters.)
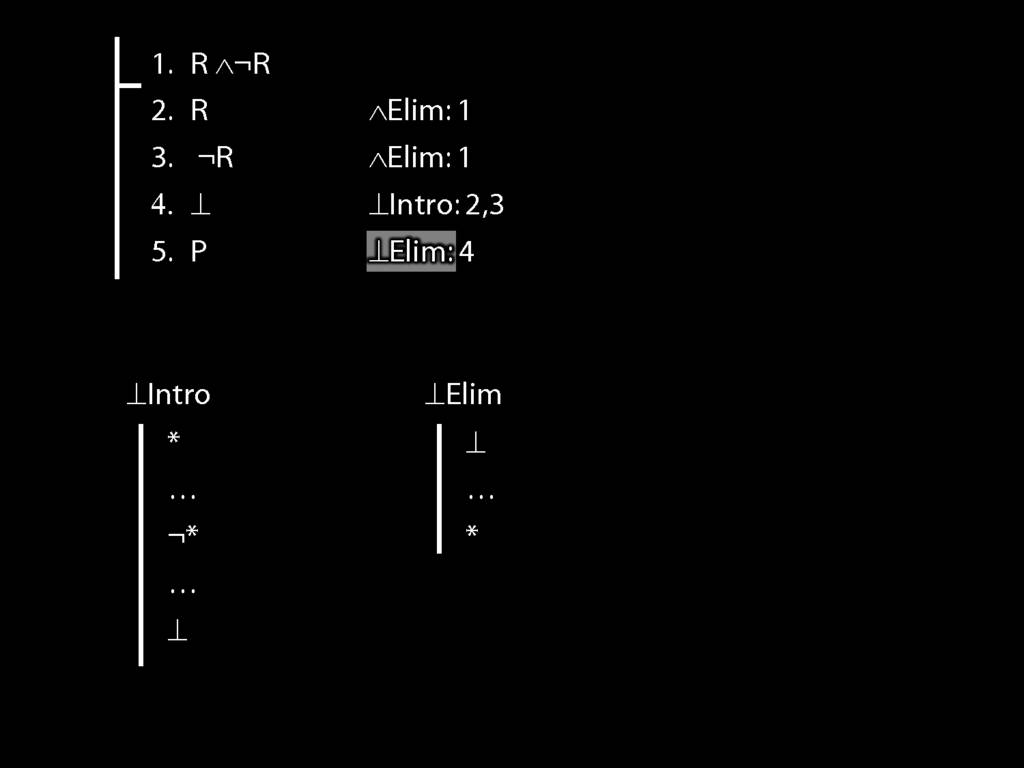
What about the elim rule, contradiction elim?
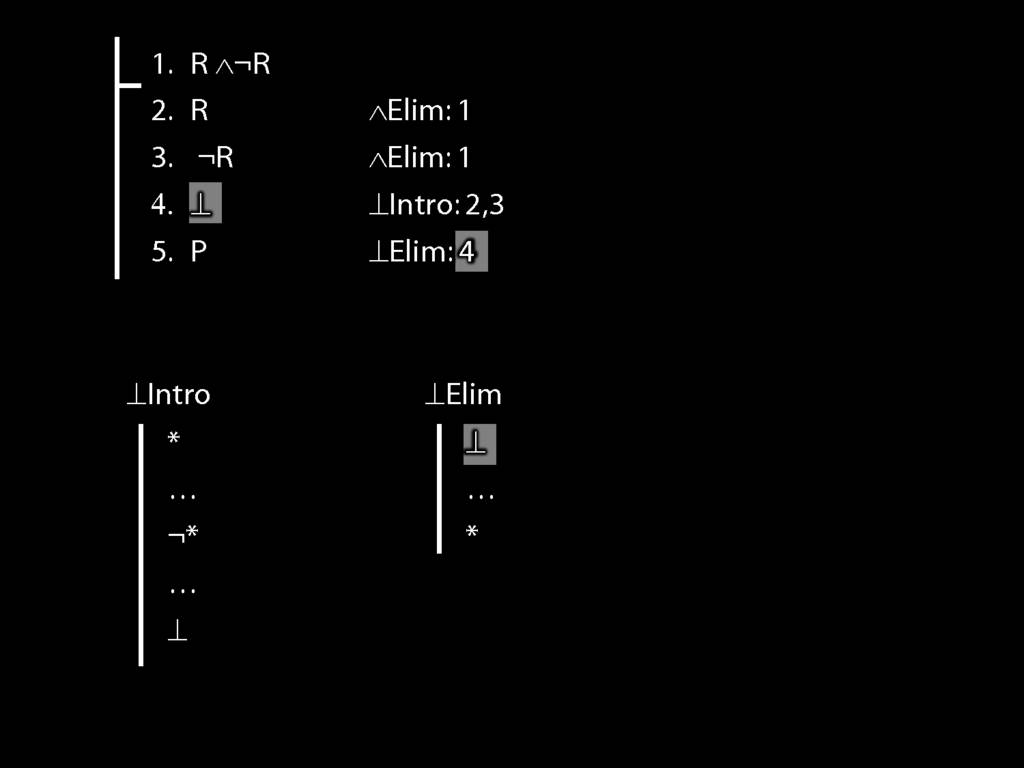
Here's how to use it: you need to have a contradiction in your proof somewhere, ...
... and you cite the contradiction ...
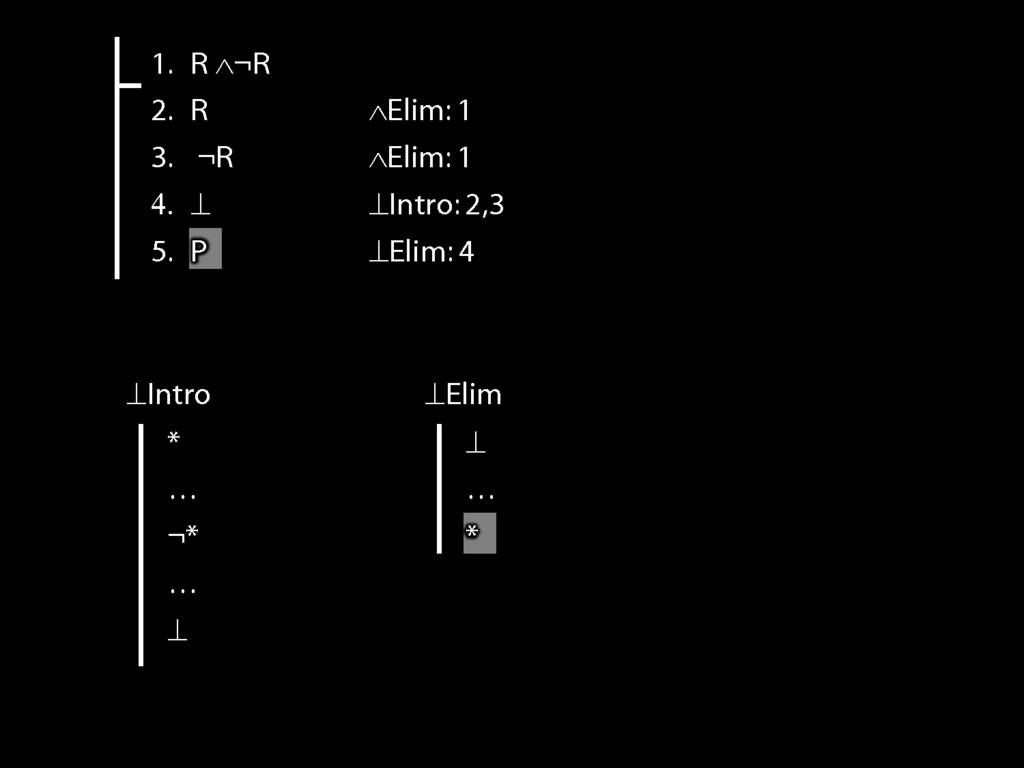
... and you can add whatever you want to your proof.
Contradiction elim is a wonderful rule but it comes with a word of caution.
It's quite rare that you will use contradiction elim.
Most of the time, when you have a contradiction in your proof, the rule you actually want is negation introdction.
So be careful when you feel the urge to eliminate a contardiction: always ask yourself whether you shouldn't be introducing negation yet.
(We'll see how to introduce negation later.)
I haven't explain anything about why the rules should work as they do.
My suggestion is that you first learn the rules without thinking about their meaning,
and later we'll discuss how the rules relate to logical validity.
(This is a bit different from the textbook which wants you to think about why the rules are good before you use them.)